Crispy, Gooey, and Oh-So-Dreamy: The Ultimate Homemade Fried Peanut Butter and Jelly Sandwich
Picture this: it’s a rainy day, the kind of day that begs for comfort food. You know the type—when the world seems a little gray, and you just want to retreat into the warmth of your kitchen, surrounded by familiar scents. The smell of sizzling butter brings back memories of my grandmother in her cozy little kitchen, whipping up something special to chase the clouds away. And what was her secret weapon, you ask? A Homemade Fried Peanut Butter and Jelly Sandwich.
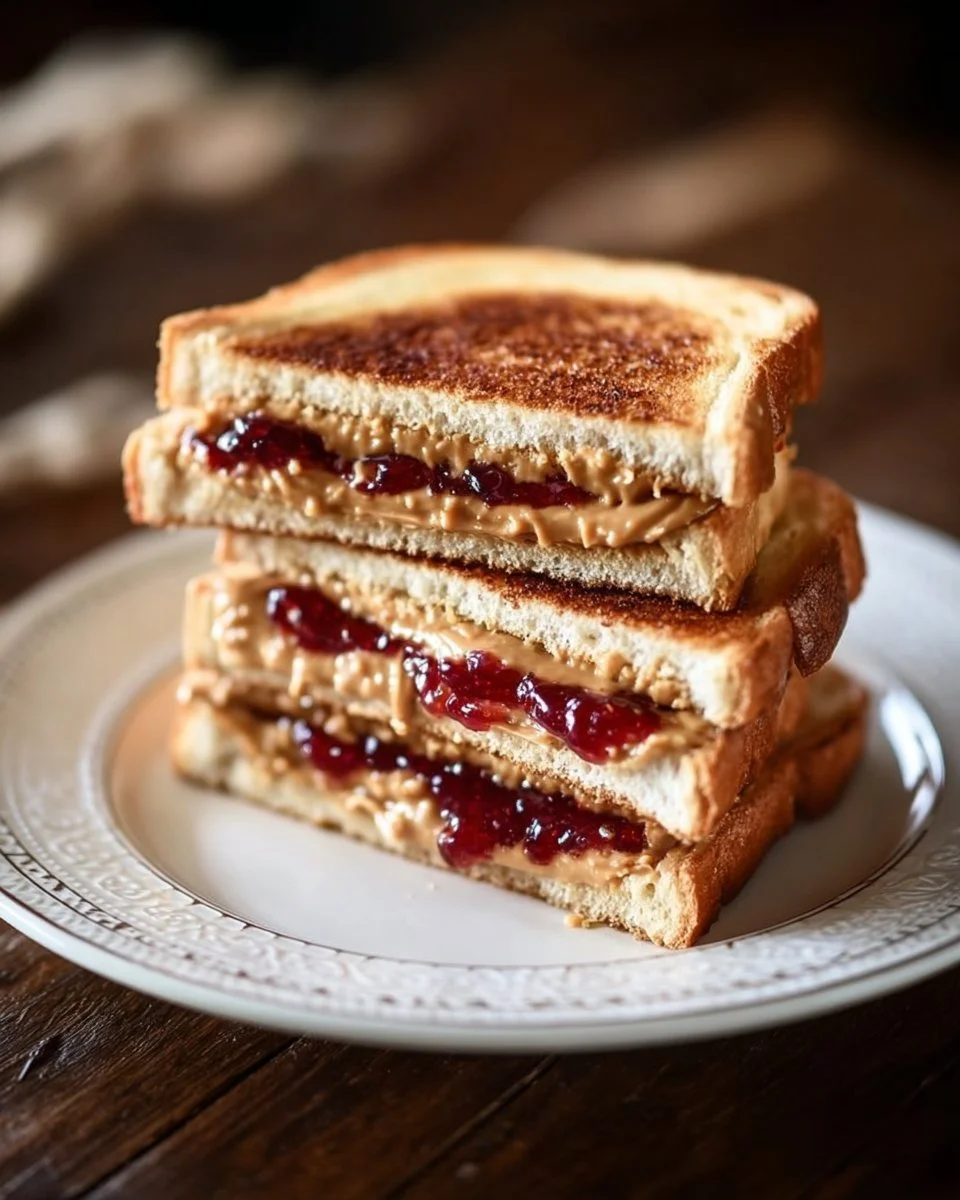
These aren’t just any ol’ sandwiches. We’re talking about a crispy, golden exterior giving way to a gooey, sweet, and nutty filling that warms your heart as much as your taste buds. What makes this recipe so special is the perfect combination of textures—the crunch of the bread and the smoothness of the peanut butter and jelly working in harmony. Plus, a drizzle of maple syrup makes you question if this is breakfast, lunch, or dessert!
This recipe will introduce you to a world where classic comfort meets gourmet delight. So dust off that skillet, and let’s learn how to create your own warm, memory-filled bites of happiness that will have everyone begging for seconds!
What Are Homemade Fried Peanut Butter and Jelly Sandwiches?
The origin of the humble peanut butter and jelly sandwich is nothing short of an American icon. It has been a lunchtime staple for generations. But “homemade fried” takes it up a notch, transforming these nostalgic bars of goodness into a culinary delight.
Visually, you’ll notice that these sandwiches are beautifully golden brown and lightly crisped on the outside, while the inside bursts with nutty peanut butter and fruity jelly upon each bite. You get the best of both worlds: crispy on the outside and creamy inside.
These sandwiches are perfect for any occasion—whether you’re a child looking for an after-school snack, an adult needing a quick comfort meal, or a host wanting to impress at brunch. You might not believe it, but once you try these homemade fried peanut butter and jelly sandwiches, you may never return to their unfried counterparts again!
Why You’ll Love This Recipe
Elevated Comfort Food: There’s something undeniably comforting about biting into that familiar flavor of a peanut butter and jelly sandwich, but frying it gives it a crunchy texture that’s hard to resist.
Customization Galore: Not a fan of jelly? Swap it out for banana slices, Nutella, or even marshmallow fluff! This recipe is a canvas—let your creativity shine and personalize each sandwich to match your taste preference!
Cost-Effective: Making these sandwiches at home is not only delicious but also budget-friendly; while a fried PB&J might cost $5 or more at a restaurant, you can whip these up for a fraction of the cost without sacrificing quality.
Time-Saving: In about 10 minutes, you can create a delectable homemade treat that beats the convenience of store-bought snacks, which often miss the mark on flavor and texture.
Easy to Master: This recipe is perfect for cooks of any skill level. Even if you’re a novice in the kitchen, I promise you can pull this off with flying colors.
Ingredients
To create the magic of your own Homemade Fried Peanut Butter and Jelly Sandwich, here’s what you’ll need:
- 2 slices of bread: Choose a hearty bread like sourdough or whole grain for ideal structure. For a sweeter note, try brioche.
- 2 tablespoons peanut butter: Creamy or crunchy—it’s your call! Look for natural brands with minimal additives for the best flavor.
- 2 tablespoons jelly: Grape is a classic, but raspberry or strawberry adds a delightful twist.
- 1 tablespoon maple syrup: Not just any syrup will do! Opt for real maple syrup for that authentic flavor.
- Butter for frying: Use unsalted butter for a rich, creamy taste. Make sure it’s at room temperature to easily melt in the pan.
- Powdered sugar (optional): A little dusting adds elegance and sweetness—perfect for presentation.
Pro Tip: Gather all your ingredients first, ensuring your butter is soft enough to spread easily and that your skillet is prepped for a fabulous fry!
Step-by-Step Instructions
Spread the Peanut Butter and Jelly: On one slice of bread, spread 2 tablespoons of peanut butter; on the other, spread 2 tablespoons of jelly. Make sure to reach the edges so every bite is filled with goodness.
Press It Together: Carefully press the two slices together to form a sandwich. A light press will help them stick without making a mess.
Heat the Butter: In a skillet, add 1 tablespoon of butter and heat over medium heat. You’ll know it’s ready when the butter is melted and begins to bubble—don’t let it brown!
Cook One Side: Place the sandwich in the skillet, cooking one side until golden brown—about 3-4 minutes. Keep an eye on it; it should develop a nice, crispy crust.
Flip and Add Sweetness: Gently flip the sandwich and drizzle 1 tablespoon of maple syrup on the top side as it cooks. Cook the other side for another 3-4 minutes or until it’s perfectly crisp.
Check for Crispiness: Once both sides are golden brown, remove it from the skillet using a spatula. Give it a minute to rest on a plate.
Optional Dusting: If you’re feeling fancy, sprinkle powdered sugar atop your sandwich for a delightful finish before serving.
Slice and Enjoy: Cut it into halves or quarters and savor every crispy bite!
(Chef’s Tip: Don’t rush the cooking process. Letting the sandwich fry for the recommended time ensures that you’re rewarded with the perfect crunchy exterior.)

Expert Tips & Tricks
Bread Choice Matters: While white bread is traditional, using thicker slices of grain or brioche will yield a sturdier sandwich and enhance the flavor.
Maple Syrup Variations: If you want to spice things up, consider adding a sprinkle of cinnamon or a dash of vanilla extract into the syrup for an extra flavor kick!
Storage: If you have leftovers (which is highly unlikely!), you can keep them in an airtight container in the fridge for up to 2 days. Just reheat them in a skillet to regain that glorious crunch.
Make Ahead: You can assemble the sandwiches a few hours in advance, just be sure to store them in the fridge. When it’s time to fry, they’ll only take minutes!
Troubleshooting: If your sandwich starts to ooze filling out the sides while cooking, try adjusting the heat lower to avoid burning the bread while the insides cook.
Serving Suggestions
These fried delights are delicious on their own, but they pair beautifully with a variety of sides! Consider a warm bowl of tomato soup for dipping, or fresh fruit to lighten things up.
For presentation, serve on a rustic wooden board and garnish with additional fresh fruit or a sprig of mint. Perfect for brunch, an after-school treat, or even a late-night snack—this sandwich shines regardless of its setting!
Variations & Substitutions
Feeling adventurous? Here’s how to mix things up:
- Nut Alternatives: If you’re peanut butter intolerant, almond butter, sunflower seed butter, or cashew butter work wonderfully.
- Fruit Swaps: Seasonal fruits like sliced strawberries, banana, or fig jam can offer a delightful twist that brings different flavors to life.
- Make it Dessert: Add chocolate chips to your peanut butter layer for a sweet dessert option that children and adults alike will adore.
Nutrition & Storage Info
- Prep Time: 5 minutes
- Cook Time: 8 minutes
- Total Time: 13 minutes
- Yield: 1 sandwich (easily doubled!)
- Estimated Calories: Approximately 450 calories per sandwich
Storage
- Room Temperature: Best enjoyed fresh.
- Refrigerator: Store in an airtight container for up to 2 days.
- Freezer: Freeze sandwiches (without syrup) for up to a month. Reheat straight from the freezer in a skillet.
FAQ Section
Can I use whole grain bread?
Absolutely! Whole grain or sourdough adds a nuttiness to the sandwich that elevates the taste.What can I substitute for jelly?
Try honey, or fresh fruit like bananas, for a delicious twist!Can I air fry these sandwiches?
Yes! Air frying can yield a wonderful, crunchy texture without the extra oil.How do I keep the filling from leaking out?
Ensure you spread the peanut butter and jelly evenly all the way to the edges, and avoid overfilling.Can I make these gluten-free?
Sure! Use gluten-free bread for a safe and delicious alternative.What’s the best way to reheat them?
The skillet method is the best; just heat over low for a few minutes until warmed through.Can I make these ahead of time?
Yes, you can assemble and store in the fridge, frying just before serving for the crispiness.What if I don’t have maple syrup?
Honey or agave syrup can work in a pinch for that sweetened cooked flavor.Why is my sandwich not cooking?
Ensure your pan is hot enough before placing the sandwich—medium heat is key!Can I use margarine instead of butter?
You can, but real butter gives a richer flavor and better crispness.

Conclusion
This Homemade Fried Peanut Butter and Jelly Sandwich has truly earned its spot as a timeless comfort food—the perfect balance of nostalgia and indulgence. Making it yourself not only makes it healthier but allows you the freedom to customize it to your love for flavors. I encourage you to try this simple yet unforgettable dish and make it a cherished part of your kitchen adventures.
I’d love to hear your thoughts! Drop a comment below with your feedback or questions, and don’t forget to check out other comforting recipes on the blog. Happy cooking!
Print
Homemade Fried Peanut Butter and Jelly Sandwich
- Total Time: 13 minutes
- Yield: 1 sandwich 1x
- Diet: Vegetarian
Description
Experience the perfect blend of crispy and gooey with this ultimate fried peanut butter and jelly sandwich, a comforting treat for all ages.
Ingredients
- 2 slices of bread (sourdough or brioche recommended)
- 2 tablespoons peanut butter
- 2 tablespoons jelly (grape, raspberry, or strawberry)
- 1 tablespoon maple syrup
- Butter for frying
- Powdered sugar (optional)
Instructions
- Spread 2 tablespoons of peanut butter on one slice of bread and 2 tablespoons of jelly on the other.
- Press the slices together to form a sandwich.
- In a skillet, heat 1 tablespoon of butter over medium heat until melted and bubbling.
- Place the sandwich in the skillet and cook until golden brown, about 3-4 minutes.
- Flip the sandwich, drizzle 1 tablespoon of maple syrup on top, and cook for another 3-4 minutes until crispy.
- Once golden, remove from skillet, let it rest for a minute.
- If desired, sprinkle with powdered sugar before serving, then slice and enjoy!
Notes
Customize with different nut butters or fruit fillings; leftover sandwiches can be stored in the fridge for up to 2 days.
- Prep Time: 5 minutes
- Cook Time: 8 minutes
- Category: Snack
- Method: Frying
- Cuisine: American
Nutrition
- Serving Size: 1 sandwich
- Calories: 450
- Sugar: 20g
- Sodium: 300mg
- Fat: 24g
- Saturated Fat: 10g
- Unsaturated Fat: 10g
- Trans Fat: 0g
- Carbohydrates: 40g
- Fiber: 3g
- Protein: 12g
- Cholesterol: 30mg
🥗 Free Custom Keto Meal Plan?
Do you want to lose weight while still enjoying delicious Asian & Thai Fusion meals? Take this quick quiz to get your personalized Keto plan based on your favorite foods!
- ✅ No more guessing what to eat
- ✅ Delicious & easy-to-make recipes
- ✅ Tailored to your body type
Get My Custom Plan Now! →
*Over 100,000+ people have transformed their lives with this quiz.