
Refreshingly Delicious Paleo Vanilla Ice Cream (Dairy Free)
When summer rolls around, my mind immediately drifts to my childhood, memories of warm afternoons spent in the backyard, each spoonful of cold, creamy vanilla ice cream revitalizing my spirit. Today, I want to share with you a grown-up twist on that nostalgic classic: Paleo Vanilla Ice Cream (Dairy Free). This isn’t just any homemade ice cream; it’s a chance to recreate comfort food that is both indulgent and aligned with a healthy lifestyle.
What makes this Paleo Vanilla Ice Cream special? Unlike the store-bought options laden with refined sugars and preservatives, this recipe combines wholesome ingredients that won’t leave you feeling guilty or sluggish afterward. Made with rich coconut cream, smooth egg yolks, and a hint of maple syrup, you’ll find yourself savoring every bite. Plus, it’s super easy to whip up, meaning more time enjoying and less time stressing in the kitchen!
Join me as I guide you through the simple yet delightful process of making this dairy-free treat. Trust me, your taste buds are in for a treat! By the end of this post, you’ll not only have the perfect recipe but also tips to tailor it to your preferences. Let’s dive into the creamy goodness that is Paleo Vanilla Ice Cream!
What are Paleo Vanilla Ice Cream (Dairy Free)?
Paleo Vanilla Ice Cream (Dairy Free) has a rich history rooted in the principles of the Paleo diet, which promotes whole, unprocessed ingredients. This delightful treat is a prime example of how you can enjoy something sweet while still honoring your dietary choices. The taste is a perfect balance of sweetness with a luscious, creamy texture that melts in your mouth.
What makes this ice cream unique is its base—coconut cream. It gives each scoop a velvety richness, while the egg yolks add a custardy depth that standard vanilla ice cream simply can’t compete with. Whether you’re looking for a refreshing dessert after a dinner party or a treat to cool down on a hot day, this recipe is your go-to. Plus, it’s simple enough to make for celebrations or a family gathering when the craving strikes!
Why You’ll Love This Recipe
Healthier Ingredients: One of the biggest reasons to love this recipe is that it uses natural sweeteners and no artificial flavors. When compared to typical store-bought ice creams that often come packed with unhealthy additives, making your own offers far healthier alternatives without sacrificing flavor.
Customizable: Feel free to get creative! You can easily mix in nuts, chocolate chips, or your favorite fresh fruits to take this ice cream to the next level. I’ve experimented with blueberries and even swirled in some almond butter, and they both tasted delightful!
Cost-Effective: Trust me, making your own ice cream is incredibly budget-friendly! Store-bought versions, especially the organic and health-oriented kinds, can cost quite a bit—this recipe saves you money while offering far superior taste.
Easy to Make: You don’t need to be a professional chef to nail this recipe. With just a handful of ingredients and an ice cream maker, you’re only about 30 minutes from experiencing pure ice cream ecstasy!
Perfect for Everyone: It’s dairy-free, gluten-free, and naturally sweetened, making it an excellent option for those with dietary restrictions or anyone wanting to enjoy a guilt-free dessert!
Ingredients
- 1 can coconut cream (13.5 oz): Rich and creamy, the base for our ice cream. Look for organic, full-fat coconut cream without any additives.
- 3 large egg yolks: These help create that wonderfully creamy texture. Make sure they’re fresh!
- 1/3 cup maple syrup: A natural sweetener that adds a touch of unique flavor. You can also use honey or agave if preferred.
- 1/2 Tbsp vanilla extract: Go for pure vanilla extract to really enhance that vanilla flavor; it makes all the difference!
- 1/4 cup collagen peptides: This adds protein and helps with the texture, making the ice cream richer and creamier.
- 1/4 tsp salt: A pinch of salt elevates the sweetness and balances the flavors.
Prep Notes: Ensure your coconut cream is at room temperature before blending. If your kitchen runs cool, warm it slightly over hot water to achieve a pourable consistency.
Step-by-Step Instructions
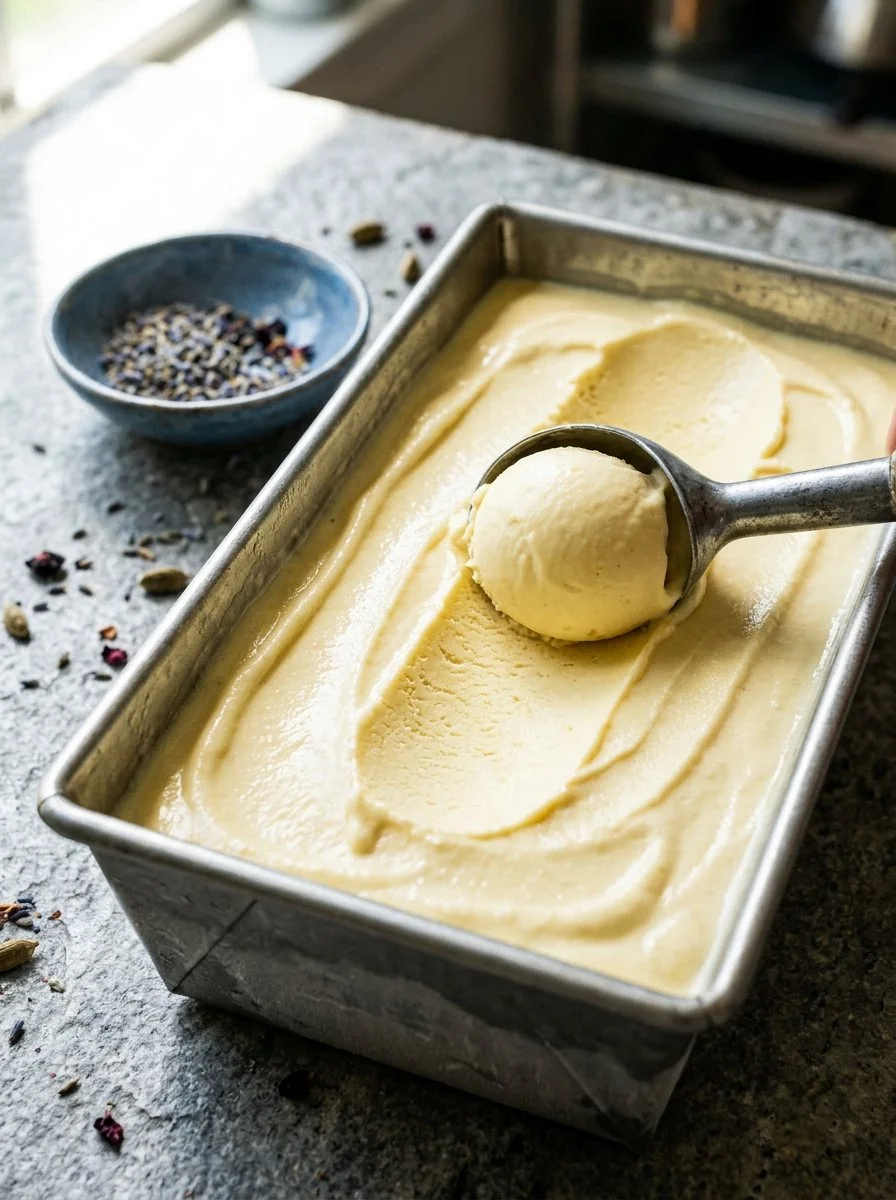
Combine Ingredients: Start by placing all the ice cream ingredients (coconut cream, egg yolks, maple syrup, vanilla extract, collagen peptides, and salt) in a high-speed blender. Blend on low for about 15 seconds, then switch to medium-high speed for another 30-45 seconds until the mixture is well combined and super smooth. You want to see all that creamy goodness meld together!
Churn the Ice Cream: Pour the blended mixture into your pre-chilled ice cream maker. Churn according to the manufacturer’s instructions, usually around 20-25 minutes, until it reaches your desired thickness—think soft serve versus classic scoopable texture.
Immediate Enjoyment or Freezing: You can enjoy the ice cream right away, which will have more of a soft-serve texture. For a firmer texture, transfer it to a loaf pan and place it in the freezer for at least 2-3 hours.
Chef’s Tip: If you forget to set your ice cream maker beforehand, no worries! Just place the bowl in the freezer for a few hours before pouring in the mixture.
Texture Note: When you first eat it, it will be creamier and softer. After a day in the freezer, it will harden to more of a traditional ice cream texture, perfect for scooping!
Expert Tips & Troubleshooting
Ingredient Quality Matters: Always opt for high-quality ingredients. Not all coconut creams are created equal!
Storage: Store leftovers in an airtight container in the freezer. It will last about 1-2 weeks; after that, it may develop ice crystals.
Make Ahead: This ice cream can be made ahead of time. Just pull it out of the freezer about 10 minutes before serving to allow it to soften slightly for easy scooping.
Common Problems: If your ice cream is too icy, it’s likely due to air getting into the mixture while churning. Remember to churn at the right temperature and consistency.
Customization: Feel free to adjust the level of sweetness! Some like it sweeter; others prefer a less sweet version—just taste the mixture before churning!
Avoid Over-Churning: Watch your mixture closely. Over-churning can lead to a grainy texture, so keep an eye on it!
Serving Suggestions
There’s something about a scoop of rich ice cream that calls for delightful pairings. Consider serving your Paleo Vanilla Ice Cream atop a slice of gluten-free chocolate cake or alongside fresh berries for a vibrant contrast of flavors. A sprinkle of crushed nuts on top can add a delightful crunch!
This ice cream is perfect for summer picnics, birthday parties, or just a cozy family night in. Light a few candles, play some music, and create a sweet little moment that you’ll cherish.
Variations & Substitutions
Flavor Combinations: If you’re feeling adventurous, try adding a few tablespoons of cocoa powder for a chocolate version, or swirl in peanut butter for a nutty kick. Swap out the vanilla extract for almond extract for a different yet delightful flavor.
Dietary Restrictions: For those who cannot consume eggs, you can try a simple banana or avocado base for creaminess and adapt the sweetener accordingly.
Seasonal Variations: In the fall, blend in some pumpkin puree and spices for a delicious pumpkin ice cream. In winter, how about a mint version with peppermint extract?
Nutrition & Storage Info
- Prep Time: 10 minutes
- Cook Time: 20-25 minutes (churning)
- Total Time: 2-3 hours (including freezing)
- Yield: About 6 servings
- Estimated Calories: Approximately 220 calories per serving (varies based on add-ins)
- Storage Instructions: Store in an airtight container in the freezer for up to 2 weeks. For best texture, let it sit at room temperature for a few minutes before scooping.
FAQ SECTION
Can I make this ice cream without an ice cream maker?
Absolutely! Pour the mixture into a shallow dish and place it in the freezer. Stir every 30 minutes until it reaches your desired consistency.Will this ice cream taste like coconut?
The coconut flavor is subtle, especially with the addition of vanilla. If you’re not a fan, use a refined coconut oil for even less coconut taste.Can I use sweeteners other than maple syrup?
Yes! Honey, agave syrup, or stevia can work well, but adjust to taste, as they will impart different flavors.Is this ice cream vegan?
No, because of the egg yolks. For a vegan version, you can experiment with creating a banana or avocado base instead.What can I add to make it more nutritious?
Incorporating nut butters, protein powders, or chia seeds can increase its nutritional value.Can I use almond milk instead of coconut cream?
Not recommended as it wouldn’t create the same creamy texture. Stick with full-fat coconut cream for the best results.What if I don’t have collagen peptides?
You can leave them out or substitute with a scoop of protein powder that matches your dietary needs.How creamy will this ice cream be?
Very creamy! The combination of coconut cream and egg yolks provides an incredibly smooth texture.Can I store it longer?
While it’s best enjoyed within 1-2 weeks, it can be stored for up to a month. Just be aware it may develop ice crystals.Do I need to temper the egg yolks?
No need for tempering in this recipe since you blend everything together in the ice cream maker!

Conclusion
This Paleo Vanilla Ice Cream (Dairy Free) has the unique ability to bring a little nostalgia into your life while being suitable for health-conscious eaters. The delightful richness is truly unmatched, making it a dessert you’ll come back to time and again. So, grab those ingredients, roll up your sleeves, and bring the joy of homemade ice cream into your home!
I invite you to try this recipe and let me know how much you love it! Drop your thoughts in the comments, and feel free to share any creative twists you’ve tried. Plus, don’t forget to explore other delicious recipes on the blog for more fun kitchen adventures!
Print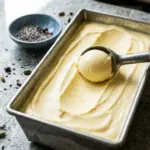
Paleo Vanilla Ice Cream (Dairy Free)
- Total Time: 150 minutes
- Yield: 6 servings 1x
- Diet: Dairy Free
Description
A healthier, dairy-free twist on classic vanilla ice cream made with coconut cream and natural sweeteners.
Ingredients
- 1 can coconut cream (13.5 oz)
- 3 large egg yolks
- 1/3 cup maple syrup
- 1/2 Tbsp vanilla extract
- 1/4 cup collagen peptides
- 1/4 tsp salt
Instructions
- Combine all the ice cream ingredients in a high-speed blender and blend on low for about 15 seconds, then increase to medium-high speed for another 30-45 seconds until smooth.
- Churn the mixture in a pre-chilled ice cream maker according to the manufacturer’s instructions, usually around 20-25 minutes.
- Enjoy immediately for a soft-serve texture, or transfer to a loaf pan and freeze for at least 2-3 hours for a firmer texture.
Notes
Store leftovers in an airtight container in the freezer for up to 2 weeks.
- Prep Time: 10 minutes
- Cook Time: 25 minutes
- Category: Dessert
- Method: Churning
- Cuisine: Paleo
Nutrition
- Serving Size: 1 serving
- Calories: 220
- Sugar: 10g
- Sodium: 20mg
- Fat: 15g
- Saturated Fat: 13g
- Unsaturated Fat: 2g
- Trans Fat: 0g
- Carbohydrates: 10g
- Fiber: 0g
- Protein: 3g
- Cholesterol: 90mg
🥗 Free Custom Keto Meal Plan?
Do you want to lose weight while still enjoying delicious Asian & Thai Fusion meals? Take this quick quiz to get your personalized Keto plan based on your favorite foods!
- ✅ No more guessing what to eat
- ✅ Delicious & easy-to-make recipes
- ✅ Tailored to your body type
Get My Custom Plan Now! →
*Over 100,000+ people have transformed their lives with this quiz.

ilove it