Irresistible Burnt Honey Pie: Your New Favorite Dessert Recipe
Meta Description: Discover how to make an unforgettable Burnt Honey Pie that marries sweet caramel notes with the warmth of homemade goodness. This easy recipe is perfect for any occasion!
Imagine the cozy aroma of caramelized honey wafting through your kitchen, instantly transporting you back to your grandmother’s home on a crisp autumn day. That’s exactly what I felt the first time I attempted to make Burnt Honey Pie. My grandmother would whip up a similar recipe that was a family favorite, but she could never quite teach me the secret behind that silky texture and perfectly balanced sweetness. After several experiments, I delightedly recreated this enchanting pie that marries nutty, burnt notes with a velvety filling, suitable for any dessert lover—even those who don’t think they like pie!
What makes this Burnt Honey Pie special? It’s not just a dessert; it’s a nostalgic experience that connects generations. Unlike traditional pies, this one boasts an irresistible depth of flavor from the caramelized honey and uses ingredients that are usually staples in every kitchen. That’s what makes this recipe better than most—you get to create something extraordinary with what you already have at home!
In this post, I’ll guide you through every step of making this divine pie and share tips along the way to ensure your Burnt Honey Pie turns out absolutely perfect. Grab your apron; let’s get baking!
What Are Burnt Honey Pies?
The enticing Burnt Honey Pie has a delightful origin story rooted in the culinary traditions of various cultures, where honey symbolizes sweetness and prosperity. It first gained popularity as a rustic dessert, celebrating simple ingredients transformed into something extraordinary.
What sets Burnt Honey Pie apart is its unique flavor profile—a sumptuous filling made from caramelized honey, combined with creamy richness from heavy cream and eggs. The texture is silky smooth, with a slightly set filling and a crisp, flaky pie crust that adds a lovely contrast.
This pie is perfect for all occasions, whether you’re hosting a dinner party, celebrating a birthday, or simply treating yourself after a long week. It invites the warmth of home into your heart and has a way of making every bite feel like a hug.
Why You’ll Love This Recipe
Unique Flavor: The caramelized honey brings out a rich, nutty flavor that elevates this pie beyond the average dessert. If you’ve had regular honey desserts before, get ready for an explosion of taste you never knew you were missing!
Cost-Effective: With only a handful of ingredients—many of which might already be sitting in your pantry—this pie won’t break the bank. Compared to store-bought options, you’ll have a premium dessert for a fraction of the price.
Customizable: You can easily adapt this recipe to fit your taste. Want to add a dash of cinnamon or a splash of bourbon? Go for it! This pie is your canvas, and the possibilities are endless.
Easy to Make: If you’re a novice baker, don’t fret! This recipe is straightforward and requires minimal techniques. You’ll impress everyone with minimal effort!
Wholesome Comfort Food: For me, baking this pie is like creating a family heirloom. It brings people together and makes them feel warm inside. That’s what comfort food is all about!
With these reasons at hand, I can practically promise you’ll adore making (and devouring) this Burnt Honey Pie.
Ingredients
To whip up your very own Burnt Honey Pie, here’s what you’ll need:
- 1 pie crust (homemade or store-bought – I love using a buttery, flaky crust like the one from the Pillsbury brand if I’m in a rush)
- 1 cup honey (preferably raw for the best flavor)
- 4 large eggs (organic if possible)
- 1/2 cup heavy cream (make sure it’s fresh and chilled for the best texture)
- 1/4 cup granulated sugar (I personally favor Domino sugar for its fine texture)
- 1/4 teaspoon sea salt (for that essential flavor balance)
- 1 teaspoon vanilla extract (use pure vanilla for a richer taste)
- 1 tablespoon lemon juice (freshly squeezed is a must for brightness)
Prep Notes:
- Make sure your butter is at room temperature if you’re preparing a homemade pie crust.
- When caramelizing your honey, keep a close eye on it to avoid burning—it can create a bit of magic if you get it right!
Step-by-Step Instructions
Preheat Your Oven: Set your oven to 350°F (175°C). This ensures an even baking temperature.
Prepare the Pie Crust: Roll out your pie crust on a lightly floured surface. Fit it into a 9-inch pie dish and gently prick the bottom with a fork. Bake for about 15-18 minutes or until golden brown. Chef’s Tip: If using store-bought, check the package instructions!
Caramelize the Honey: In a saucepan over medium heat, add your honey. Stir occasionally, and watch it transform color as it begins to darken (it should take about 5-7 minutes). This step is crucial, so keep your eyes glued!
Mix the Filling: In a mixing bowl, whisk together the eggs, heavy cream, sugar, salt, vanilla extract, and lemon juice. Common Mistake to Avoid: Make sure your eggs are at room temperature to prevent the filling from curdling when mixed.
Combine with Honey: Slowly add the caramelized honey to the egg mixture, stirring gently until fully incorporated but ensuring the honey has cooled slightly to avoid cooking the eggs.
Fill the Crust: Pour the honey filling into the baked pie crust.
Bake the Pie: Bake for 25-30 minutes, or until the filling is set but still has a slight jiggle in the center. You’ll know it’s done when the edges look firm but the center has a little wiggle.
Cool Before Serving: Let the pie cool to room temperature, allowing the flavors to meld. Trust me, the wait will be worth it!
Expert Tips & Tricks
Choose Quality Ingredients: The better the quality of your honey, eggs, and vanilla, the better your pie will taste.
Make Ahead: You can caramelize the honey a day in advance and store it in an airtight container in the fridge to save time on baking day!
Serving Storage: This pie can be stored at room temperature for up to 2 days, or in the fridge for up to a week. If you’re storing it in a freezer, wrap it tightly in plastic wrap and foil—with proper storage, it should last about 3 months in an airtight container.
Troubleshooting: If your pie doesn’t fully set, simply return it to the oven for a few more minutes until it’s just right.
Presentation: Dust with powdered sugar or serve with a dollop of whipped cream for that extra flair!
Serving Suggestions
Your Burnt Honey Pie pairs beautifully with fresh fruit, like berries or poached pears, adding a pop of color and brightness. For a cozy touch, a scoop of vanilla ice cream or a side of whipped cream is always an excellent treat. Whether it’s a holiday gathering or a quiet dinner, this pie will steal the show.
Variations & Substitutions
- Different Honey: Try using flavored honey, such as lavender or orange blossom, to create a unique twist.
- Seasonal Fruits: Top with seasonal fruits like figs in the fall or strawberries in the summer for a fresh take.
- Dietary Restrictions: To make this recipe gluten-free, substitute the pie crust with a gluten-free option, and ensure the honey is verified.
- Nutty Flavors: Consider adding crushed nuts or nut extracts for added complexity.
Nutrition & Storage Info
- Prep Time: 20 minutes
- Cook Time: 30 minutes
- Total Time: 50 minutes
- Yield: 8 servings
- Estimated Calories: ~250 calories per slice
- Storage Instructions: Store at room temperature for up to two days, or refrigerate for up to a week. Freeze for long-term storage (about 3 months).
FAQ Section
Can I use a store-bought pie crust?
Absolutely! Using a store-bought crust is a great time-saver, especially when you’re in a pinch.What type of honey is best for this recipe?
A light, flavorful honey works beautifully, but feel free to experiment with varieties you enjoy!How do I know when it’s done baking?
Look for a slightly jiggly center that appears set around the edges. You want a little wobble!Can I add spices like cinnamon or nutmeg?
Yes! Adding spices can enhance the flavor and warmth.What if my filling curdles?
It might have been mixed too vigorously or cooked too quickly. To avoid this, combine ingredients gently.How can I ensure my pie doesn’t stick to the dish?
Make sure to spray or lightly butter your pie dish before fitting the crust.Can I make this recipe dairy-free?
You could try using coconut cream instead of heavy cream and a dairy-free pie crust.How should I store leftovers?
Keep leftovers in a sealed container in the fridge or at room temperature for short-term storage.Can I freeze the pie?
Yes, ensure it’s wrapped tightly to avoid freezer burn.Is it safe to eat if it’s slightly underbaked?
It’s best to ensure the pie is fully set for safety reasons, especially with eggs involved.
Conclusion
This Burnt Honey Pie is not just a treat; it’s an experience that will create lasting memories over shared moments around the table. The delightful flavors and comforting texture make it a standout for any occasion, and I encourage you to give it a try—you won’t be disappointed! I’d love to hear how your baking adventure goes, so feel free to leave your feedback in the comments.
Don’t forget to check out my other dessert recipes on the blog, where you’ll find everything from classic apple pie to decadent chocolate tarts. Happy baking!
Print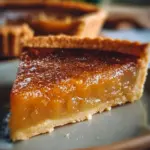
Irresistible Burnt Honey Pie
- Total Time: 50 minutes
- Yield: 8 servings 1x
- Diet: Vegetarian
Description
Discover how to make an unforgettable Burnt Honey Pie that marries sweet caramel notes with the warmth of homemade goodness. This easy recipe is perfect for any occasion!
Ingredients
- 1 pie crust (homemade or store-bought)
- 1 cup honey (preferably raw)
- 4 large eggs
- 1/2 cup heavy cream
- 1/4 cup granulated sugar
- 1/4 teaspoon sea salt
- 1 teaspoon vanilla extract
- 1 tablespoon lemon juice
Instructions
- Preheat your oven to 350°F (175°C).
- Prepare the pie crust by rolling it out and fitting it into a 9-inch pie dish. Bake for 15-18 minutes or until golden brown.
- In a saucepan over medium heat, add your honey and stir occasionally until it caramelizes (5-7 minutes).
- In a mixing bowl, whisk together the eggs, heavy cream, sugar, salt, vanilla, and lemon juice.
- Slowly mix the caramelized honey into the egg mixture, making sure the honey has cooled slightly.
- Pour the honey filling into the baked pie crust.
- Bake for 25-30 minutes, until the filling is set but still jiggles slightly in the center.
- Cool before serving to allow flavors to meld.
Notes
Store at room temperature for up to 2 days, or in the fridge for up to a week. Freeze for long-term storage for about 3 months.
- Prep Time: 20 minutes
- Cook Time: 30 minutes
- Category: Dessert
- Method: Baking
- Cuisine: American
Nutrition
- Serving Size: 1 slice
- Calories: 250
- Sugar: 20g
- Sodium: 100mg
- Fat: 12g
- Saturated Fat: 7g
- Unsaturated Fat: 5g
- Trans Fat: 0g
- Carbohydrates: 30g
- Fiber: 1g
- Protein: 5g
- Cholesterol: 70mg
🥗 Free Custom Keto Meal Plan?
Do you want to lose weight while still enjoying delicious Asian & Thai Fusion meals? Take this quick quiz to get your personalized Keto plan based on your favorite foods!
- ✅ No more guessing what to eat
- ✅ Delicious & easy-to-make recipes
- ✅ Tailored to your body type
Get My Custom Plan Now! →
*Over 100,000+ people have transformed their lives with this quiz.