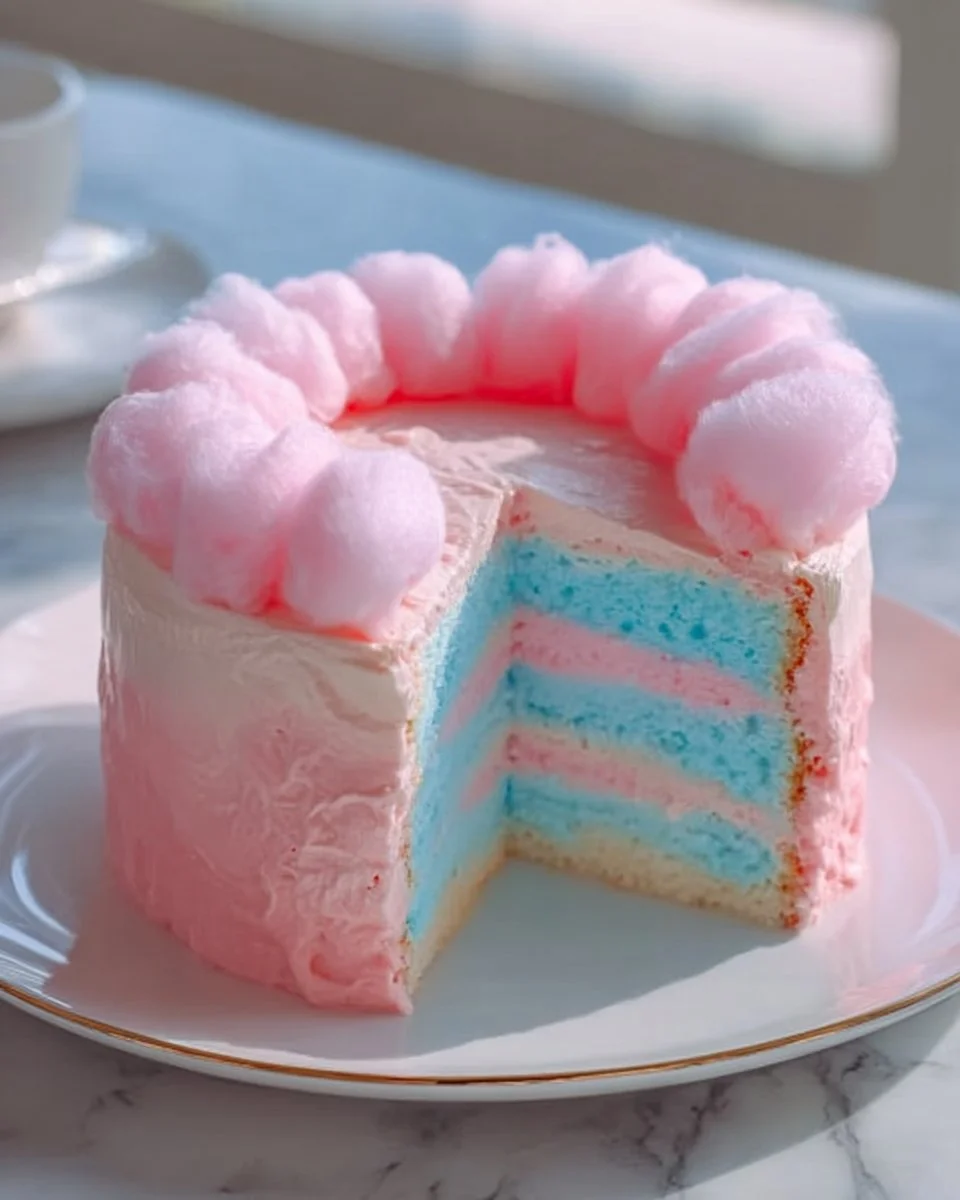
Whimsical Cotton Candy Cake: A Sweet Celebration of Color and Flavor
Picture this: it’s a warm summer afternoon, and the air is filled with laughter as kids chase after an ice cream truck parked down the street. The smell of cotton candy wafts through the air, instantly transporting me back to childhood fairs and birthday parties. Those fluffy, sugary clouds inspired my creation of this delightful Cotton Candy Cake, a vibrant dessert that not only looks like a fairytale but tastes like one too!
This Cotton Candy Cake is not your ordinary cake; its colorful layers and sweet cotton candy topping will make everyone feel like a kid again. What truly sets this recipe apart is how easy it is to whip up—from the bright marbled layers to the heavenly buttercream frosting, it’s a joyful treat for both the baker and the guests. This cake holds the power to turn any regular gathering into a celebration filled with nostalgia and sweetness.
Together, we’ll make a cake that isn’t just a dessert—it’s a memory waiting to happen. By the end of this post, you will learn step-by-step how to create this whimsical treat, complete with tips and tricks that will have your cotton candy cake stealing the show at your next event. Let’s get started!
What Are Cotton Candy Cakes?
Cotton Candy Cakes are a fun and vibrant twist on the traditional cake. Born from the whimsical allure of carnival snacks, they transform that iconic carnival favorite into a cake that’s perfect for birthday parties, baby showers, or any celebration where joy is the theme. Originating as a trend among dessert lovers and bakers looking to bring a touch of nostalgia to gatherings, these cakes are known for their delightful combination of taste and spectacle.
Imagine biting into a slice, where each forkful offers a moist, fluffy texture with bursts of color—this cake is often made using vanilla cake mix and is sweetened with flavored extracts and light frosting, resulting in a taste reminiscent of sweet cotton candy. The layering of various colors creates a stunning visual effect that is sure to impress. You might want to make this cake for celebrations, but I recommend it simply for personal indulgence or as a family bonding project.
Why You’ll Love This Recipe
Incredibly Easy to Make: Whether you’re a beginner or a seasoned baker, this Cotton Candy Cake is straightforward and quick. Using a simple box of cake mix, you can have a colorful and charming cake ready in no time, making it perfect for last-minute gatherings!
Cost-Effective: Compared to purchasing a custom-made cake from a bakery, making this cake at home is much more affordable. Plus, you have control over ingredient quality. You can use high-quality vanilla and butter to make a cake that’s not only beautiful but also delicious.
Customization Options: One of my favorite aspects of this recipe is how easily it can be customized. Want to play with flavors? You can infuse the batter with different extracts like almond or even citrus for a zesty twist.
Fun Presentation: The vibrant layers and fluffy cotton candy topping not only make this cake visually stunning but also create a fantastic centerpiece for any gathering. Your friends and family will be reaching for their cameras before they take their first bite!
Nostalgic Comfort Food: For those of us who grew up loving cotton candy, this cake brings back those sweet memories. There’s something about the combination of a fluffy cake with the airy sweetness of cotton candy that feels like a warm hug from the past.
Ingredients Section

Ingredients
- 1 box of vanilla cake mix: Choose a high-quality mix for a great base (Duncan Hines or Betty Crocker are reliable options).
- 3 large eggs: Bring them to room temperature for better mixing.
- 1/2 cup of vegetable oil: This adds moisture to the cake.
- 1 cup of water: Standard for mixing with the cake batter.
- 1 tsp vanilla extract: Go for pure vanilla extract for the best flavor.
- Food coloring: Pink, blue, and purple to replicate those classic cotton candy hues.
- Cotton candy: For decoration—your choice of flavor!
- Buttercream frosting: You can make it from scratch or use store-bought.
Note on Ingredients:
- Remember that room temperature ingredients mix better and lead to a more even batter.
- For a richer taste, consider substituting half the oil with melted butter.
Step-by-Step Instructions
Preheat your oven: Preheat your oven to 350°F (175°C) and grease and flour three 8-inch round cake pans.
Mix the batter: In a large bowl, combine the cake mix, eggs, vegetable oil, water, and vanilla extract. Mix until you achieve a smooth consistency—this should take about 2 minutes.
Divide the batter: Split the batter into three separate bowls. Add a few drops of food coloring to each bowl to create a beautiful pink, blue, and purple batter.
Pour the batter: Pour the colored batter into the prepared cake pans, alternating colors for a lovely marbled effect. You can use a toothpick to swirl the colors slightly for even more fun!
Bake: Place the pans in the preheated oven and bake for 25-30 minutes, or until a toothpick inserted into the center comes out clean. Keep an eye on them towards the end of the baking time to ensure they don’t overbake.
Cool the cakes: Allow the cakes to cool completely in the pans for about 10 minutes before transferring them to a wire rack.
Level the cakes: After they have cooled, use a serrated knife to level the tops of the cakes if necessary. This will ensure a stable stacking.
Stack with frosting: Place one layer of cake on a serving plate and spread a generous amount of buttercream frosting on top. Repeat with the second layer, then place the final (third) layer on top.
Frost the cake: Use the buttercream frosting to cover the top and sides of the cake, smoothing it out with a spatula for a neat finish.
Decorate: Now for the fun part—decorate the top of the cake with cotton candy and any additional sprinkles or decorations you have on hand.
Slice and Serve: Finally, slice a generous piece of your whimsical cotton candy cake and serve it at your festive gathering!

Expert Tips & Tricks
- Don’t Rush: Allow your cakes to cool completely before frosting, as warm cakes can lead to melty frosting.
- Storage: If you have leftovers, store your cake covered at room temperature for 2 days or in the fridge for up to a week.
- Make-ahead: You can bake the layers a day or two in advance; simply wrap them tightly in plastic wrap before refrigerating.
- Troubleshooting: If your cake sinks in the middle, it may have been underbaked. Always check with the toothpick test! Also, avoid opening the oven door too early while baking.
- Frosting Techniques: For a smooth finish on your frosting, try using a bench scraper for straight edges!
- Keep it Fresh: If you’re worried about the cotton candy melting, add it just before serving for maximum fluffiness.
Serving Suggestions
This vibrant Cotton Candy Cake is perfect for a range of occasions—from birthday celebrations to casual summer picnics. Pair it with a scoop of vanilla ice cream for a delightful contrast in temperature and texture, or serve alongside fresh fruit to balance out the sweetness.
For impressive presentation, consider placing the cake on a colorful cake stand and surrounding it with small bowls of assorted candy or edible glitter. Brightly colored plates and napkins can really highlight the fun, festive atmosphere!
Variations & Substitutions
- Different Flavors: Want to switch it up? Try vanilla bean, lemon, or even chocolate cake mix as a base flavor.
- Dietary Restrictions: For a gluten-free option, use a gluten-free vanilla cake mix. You can also use egg replacements or vegan butter for a dairy-free version.
- Seasonal Variations: During holidays, use themed colors and decorations. Think red and green for Christmas or orange and black for Halloween.
Nutrition & Storage Info
- Prep Time: 20 minutes
- Cook Time: 30 minutes
- Total Time: 50 minutes plus cooling time
- Yield: 12 servings
- Estimated Calories: Approximately 350 calories per slice
- Storage Instructions: Keep at room temperature for 2 days or refrigerated for up to a week. The cake can be frozen for up to 3 months. Just be sure to wrap it tightly!
FAQ Section
Can I use a different cake mix flavor?
Yes! Experimenting with different flavors like lemon or chocolate can be delightful.Is there a way to make the cake healthier?
You can substitute some oil with applesauce for reduced fat, and add whole wheat flour.What is the best way to color the batter?
Use gel food coloring instead of liquid for more vibrant colors without changing the batter’s consistency.How do I keep the cotton candy from melting?
Add the cotton candy topping just before serving to maintain its airy texture.Can I make this cake in advance?
Absolutely! Bake the layers and store them wrapped in plastic. Frost on the day of serving.What frosting works best?
A stable buttercream or cream cheese frosting can work wonders, but avoid anything too soft since it might not hold the layers well.Can I make this as cupcakes?
Yes! Simply divide the batter into cupcake liners and decrease the baking time to about 20 minutes.What drinks pair well with this cake?
Sweet iced tea, lemonade, or even a bubbly soda make great companions.My cake is dry. What went wrong?
This could be due to overbaking or not incorporating enough moisture. Always keep an eye on your cakes while they bake!How can I make the layers more colorful?
Adding a bit more food coloring and swirling them properly will enhance the vibrancy of the layers.
Conclusion
This Cotton Candy Cake is more than a delightful dessert; it’s a vessel for memories, joy, and celebration. With its beautiful layers and mesmerizing toppings, it’s the perfect addition to any gathering. I encourage you to gather your loved ones, bake this whimsical cake together, and share the laughter and sweetness that comes with it.
And if you loved this recipe, don’t forget to check out my other delightful creations on the blog. I can’t wait to hear your feedback or any fun twists you make on this cake! Happy baking!
Print
Whimsical Cotton Candy Cake
- Total Time: 50 minutes
- Yield: 12 servings 1x
- Diet: Vegetarian
Description
A vibrant dessert inspired by cotton candy, featuring colorful layers and sweet buttercream frosting, perfect for celebrations.
Ingredients
- 1 box of vanilla cake mix
- 3 large eggs
- 1/2 cup of vegetable oil
- 1 cup of water
- 1 tsp vanilla extract
- Food coloring (pink, blue, purple)
- Cotton candy (for decoration)
- Buttercream frosting (homemade or store-bought)
Instructions
- Preheat your oven to 350°F (175°C) and grease and flour three 8-inch round cake pans.
- Mix the batter by combining the cake mix, eggs, oil, water, and vanilla extract until smooth.
- Divide the batter into three bowls and add food coloring to create pink, blue, and purple colors.
- Pour the colored batter into the prepared pans, alternating colors for a marbled effect.
- Bake for 25-30 minutes, or until a toothpick inserted comes out clean.
- Cool the cakes in the pans for about 10 minutes before transferring to a wire rack.
- Level the tops of the cakes with a serrated knife if necessary.
- Stack the layers, spreading buttercream frosting between each layer.
- Frost the sides and top of the cake with buttercream frosting.
- Decorate the top with cotton candy and any additional sprinkles.
- Slice and serve your whimsical cotton candy cake.
Notes
Add cotton candy just before serving to prevent it from melting.
- Prep Time: 20 minutes
- Cook Time: 30 minutes
- Category: Dessert
- Method: Baking
- Cuisine: American
Nutrition
- Serving Size: 1 slice
- Calories: 350
- Sugar: 25g
- Sodium: 200mg
- Fat: 10g
- Saturated Fat: 3g
- Unsaturated Fat: 5g
- Trans Fat: 0g
- Carbohydrates: 45g
- Fiber: 1g
- Protein: 3g
- Cholesterol: 40mg
🥗 Free Custom Keto Meal Plan?
Do you want to lose weight while still enjoying delicious Asian & Thai Fusion meals? Take this quick quiz to get your personalized Keto plan based on your favorite foods!
- ✅ No more guessing what to eat
- ✅ Delicious & easy-to-make recipes
- ✅ Tailored to your body type
Get My Custom Plan Now! →
*Over 100,000+ people have transformed their lives with this quiz.