Vibrant Yogurt Rainbow Polka Dot Jello: A Fun and Festive Dessert!
Every summer, my family and I gathered for our annual picnic, the air filled with laughter, stories, and the irresistible scent of delicious food. But what always stole the show was my grandmother’s Yogurt Rainbow Polka Dot Jello. As children, we would watch in sheer amazement as the colorful jelly layers swirled together to form a quirky mosaic of flavors. Each bite was a delightful dance of creaminess and sweetness, making it a true standout at our table.
What makes this recipe so special is not just its eye-catching presentation but also its ability to bring everyone together. Unlike the store-bought jello that has a shockingly artificial taste, this homemade version combines the creaminess of yogurt with the playful sweetness of jelly in a vibrant array of colors. It’s a delicious reminder of family bonding over dessert, and it never fails to evoke a sense of nostalgia.
In this post, I’ll walk you through how to make your very own Yogurt Rainbow Polka Dot Jello, complete with tips, variations, and personal anecdotes that will inspire you to add a splash of color to your desserts—even if it’s just for a simple weekday treat or a lively party celebration!
What Are Yogurt Rainbow Polka Dot Jello?
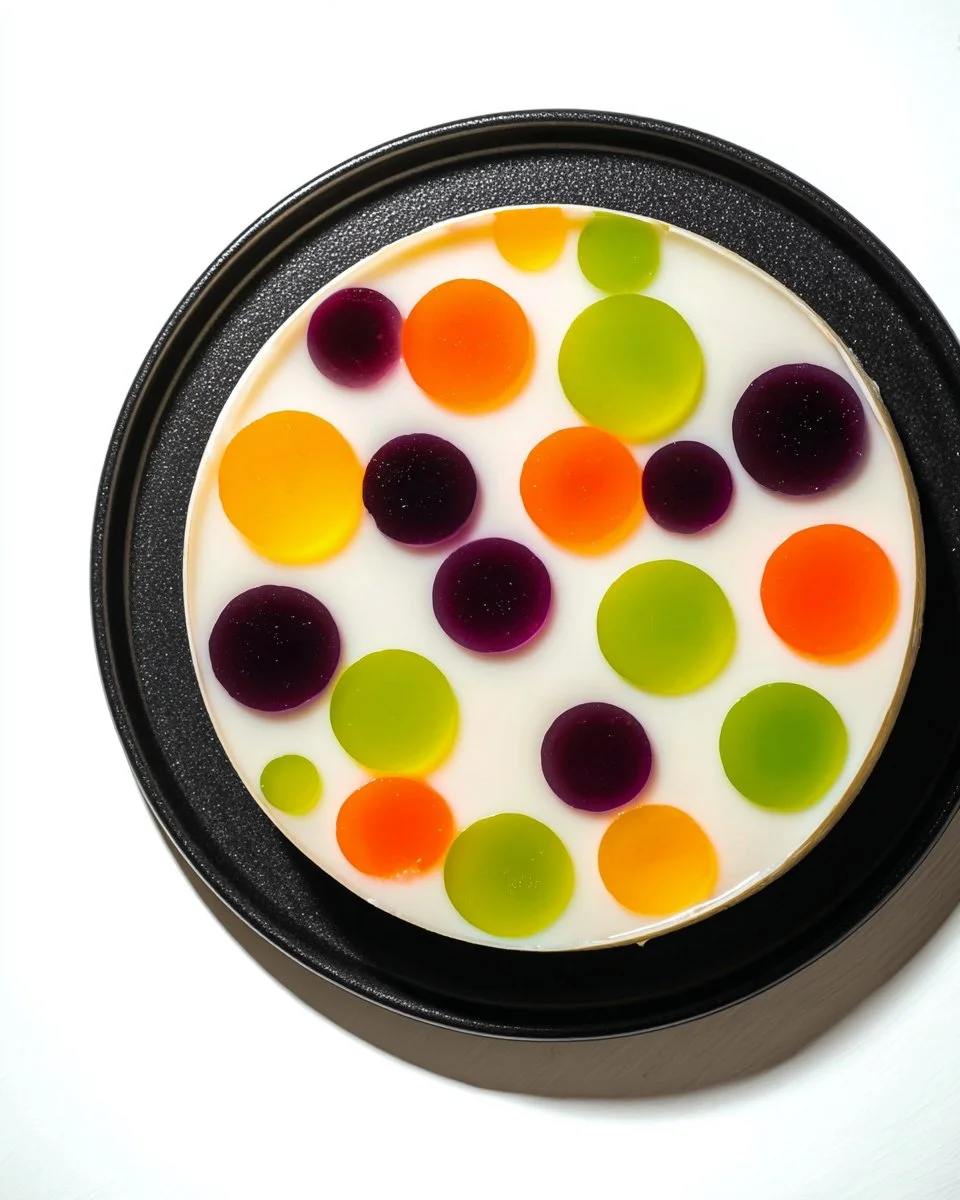
Yogurt Rainbow Polka Dot Jello combines creamy yogurt and fruity jelly into a delightful dessert that’s as much fun to make as it is to eat. The origins of this playful dish are rooted in childhood memories, where bright colors and fun textures reign supreme. You can taste the layers, with the silky yogurt providing a light tartness and the jelly bringing sweetness that’s unmistakably refreshing.
These treats are unique in their presentation; each slice displays a polka dot pattern that’s sure to catch the eye. Perfect for parties, picnics, or just a creative way to enjoy dessert at home, the adaptability of this recipe means you can make it for any occasion, from birthday parties to holiday feasts. It’s also a wonderful way to get kids involved in the kitchen, allowing them to mix, pour, and layer while learning valuable cooking skills.
Why You’ll Love This Recipe
Visually Stunning: The colorful layering not only makes for an eye-catching dessert but also makes each slice feel like a treat. It’s a dessert that can be the centerpiece of any gathering!
Homemade Goodness: Unlike store-bought options loaded with artificial flavors, this version is based on wholesome yogurt and natural jelly, ensuring a fresher, more flavorful experience. You’ll appreciate how much better it tastes!
Cost-Effective: Making Yogurt Rainbow Polka Dot Jello at home is budget-friendly. A few simple ingredients can create a dessert that rivals expensive restaurant options, leaving plenty of room in your wallet for other fun summer activities.
Customizable: You have complete control over flavors and colors. Want to experiment with different yogurt types? Go for plant-based options or fruity alternatives! Prefer different jelly flavors? The sky’s the limit!
Easy to Make: This recipe is beginner-friendly and doesn’t require any complex techniques. With just a little patience and time, you’ll have a delightful treat ready to impress family and friends.
Ingredients Section
Here’s what you’ll need to create this mesmerizing dessert:
- 4 cups yogurt drink (choose your favorite flavor; I love using vanilla for its versatility)
- 1 1/2 tablespoons agar-agar powder (a great gelatin alternative, perfect for a vegetarian-friendly treat)
- 4 jelly cones (stick to a classic flavor like raspberry or orange for fun colors)
Ingredient Notes:
- Yogurt Drink: Opt for a high-quality brand that’s smooth and creamy. Greek yogurt drinks work beautifully too for added richness.
- Agar-Agar Powder: Ensure it’s from a reputable brand like NOW Foods or Bob’s Red Mill for the best results.
- Jelly Cones: I recommend using bright colors to enhance the polka dot effect. Check local stores or online for seasonal flavors!
Prep Notes:
- Make sure your ingredients are at room temperature before you start, especially the yogurt, to ensure it blends smoothly.
Step-by-Step Instructions
Combine Ingredients: Pour the yogurt drink into a pot. Add the agar-agar powder to the drink, stirring constantly for about 2-3 minutes. Allow the mixture to sit for 10 minutes to let the agar soften.
Heat the Mixture: Set the pot over medium heat. Continue stirring until the mixture reaches a gentle boil, ensuring that the agar-agar is fully dissolved (you’ll know it’s ready when you see tiny bubbles forming). Remove from heat and let it cool slightly.
Prepare the Jelly: While the yogurt mixture cools, slice the jelly cones into round pieces, approximately ½ inch thick.
Layer the Dessert: Arrange the sliced jelly cones at the bottom of your bowl or mold. Slowly pour the yogurt agar mixture over the jelly cones by running it over the back of a spoon to keep the jelly pieces in place.
Let it Set: Allow the dessert to set at room temperature for about 20-30 minutes. If you want to speed up the process, pop it in the fridge for a bit.
Unmold and Serve: Once set, run a silicone spatula around the edges of the bowl. Place a dish over the bowl and flip it upside down. Cut into slices and garnish with leftover jelly cones for a vibrant finish.
Chill for Extra Refreshment: If you prefer your dessert cold, refrigerate it for at least an hour before serving for that refreshing bite!
Chef’s Tip: Keep an eye on your agar-agar mixture while it heats; it can boil over quickly if left unattended!
Expert Tips & Tricks
- Ingredient Quality Matters: Choosing high-quality yogurt and jelly will significantly impact flavor. Fresh ingredients make a world of difference!
- Storage Recommendations: Store any leftovers in an airtight container in the fridge for up to 3 days. However, it’s best enjoyed fresh!
- Make-Ahead Instructions: You can prepare this delightful dessert a day in advance; it will hold up beautifully!
- Common Mistakes to Avoid: Ensure that you fully dissolve the agar-agar in the yogurt mixture—if not, your jello may not set properly.
- Troubleshooting: If the jello isn’t setting, it might need more agar-agar. Just dissolve a bit more in some warm water and add it to the cooling mixture.
Serving Suggestions
This vibrant Yogurt Rainbow Polka Dot Jello is delicious on its own, but you can pair it with whipped cream or serve alongside a simple fruit salad for a refreshing contrast. If you want to impress your guests, try serving it in individual cups with a sprig of mint on top for added flair. This dessert shines at birthday parties, summer BBQs, or any event needing a bright touch!
Variations & Substitutions
Feel free to get creative with your Yogurt Rainbow Polka Dot Jello! Here are some fun ideas to tailor it to your taste:
- Flavor Combinations: Swap out the yogurt for flavored varieties like strawberry or peach to complement the jelly flavors.
- Dietary Adaptations: For a dairy-free option, use coconut yogurt and vegan jelly. These substitutions can yield equally delicious results!
- Seasonal Variations: In the fall, use pumpkin-flavored yogurt with autumnal jelly colors. For winter, cranberry or pomegranate flavors would pair beautifully!
Nutrition & Storage Info
- Prep Time: 15 minutes
- Cook Time: 15 minutes
- Total Time: 30 minutes (plus cooling time)
- Yield: 8 servings
- Estimated Calories per Serving: 120 calories
- Storage Instructions: Keep it in the fridge for up to 3 days. If you wish to freeze, slice and store in airtight containers for up to a month.
FAQ Section
Can I use regular gelatin instead of agar-agar?
Yes, but be sure to follow the package instructions for how much to use.How do I know when the agar-agar is fully dissolved?
You should not see any clumps in the liquid, and it will slightly thicken.What can I use instead of jelly cones?
You can use any gummy candy or fresh fruit cut into small pieces for variety.Can I make this a day in advance?
Absolutely! This dessert is perfect for prepping ahead of time.What’s a good yogurt substitution for those with lactose intolerance?
Coconut milk yogurt or almond yogurt works great and adds a unique flavor!How do I store leftovers?
Keep it in an airtight container in the fridge for up to 3 days.Can I use homemade jelly instead of store-bought?
Yes, homemade jelly can elevate the flavors even more!What type of mold is best for this recipe?
A silicone mold helps make the unmolding process effortless. However, any bowl will work—just grease it lightly.Can I add more layers?
Definitely! Just increase the number of combinations of yogurt and jelly layers as desired.Is this recipe suitable for children?
Yes! It’s not only fun but also a great way to get kids interested in cooking.

Conclusion
This Yogurt Rainbow Polka Dot Jello is not just a dessert; it’s a colorful masterpiece that brings joy and nostalgia to the table. Perfect for family gatherings or just a sweet treat, it’s a recipe you’ll want to share. I truly hope you try this delightful recipe and share your results with me, as I love hearing from readers! Don’t forget to check out some of my other lively desserts that will brighten your day, too. Happy baking!
Print
Yogurt Rainbow Polka Dot Jello
- Total Time: 30 minutes
- Yield: 8 servings 1x
- Diet: Vegetarian
Description
A visually stunning dessert that combines creamy yogurt and fruity jelly into delightful layers, perfect for any gathering.
Ingredients
- 4 cups yogurt drink (vanilla or your favorite flavor)
- 1 1/2 tablespoons agar-agar powder
- 4 jelly cones (raspberry or orange flavor)
Instructions
- Combine the yogurt drink and agar-agar powder in a pot. Stir constantly for about 2-3 minutes and let it sit for 10 minutes.
- Heat the mixture over medium heat until it reaches a gentle boil and the agar-agar is fully dissolved.
- Prepare the jelly by slicing it into round pieces about ½ inch thick.
- Layer the jelly pieces at the bottom of a bowl and pour the yogurt mixture over them using the back of a spoon.
- Let the dessert set at room temperature for 20-30 minutes or refrigerate for a quicker setting.
- Unmold the dessert by running a silicone spatula around the edges and flipping it onto a dish. Cut into slices and garnish with jelly if desired.
- Chill in the fridge for at least an hour for a refreshing dessert.
Notes
Keep an eye on the agar-agar mixture to prevent boiling over. Store leftovers in an airtight container in the fridge for up to 3 days.
- Prep Time: 15 minutes
- Cook Time: 15 minutes
- Category: Dessert
- Method: Chilling
- Cuisine: American
Nutrition
- Serving Size: 1 serving
- Calories: 120
- Sugar: 10g
- Sodium: 50mg
- Fat: 2g
- Saturated Fat: 0g
- Unsaturated Fat: 1g
- Trans Fat: 0g
- Carbohydrates: 24g
- Fiber: 0g
- Protein: 4g
- Cholesterol: 5mg
🥗 Free Custom Keto Meal Plan?
Do you want to lose weight while still enjoying delicious Asian & Thai Fusion meals? Take this quick quiz to get your personalized Keto plan based on your favorite foods!
- ✅ No more guessing what to eat
- ✅ Delicious & easy-to-make recipes
- ✅ Tailored to your body type
Get My Custom Plan Now! →
*Over 100,000+ people have transformed their lives with this quiz.