Delightfully Creamy Viral Snow Ice Cream Recipe: Your Ultimate Guide to the Winter’s Sweetest Treat!
There’s something magical about winter, isn’t there? The world transforms into a snowy wonderland, and it’s as if Mother Nature hands us a blank canvas just waiting to be painted—only this time, the paint is made of fluffy, white snow! I still remember the first time I attempted making Viral Snow Ice Cream; it was one of those spontaneous moments that turned into a cherished family memory. We came in from a snowball fight, cheeks red and noses chilly, and I thought, “Why not turn this glorious powder into a delicious treat?” That day, we created not just a dessert but a tradition that keeps our spirits high each winter.
What makes Viral Snow Ice Cream so special is not just its fluffy texture and sweet, creamy flavor—it’s the pure joy of creating something extraordinary from nature’s offerings. In this cozy recipe, I’ll show you how to transform freshly fallen snow into this delightful dessert with just a handful of ingredients you probably already have at home. No heavy equipment required, just your trusty spoon and a sense of adventure! By the end of this guide, you’ll have everything you need to whip up your very own batch of Viral Snow Ice Cream that will surely impress family and friends and create memories of your own.
What Are Viral Snow Ice Cream?
Originating from viral social media trends, Viral Snow Ice Cream turned heads with its simple beauty and delicious taste. At its core, this ice cream mimics traditional creamy desserts but elevates them by using fresh, fluffy snow instead of traditional bases. The texture is nothing short of dreamy; imagine biting into insulated clouds—smooth, velvety, and soft, with a burst of sweet creaminess.
What sets Viral Snow Ice Cream apart from typical store-bought ice cream is the process and the ingredients. Depending on the snow, every batch can be a little different, giving you the joy of experimentation in every scoop. Plus, it’s an instant treat during a light snowfall—perfect for when you need a sweet escape from the chill. Whether you’re hosting a winter gathering, longing for some childhood nostalgia, or looking for a unique dessert to wow your guests, this recipe is a crowd-pleaser.
Why You’ll Love This Recipe
Simplicity at Its Best: This recipe is incredibly easy to make, requiring only a few pantry staples. Even if you’re no gourmet chef, you’ll impress everyone with this delightful treat!
Budget-Friendly: Forget about splurging on expensive desserts. This Viral Snow Ice Cream costs next to nothing, especially when you get your snow fresh from the great outdoors!
Customizable Flavors: You can make this recipe your own. From vanilla to chocolate, or even tangy lemon, the sky’s the limit on flavor combinations!
Quality Time: Making this snow ice cream is a fun family activity. Get the kids involved, and create lasting memories as you mix up delicacies in the snow.
Quick to Make: You can whip this up in about 15 minutes. No long waiting times means you can indulge in a homemade sweet treat right away!
With minimal effort and maximum joy, this Viral Snow Ice Cream certainly outshines any store-bought dessert.
Ingredients Section
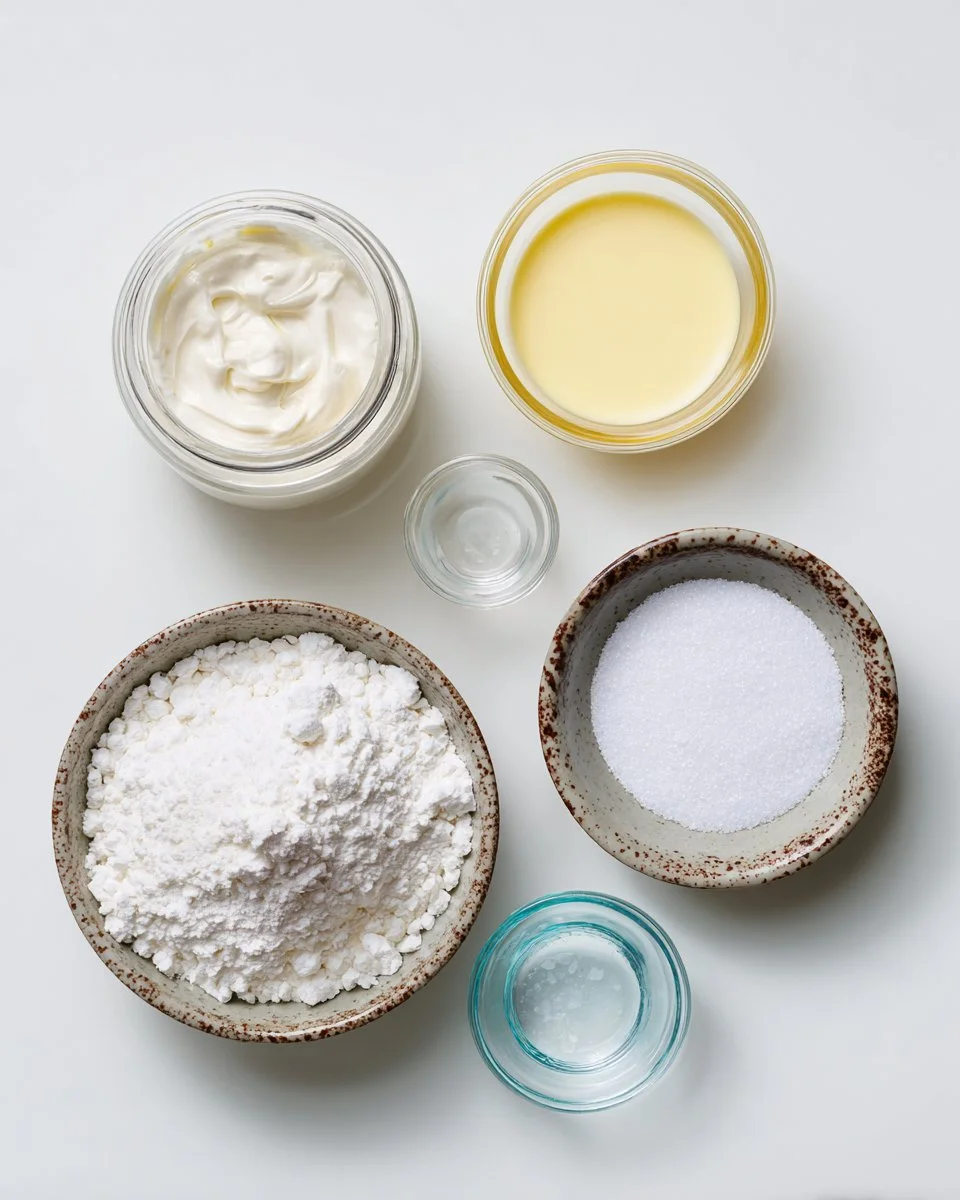
To create your fluffy Viral Snow Ice Cream, you’ll need the following ingredients:
- 1 small container of whipping cream (35 percent): This is the creamy foundation that will give you that delectable richness.
- 1 teaspoon of vanilla extract: Adjust to taste; this adds a lovely aroma and flavor.
- 1/2 cup powdered sugar: Sweetness is vital—adjust according to your preference.
- Salt (for the bottom of the well): Essential for creating the perfect environment for your ice cream.
Ingredient Quality/Substitutions
- Whipping Cream: Freshly whipped cream yields the best results. For a lighter option, you can substitute half-and-half, but the texture will be less creamy.
- Vanilla Extract: Use pure vanilla extract for a richer flavor. If you’re in a pinch, even vanilla essence can work, but steer clear of artificial flavors.
- Powdered Sugar: Confectioner’s sugar gives the smooth sweetness that granulated sugar can’t achieve as easily.
Prep Notes
- Let your whipping cream come to room temperature to ensure easy mixing. Also, please ensure your snow is clean and fresh for the best ice cream experience.
Step-by-Step Instructions
Gather Ingredients and Equipment: Before you head out into the snowy wonderland, gather your whipping cream, vanilla, powdered sugar, and a large bowl.
Make Your Snow Well: Create an indent in the fresh snow with your bowl. Aim for a deep well that can hold all your ingredients without overflow.
Add Salt: Sprinkle a generous amount of salt into the bottom of the snow well. This helps to increase the ice cream’s freezing power, kinda like magic!
Combine Ingredients: Pour in your whipping cream, followed by the vanilla extract and powdered sugar.
Mix & Enjoy!: Use your spoon to gently combine, mixing until it thickens and solidifies—this shouldn’t take more than a few minutes.
Chef’s Tip: If it seems too runny, don’t panic! Just add more snow and give it a good mix again. Tasting as you go is encouraged!
- Scoop & Serve: Once you achieve a creamy texture, scoop it into bowls, and enjoy your homemade Viral Snow Ice Cream!
Expert Tips & Tricks
Storage Recommendations: Viral Snow Ice Cream is pure bliss when fresh. However, if you need to store it, keep it in an airtight container in the freezer for up to 2 hours. After that, it tends to crystalize.
Make Ahead Instructions: You can prep your ingredients (cream, sugar, etc.) when a snowstorm is forecasted, making the process even quicker!
Troubleshooting Common Problems: If your ice cream isn’t solidifying, ensure the snow is fresh and fluffy—not packed down from foot traffic. For softer ice cream, you can put it in the freezer briefly.
Additional Tips: Try adding a splash of milk to adjust the texture or mix in chocolate syrup for a touch of indulgence!
Serving Suggestions
Viral Snow Ice Cream shines on its own, but why not take it up a notch? Serve it alongside freshly baked brownies or a slice of warm pie for a contrast in temperature and textures. For a whimsical presentation, top with colorful sprinkles or a drizzle of chocolate syrup.
This delightful dessert is perfect for cozy movie nights or as a fun activity during family gatherings. Who wouldn’t love creating their own snowy delicacies together?
Variations & Substitutions
Want to explore? Here are some fun variations to shake things up!
Flavors: Consider adding cocoa powder for chocolate snow ice cream, or try blending in mashed fruit like strawberries or bananas for a fruity twist.
Dietary Adaptations: If you have dietary restrictions, you could substitute sugar with Stevia or a powdered sugar alternative for a low-sugar version!
Seasonal Variations: Why not experiment with peppermint extract for a holiday treat? Or add spices like cinnamon and nutmeg to cozy up this delightful snow cream for the winter holidays!
Nutrition & Storage Info
- Prep Time: 5 minutes
- Cook Time: 10 minutes
- Total Time: 15 minutes
- Yield: Approximately 4 servings
- Estimated Calories: About 150 calories per serving (varies based on ingredients)
Storage Instructions: Keep at room temperature for up to an hour, or in the fridge for up to two hours. Best enjoyed fresh but can be stored in the freezer for up to 2 hours.
FAQ Section
Can you make this without snow?
Absolutely! You can make a similar ice cream using ice from your freezer, but the texture and experience won’t be the same.What if my snow isn’t clean?
Always use freshly fallen, clean snow. If you’re unsure, opt for packaged ice instead.How can I ensure my ice cream is sweet enough?
Start with less sugar; you can always add more to taste as you mix!Is it okay to eat snow?
Yes, but only clean, uncontaminated fresh snow! Check your backyard for chemicals before harvesting.What if my ice cream is too icy?
That usually happens when the snow is too packed down. Next time, use fluffy, freshly fallen snow.Can I add other flavors?
Yes! Almond and coconut extracts can add a nice touch as well. Get creative!How do I store leftovers?
Put your snow ice cream in an airtight container in the freezer. Best enjoyed fresh, though!What if I want to make this dairy-free?
You can use coconut cream for a dairy-free version, adjusting the sugar accordingly.Can I freeze it longer than recommended?
It’s best to consume it within two hours to enjoy the perfect texture. Freezing longer will make it icy.What should I pair it with?
Try it with some warm cookies or fruit for a fabulous dessert combination!
Conclusion
This Viral Snow Ice Cream recipe is not just about the sweet treat; it’s about embracing the joy of winter and creating memories with the people we cherish. Whether it’s a snow day with the kids or a cozy gathering with friends, nothing compares to the delight of scooping up fluffy, homemade ice cream made from nature’s best offerings.
I hope you give it a try and share your experiences! I’d love to hear your feedback or any delightful variations you come up with! If you loved this recipe, be sure to check out some of my other cozy favorites on the blog, like Warm Cinnamon Rolls or Adventurous Hot Chocolate Ideas! Happy snow days!
Print
Viral Snow Ice Cream
- Total Time: 15 minutes
- Yield: 4 servings 1x
- Diet: Vegetarian
Description
A delightful homemade ice cream made from fresh snow, whipping cream, and sweetened to perfection.
Ingredients
- 1 small container of whipping cream (35 percent)
- 1 teaspoon of vanilla extract
- 1/2 cup powdered sugar
- Salt (for the bottom of the well)
Instructions
- Gather Ingredients and Equipment.
- Make Your Snow Well.
- Add Salt.
- Combine Ingredients.
- Mix & Enjoy!
- Scoop & Serve.
Notes
Ensure your snow is clean and fresh for the best results. Keep at room temperature for up to an hour or in the fridge for up to two hours. Best enjoyed fresh but can be stored in the freezer for up to 2 hours.
- Prep Time: 5 minutes
- Cook Time: 10 minutes
- Category: Dessert
- Method: No-Cook
- Cuisine: American
Nutrition
- Serving Size: 1 serving
- Calories: 150
- Sugar: 10g
- Sodium: 50mg
- Fat: 10g
- Saturated Fat: 6g
- Unsaturated Fat: 4g
- Trans Fat: 0g
- Carbohydrates: 15g
- Fiber: 0g
- Protein: 1g
- Cholesterol: 40mg
🥗 Free Custom Keto Meal Plan?
Do you want to lose weight while still enjoying delicious Asian & Thai Fusion meals? Take this quick quiz to get your personalized Keto plan based on your favorite foods!
- ✅ No more guessing what to eat
- ✅ Delicious & easy-to-make recipes
- ✅ Tailored to your body type
Get My Custom Plan Now! →
*Over 100,000+ people have transformed their lives with this quiz.