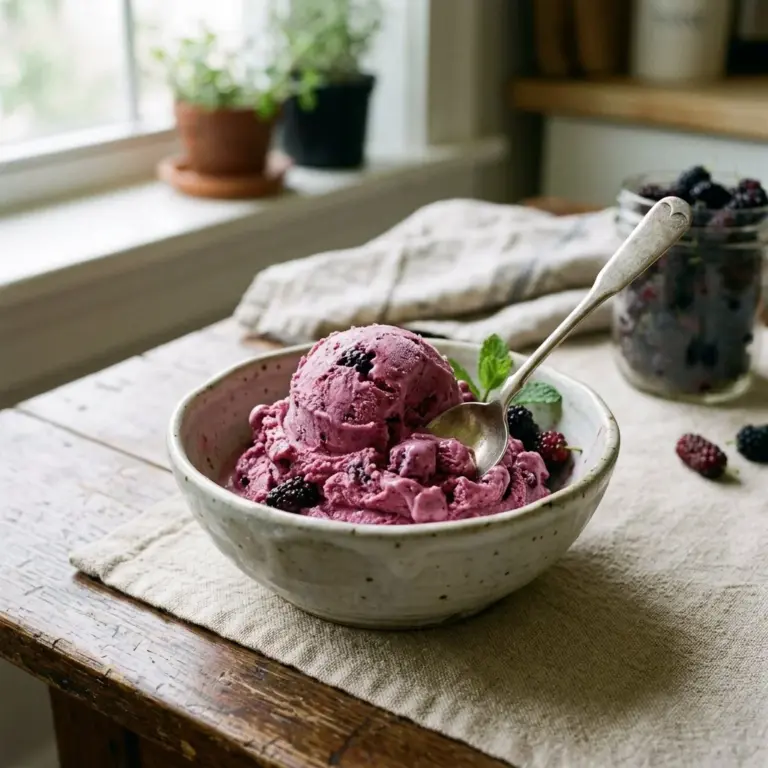
Irresistible No Churn Salted Caramel Ice Cream: The Easiest Recipe You’ll Ever Make!
There’s something magical about homemade ice cream, isn’t there? Just last summer, I found myself, spoon in hand, on my back porch, soaking up the sun while indulging in a scoop of my own No Churn Salted Caramel Ice Cream. It took me back to childhood road trips, where a pit stop at the local ice cream parlor was the highlight of the day. The creamy texture, the sweet-salty notes of caramel—it was bliss!
But you know what makes my version even better than what you’d buy at the store? It’s made with love, and I get to control every single ingredient. No artificial flavors, just the pure joy of heavy cream, sweetened condensed milk, and a dreamy homemade caramel sauce. I can still hear my kids giggling as they anticipated the first scoop, their faces lighting up with delight that only ice cream can bring.
In this post, I’m going to show you how to whip up this wealth of happiness without an ice cream maker—yup, it’s a no-churn recipe! You’re going to learn my secrets of achieving that perfect creamy texture and how a pinch of salt elevates the sweetness to pure perfection. Trust me, you’ll want this recipe tucked away in your collection!
What Are No Churn Salted Caramel Ice Cream?
So, let’s talk about what makes No Churn Salted Caramel Ice Cream so spectacular. Unlike traditional ice cream, which requires a churn and often various cooking steps, this recipe is straightforward. It dates back to the realization that making ice cream at home could be as simple as whisking and folding—no fancy machines required.
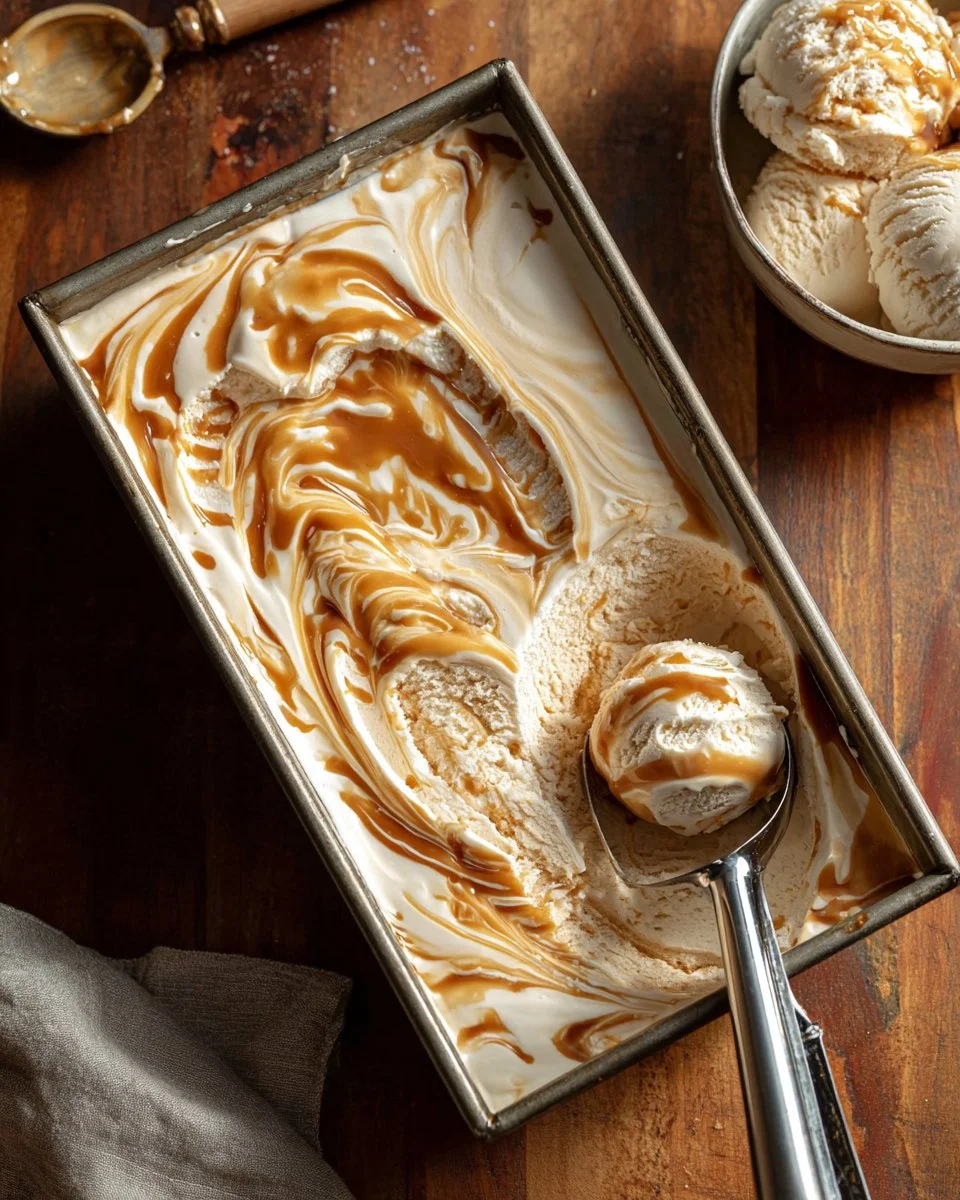
The taste? Imagine taking a soft, fluffy cloud of creamy goodness and drizzling it with luscious, buttery caramel that has just the right kick of salt. The texture is light, airy, and melt-in-your-mouth divine. You’ll taste the sweet notes of caramel mingling with a hint of salt and the rich undertones of whipped cream, all while the chill of ice cream cools your taste buds.
This dessert is not just for summer; it’s a universal treat, perfect for birthdays, celebrations, or simply a cozy night on the couch with a favorite movie. Whether you’re hosting a gathering or indulging solo, it’s sure to impress!
Why You’ll Love This Recipe
Effortless Preparation: Seriously, if you can whip cream and fold ingredients, you can make this ice cream. In about 15 minutes of active time, you will have an incredible dessert waiting for you in the freezer!
Cost-Effective: Making this at home means you’re saving money compared to those pricey pints they sell at gourmet shops. Plus, with just a handful of ingredients, it’s budget-friendly too.
Customization Galore: Want to experiment? You can easily swap out the caramel for chocolate swirl, add chunks of brownie, or toss in some crunchy nuts. The possibilities are endless!
Superior Flavor: Unlike store-bought versions which can often taste overly processed or artificial, this ice cream bursts with authentic flavors. You know every ingredient, and the taste speaks for itself.
Perfect for Gatherings: This recipe yields enough to serve a crowd, making it ideal for parties or family gatherings – your guests will love you for it!
By the end of this post, you’ll realize just how easy it is to serve up a scoop of happiness!
Ingredients Section
Here’s what you’ll need to create your dreamy No Churn Salted Caramel Ice Cream:
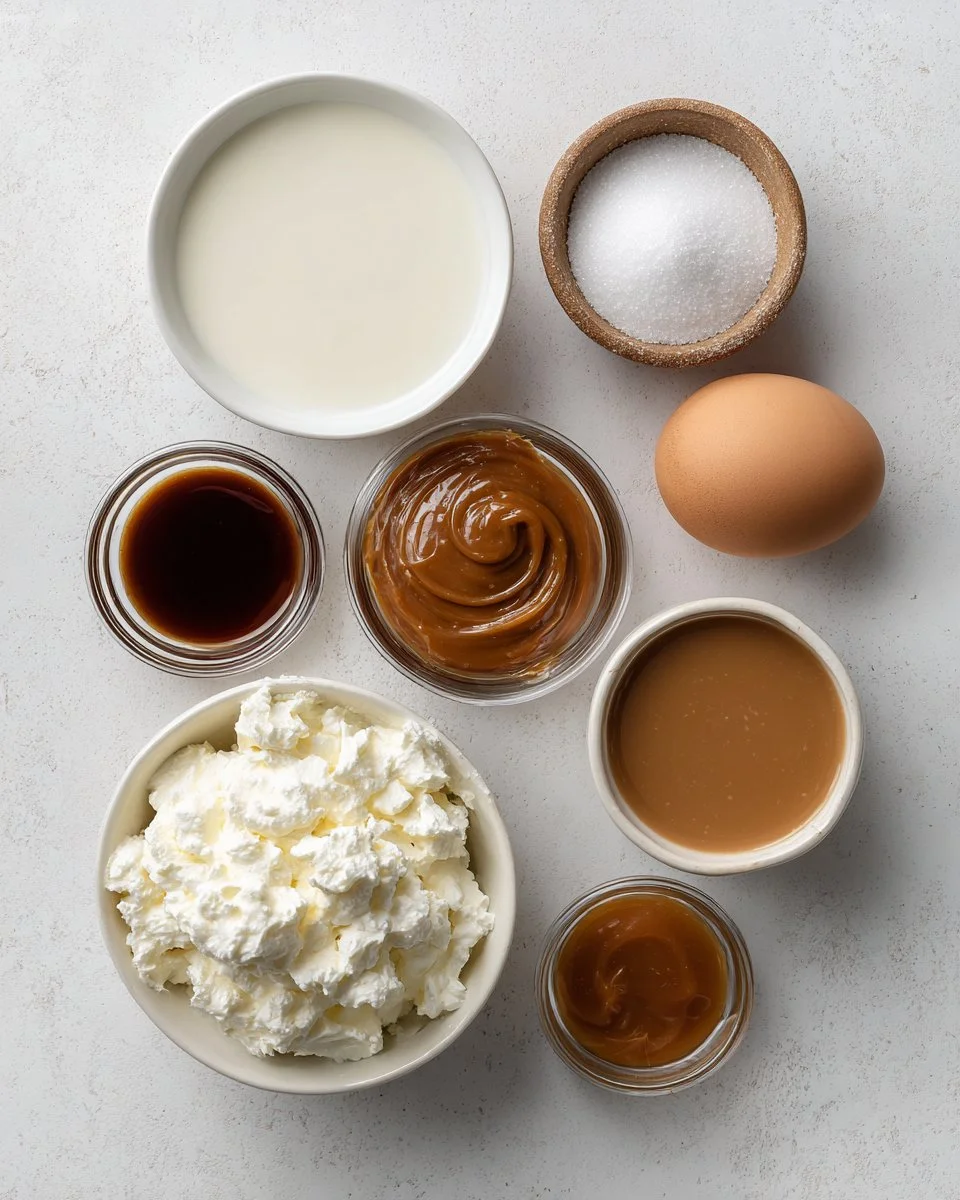
- 2 cups heavy whipping cream, cold: The key to that light and fluffy texture. Make sure it’s chilled well for optimal whipping.
- 1 can sweetened condensed milk (14 oz): This adds a rich creaminess that balances perfectly with the other flavors.
- 1 teaspoon vanilla extract: For that warm, sweet flavor that rounds everything out beautifully.
- 1/4 teaspoon kosher salt: This elevates the sweetness of the caramel, bringing depth and complexity.
- 1 cup caramel sauce, homemade or store-bought: Feel free to use your favorite brand or whip some up at home!
Prep Notes:
- Ensure your heavy cream is very cold—it whips better that way.
- If you’re opting for homemade caramel, let it cool before using.
Brand Recommendations:
- For the best results with heavy cream, I love using Organic Valley; it whips up beautifully.
- When it comes to the caramel sauce, Smucker’s seriously delivers on flavor without being overly sweet!
Step-by-Step Instructions
Now, let’s get into how to whip this beauty up step by step!
Chill Your Pan: Place a 9×5-inch loaf pan in the freezer to chill for at least 10 minutes. This helps your ice cream freeze faster, giving you a creamier texture.
Whip the Cream: In a stand mixer bowl (use the whisk attachment if you have one), pour in 2 cups of cold heavy whipping cream. Start at a low speed, gradually increasing to medium. Whip until it thickens, then increase to high speed until stiff peaks form. You’ll know it’s done when you can turn the bowl upside down and it doesn’t budge!
Mix the Base: In a separate bowl, combine 1 can of sweetened condensed milk, 1 teaspoon vanilla extract, and 1/4 teaspoon kosher salt. Gently fold in about 1 cup of the whipped cream until well combined.
Combine Mixtures: Carefully fold the sweetened condensed milk mixture into the remaining whipped cream. Be gentle here—this keeps your ice cream airy!
Layering: Pour half of the mixture into your chilled loaf pan. Drizzle half of your 1 cup caramel sauce over the top, then spoon the remaining ice cream mixture in, followed by the rest of the caramel sauce.
Swirl the Caramel: Using a butter knife, gently swirl the caramel into the ice cream mixture, just enough to create beautiful ripples.
Chill to Set: Cover the pan and freeze for at least 5 hours, or until completely set.
Chef’s Tips:
- Be patient! Freezing for at least 5 hours ensures perfect texture.
- Avoid over-mixing when folding ingredients; you want to keep that airy whipped cream as much as possible.
Common mistake to avoid: Don’t skip the chilling of the pan or the heavy cream; this is essential for the best results!

Expert Tips & Tricks
Storage Recommendations: Store your ice cream in airtight containers to prevent freezer burn. It can last in the freezer for up to 2 weeks, though it’s doubtful it will last that long!
Make-Ahead Instructions: This ice cream can be made up to a week in advance, making it a great dessert to prep for a special occasion.
Troubleshooting Common Problems: If your ice cream becomes too hard after freezing, let it sit out for 5-10 minutes before scooping. This allows it to soften just enough for easy serving.
Extra Creamy Texture: For an even creamier ice cream, try using an ice cream freezer bowl for your stand mixer instead of just a loaf pan.
Serving Suggestions
Your No Churn Salted Caramel Ice Cream is a showstopper on its own, but here are a few ideas to elevate your scooping experience:
Toppings: Serve with a drizzle of extra caramel sauce, a sprinkle of flaky sea salt, or even some crushed nuts for added texture.
Sundae Style: Create a sundae bar at your next gathering—it’s always a hit! Lay out toppings like whipped cream, cherries, and chocolate shavings.
Presentation Ideas: Serve in chilled bowls or waffle cones for that extra touch. A sprig of mint on top makes for a lovely garnish!
Variations & Substitutions
Flavor Combinations: Want to switch it up? Try chocolate fudge sauce or peanut butter. You could even incorporate crushed cookies or seasonal fruits like pumpkin or berries for fall or summer variations.
Dietary Restrictions: For a dairy-free option, you can substitute heavy cream with full-fat coconut cream and use a dairy-free condensed milk. Just remember the flavor will vary slightly!
Seasonal Variations: Add pumpkin spice in fall or peppermint extract during the holidays; the world is your oyster when it comes to flavors!
Nutrition & Storage Info
- Prep time: 15 minutes
- Cook time: 0 minutes (just freeze time)
- Total time: 5 hours (including freezing)
- Yield: 8 servings
- Estimated calories per serving: 250 calories
Storage Instructions: Keep it stored in an airtight container in the freezer. It lasts up to two weeks.
FAQ Section
Can I make this without heavy cream?
No, heavy cream is essential for achieving the soft and creamy texture of the ice cream.How can I make it lactose-free?
Substitute heavy cream with coconut cream and sweetened condensed milk with a dairy-free version.What’s the best method to scoop ice cream?
Run your scooper under hot water before dipping into the ice cream for easy scooping.Can I add mix-ins like chocolate chips?
Yes! Gently fold them in before the freezing step.How do I store leftovers?
Store in an airtight container in the freezer; it will keep for up to 2 weeks.Why did my ice cream turn icy?
This usually happens when there’s too much air incorporated or it wasn’t mixed well—be gentle when folding!What’s the main difference between churned and no churn?
Churned ice cream incorporates more air, making it lighter. No churn is denser but equally delicious.Can I use a hand mixer instead of a stand mixer?
Absolutely! Just be prepared for a bit more arm work.Can I make a smaller batch?
Yes! Simply half the ingredients to make a smaller amount.How can I make the caramel from scratch?
Melt sugar on low heat until it turns amber, then stir in butter and cream. Let cool before using.
Conclusion
This No Churn Salted Caramel Ice Cream recipe is special because it captures the essence of childhood memories, joy, and love—all wrapped up in a creamy, sweet, and salty dessert. I can’t wait for you to try it and hear how it turns out for you! Please let me know your thoughts in the comments, as well as any personal twists you add. For more delightful recipes that warm the heart, check out my blog for other delicious creations! Happy scooping!
No Churn Salted Caramel Ice Cream
- Total Time: 300 minutes
- Yield: 8 servings 1x
- Diet: Vegetarian
Description
A creamy, dreamy no churn salted caramel ice cream made with love and pure ingredients.
Ingredients
- 2 cups heavy whipping cream, cold
- 1 can sweetened condensed milk (14 oz)
- 1 teaspoon vanilla extract
- 1/4 teaspoon kosher salt
- 1 cup caramel sauce, homemade or store-bought
Instructions
- Chill your pan: Place a 9×5-inch loaf pan in the freezer to chill for at least 10 minutes.
- Whip the cream: In a stand mixer bowl, pour in 2 cups of cold heavy whipping cream and whip until stiff peaks form.
- Mix the base: Combine 1 can of sweetened condensed milk, 1 teaspoon vanilla extract, and 1/4 teaspoon kosher salt in a separate bowl. Fold in about 1 cup of the whipped cream.
- Combine mixtures: Gently fold the sweetened condensed milk mixture into the remaining whipped cream.
- Layer the mixture: Pour half of the mixture into your chilled loaf pan. Drizzle half of your caramel sauce over the top, then spoon the remaining mixture in followed by the rest of the caramel sauce.
- Swirl the caramel: Use a butter knife to gently swirl the caramel into the ice cream mixture.
- Chill to set: Cover the pan and freeze for at least 5 hours or until completely set.
Notes
Ensure the heavy cream and pan are very cold for best results. Store in an airtight container to prevent freezer burn.
- Prep Time: 15 minutes
- Cook Time: 0 minutes
- Category: Dessert
- Method: No Churn
- Cuisine: American
Nutrition
- Serving Size: 1 serving
- Calories: 250
- Sugar: 24g
- Sodium: 90mg
- Fat: 16g
- Saturated Fat: 10g
- Unsaturated Fat: 3g
- Trans Fat: 0g
- Carbohydrates: 29g
- Fiber: 0g
- Protein: 3g
- Cholesterol: 60mg
🥗 Free Custom Keto Meal Plan?
Do you want to lose weight while still enjoying delicious Asian & Thai Fusion meals? Take this quick quiz to get your personalized Keto plan based on your favorite foods!
- ✅ No more guessing what to eat
- ✅ Delicious & easy-to-make recipes
- ✅ Tailored to your body type
Get My Custom Plan Now! →
*Over 100,000+ people have transformed their lives with this quiz.