Delight in the Season: The Ultimate Christmas Fudge Recipe
Ah, the holidays! A time filled with the scents of pine, cinnamon, and that unmistakable aroma of chocolate wafting through the kitchen. I still remember the first time I made fudge during the season—I was just a kid, standing on a stool, stirring the creamy mixture in a pot while my mom prepared everything else for our family gathering. The joy of indulging in our homemade Christmas Fudge became a cherished tradition, bringing warmth, love, and laughter around the dinner table year after year. That’s why I’m excited to share with you my version of The Joy of Christmas Fudge, a treat that’s more than just sweets—it’s a slice of nostalgia.
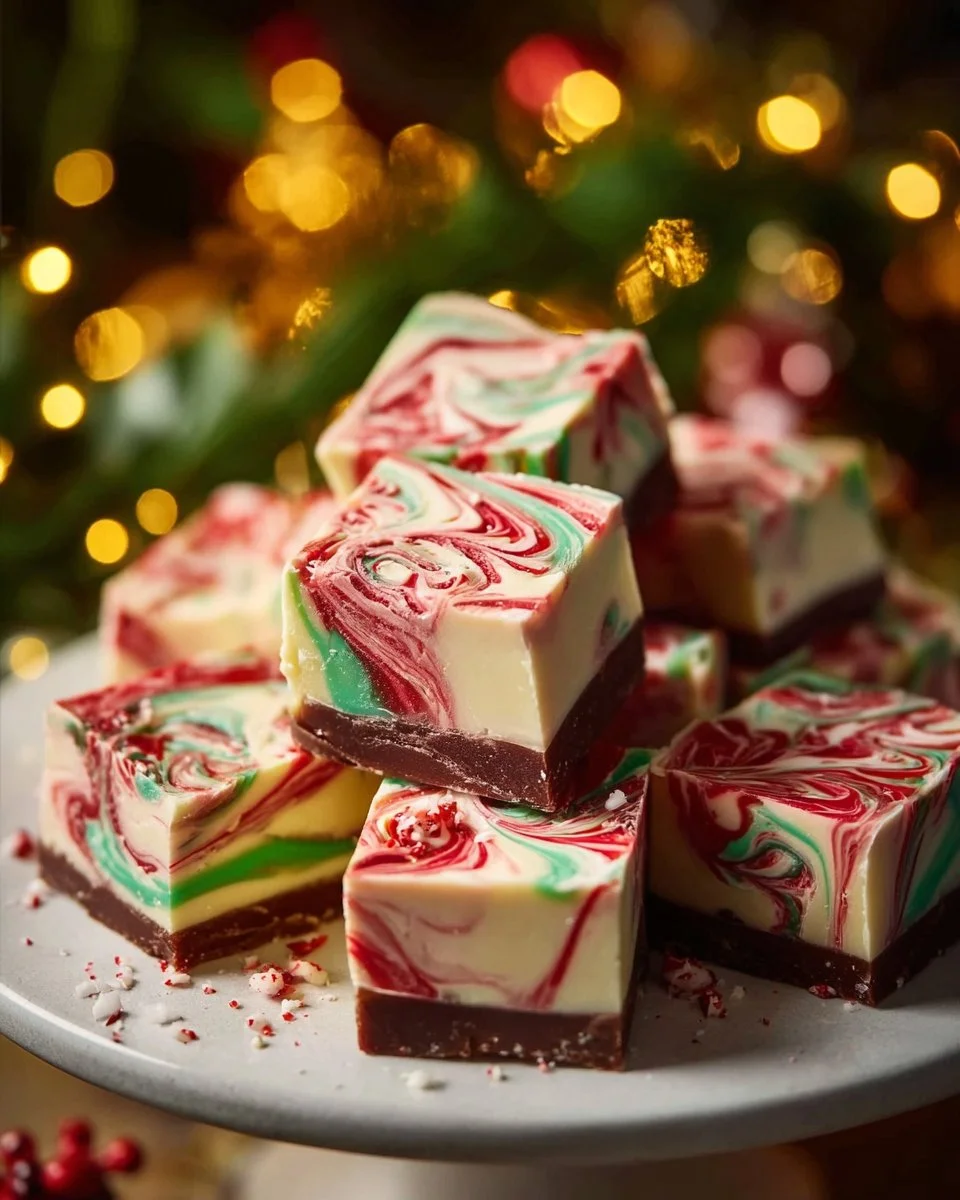
What makes this fudge special? Besides being utterly delightful, it’s super easy to whip up, requiring no fancy equipment or complicated techniques. Unlike many store-bought versions, my fudge delivers a creaminess that will melt in your mouth and leave you craving more. The vibrant swirls of red and green not only add a festive flair but also fill your heart with the spirit of the season. Plus, it’s customizable—so you can make it taste just the way you love! In this blog post, I promise to guide you step-by-step to create this holiday classic that might just turn into your new family tradition.
What Are The Joy of Christmas Fudge?
Originating in the cozy kitchens of home bakers, fudge has a rich history that spans generations. Traditionally made with simple ingredients, fudge can be made in various flavors, but there’s something magical about this holiday version. It combines creamy white chocolate with the sweetness of condensed milk, creating a luscious treat that sits between a soft candy and a silky dessert.
As far as taste and texture go, think of The Joy of Christmas Fudge as pure bliss: it’s rich, creamy, and velvety-smooth, giving your taste buds a delightful experience. Each bite melts in your mouth, allowing the sugary notes to captivate your senses. What truly sets this recipe apart is its easy customization—feel free to mix in your favorite nuts, extracts, or seasonal spices!
Make these luscious treats to celebrate any holiday gathering, gift them in festive packaging, or treat yourself during a cozy evening at home. The joy of creating and sharing this fudge embodies the warmth of the season, making it the perfect sweet to set the mood for any celebration.
Why You’ll Love This Recipe
1. Simplicity is Key
Let’s face it—nobody wants to spend the whole day in the kitchen, especially during the hectic holiday season. This fudge is a total breeze to make, requiring minimal effort and just a handful of ingredients. In less than an hour, you can have a delicious fudge ready to chill in your fridge!
2. Cost-Effective Delight
Have you ever checked how much gourmet fudge costs at specialty stores? It can be pricey! With just a few bucks for quality ingredients, you’ll whip up an entire batch that not only tastes better but is much gentler on your wallet.
3. Customization Galore
I love that this recipe is virtually a blank canvas! Want to spice things up? Add a dash of peppermint extract or fold in chopped nuts; the possibilities are endless. You’re in control, making it a delicious reflection of your personal tastes.
4. Healthier Than It Sounds
Unlike many overly sweet store-bought options, you can control the sugar level with homemade fudge. It’s made from simple ingredients, and you can even swap out white chocolate for dark or semisweet chocolate if you’re feeling bold.
5. Sharing Joy
This fudge makes an excellent gift! Package it in festive boxes or tins with a cute ribbon and share the love with friends and family. Everyone will rave about your homemade creations, bringing smiles to faces everywhere!
Ingredients Section
Essential Ingredients
- 3 cups white chocolate chips: Look for high-quality chocolate for the best flavor. I recommend Ghirardelli or Nestlé for a superb melt.
- 1 (14-ounce) can sweetened condensed milk: This creamy base is what gives the fudge its luscious texture.
- 1/2 teaspoon vanilla extract: Opt for pure vanilla for richer flavor; imitation won’t give you that warm, comforting taste.
- Red and green food coloring: These bright colors not only enhance the visual appeal but also make the fudge festive enough for the holiday season.
- 1/4 cup holiday sprinkles (optional): Who can resist a little sparkle? Add joy with festive sprinkles on top for decoration.
Prep Notes:
- Make sure your butter (if using) is at room temperature. This allows for an easier and smoother blend.
- Use quality chocolate chips for the best flavor and texture in your fudge.
Step-by-Step Instructions
Step 1: Prepare Your Dish
Line an 8×8-inch baking dish with parchment paper, allowing extra paper to hang over the sides for easy removal. This will ensure that your fudge lifts out easily once it’s set.
Step 2: Melt the Goodness
In a medium saucepan, combine the white chocolate chips and sweetened condensed milk over low heat. Stir constantly until completely melted and smooth, about 5-7 minutes.
Chef’s Tip: Resist the urge to crank the heat up! Low and slow is the secret to avoiding a grainy texture.
Step 3: Flavor it Up
Remove the saucepan from heat and stir in the vanilla extract for that comforting flavor punch.
Step 4: Color Your Fudge
Divide the melted mixture into three bowls. Tint one bowl with red food coloring and another with green, leaving the third bowl plain (white chocolate).
Visual Cue: Aim for vibrant colors—your fudge should look like a mini holiday wonderland!
Step 5: Layer with Love
Pour the red fudge mixture into the prepared pan, spreading it evenly. Layer the plain fudge on top, followed by the green fudge. Use a knife to gently swirl the layers together for a marbled effect.
Step 6: Sprinkle the Cheer
While the fudge is still warm, sprinkle holiday-themed sprinkles on top, if desired.
Step 7: Chill Out
Refrigerate for at least 2 hours, or until firm. Once set, lift the fudge out using the parchment paper and cut into small squares.
Expert Tips & Tricks
Ingredient Temperature: Make sure all ingredients are at room temperature for smooth incorporation.
Storage: The fudge can be stored in an airtight container at room temperature for a week, or in the fridge for up to two weeks.
Make Ahead: You can prepare your fudge ahead of time! Just keep it chilled until you’re ready to gift or serve.
Common Mistakes: Don’t rush the melting process! High heat can lead to clumpy fudge.
Fixing Problems: If your fudge turns out too hard, simply warm it slightly, add a splash more sweetened condensed milk, and re-stir.
Adding Flavor: Use flavored extracts like almond or mint for a fun twist to this classic recipe.
Serving Suggestions
The Joy of Christmas Fudge pairs beautifully with a warm cup of cocoa or coffee, adding a touch of sweetness to your cozy evenings. Presentation is everything—stack squares on a festive plate, drizzled with a bit of chocolate sauce, or package them in colorful boxes tied with cheerful ribbons for gifting. These fudgy delights are sure to bring smiles at any holiday gathering or as a last-minute thank you for hostesses!
Variations & Substitutions
- Flavor Combinations: Replace white chocolate chips with dark chocolate or try swirls of peanut butter for an extra layer of flavor.
- Dietary Adaptations: For vegan options, substitute with dairy-free chocolate chips and coconut cream for the sweetened condensed milk.
- Seasonal Variations: In the fall, you can add pumpkin spice; for Valentine’s, swap colors for pink and red!
Nutrition & Storage Info
- Prep Time: 15 minutes
- Cook Time: 10 minutes
- Total Time: 2 hours 25 minutes (includes chilling time)
- Yield: About 16 squares
- Estimated Calories: Approx. 150 calories per serving
- Storage Instructions: Store fudge at room temperature in an airtight container for up to 1 week or in the fridge for up to 2 weeks. You can freeze the fudge for up to 3 months—just ensure it’s wrapped well!
FAQ Section
Can I use milk chocolate instead?
Yes, but note that the texture will be a bit different—milk chocolate will create a sweeter fudge.What’s the best way to cut fudge?
Use a sharp knife and wipe it clean between cuts for neat squares.Can I add nuts?
Absolutely! Chopped nuts like walnuts or pecans can add a delightful crunch.What if it’s too soft?
Place the fudge back in the fridge to firm up. Make sure all ingredients were at the correct temperatures during mixing.How do I tell when the fudge is set?
It should be firm to the touch and hold its shape when cut.Can I use flavored chips?
Yes! Peppermint chips would be especially festive for the holidays.What kind of sprinkles should I use?
Stick with nonpareils or festive jimmies—just ensure they are vibrant and holiday-themed for the best presentation.Is this fudge gluten-free?
Yes! As long as your chocolate chips and other ingredients are gluten-free.How do I make it more chocolatey?
Add more chocolate chips or try a combination of milk and white chocolate for a richer taste.Can I make it in a different size pan?
Yes! Just adjust the baking time based on the thickness of your fudge.
Conclusion
In summary, The Joy of Christmas Fudge is not just a dessert—it’s a heartfelt creation that you can share with loved ones, filling your home with memories and cheer. This recipe is a celebration of simple pleasures, making your holidays a bit sweeter. I encourage you to give it a try, and please let me know how it turns out for you!
Don’t forget to check out other festive recipes on my blog—like peppermint bark or gingerbread cookies—to keep the holiday spirit alive. Happy baking!
Print
The Joy of Christmas Fudge
- Total Time: 145 minutes
- Yield: 16 squares 1x
- Diet: Vegetarian
Description
A delightful and easy recipe for creamy white chocolate fudge, perfect for holiday gatherings and gifting.
Ingredients
- 3 cups white chocolate chips
- 1 (14-ounce) can sweetened condensed milk
- 1/2 teaspoon vanilla extract
- Red and green food coloring
- 1/4 cup holiday sprinkles (optional)
Instructions
- Line an 8×8-inch baking dish with parchment paper.
- In a medium saucepan, combine the white chocolate chips and sweetened condensed milk over low heat, stirring constantly until melted and smooth, about 5-7 minutes.
- Remove from heat and stir in the vanilla extract.
- Divide the mixture into three bowls, tint one red and one green, leaving one plain.
- Pour the red fudge into the pan, then layer the plain and green fudge on top. Swirl with a knife for a marbled effect.
- Sprinkle with holiday sprinkles if desired.
- Refrigerate for at least 2 hours until firm, then cut into squares.
Notes
For best results, ensure all ingredients are at room temperature. Store in an airtight container at room temperature for a week or refrigerated for up to two weeks.
- Prep Time: 15 minutes
- Cook Time: 10 minutes
- Category: Dessert
- Method: No-Cook
- Cuisine: American
Nutrition
- Serving Size: 1 square
- Calories: 150
- Sugar: 20g
- Sodium: 50mg
- Fat: 8g
- Saturated Fat: 4g
- Unsaturated Fat: 3g
- Trans Fat: 0g
- Carbohydrates: 18g
- Fiber: 0g
- Protein: 2g
- Cholesterol: 10mg
🥗 Free Custom Keto Meal Plan?
Do you want to lose weight while still enjoying delicious Asian & Thai Fusion meals? Take this quick quiz to get your personalized Keto plan based on your favorite foods!
- ✅ No more guessing what to eat
- ✅ Delicious & easy-to-make recipes
- ✅ Tailored to your body type
Get My Custom Plan Now! →
*Over 100,000+ people have transformed their lives with this quiz.