Table of Contents
Table of Contents
Growing up, my weekends were often transformed into a cozy sanctuary filled with warmth, laughter, and the heavenly aroma of my grandmother’s kitchen. Among the various delights she crafted, her fruit piroshki held a special place in my heart. Every bite was a piece of love, wrapped in a golden pastry and bursting with the sweetness of homemade jam. My Fruit Piroshki Recipe is a tribute to those cherished memories, and I can promise you, these little parcels of joy are nothing short of extraordinary.
What sets my version apart from countless others is not just the delightful blend of flavors but also the tender, flaky texture that remains comforting yet refined. They remind me of family gatherings and holiday cheer, making them the perfect comfort food to share with loved ones. In this post, I’m thrilled to share my secrets with you—the ones that transformed ordinary ingredients into something truly magical. By the end, you’ll possess all the knowledge to craft these beauties yourself, warming your home with the delicious scent of baking fruit piroshki, and perhaps even sparking a delightful family tradition of your own.
What Are Fruit Piroshki?
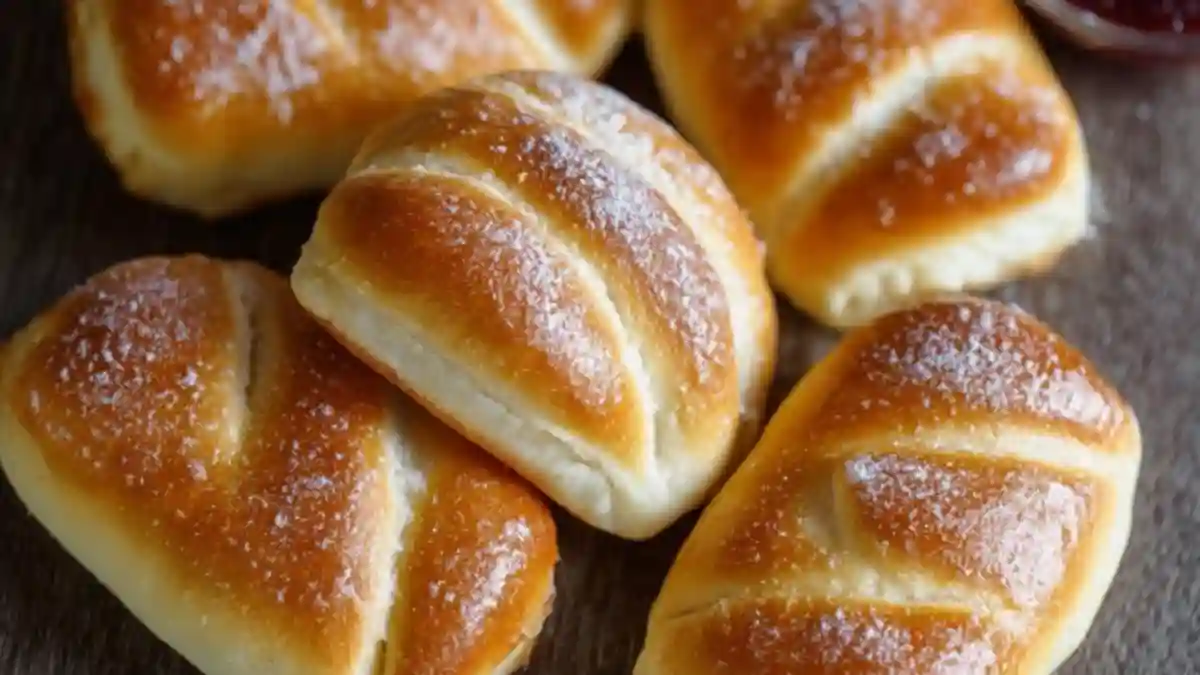
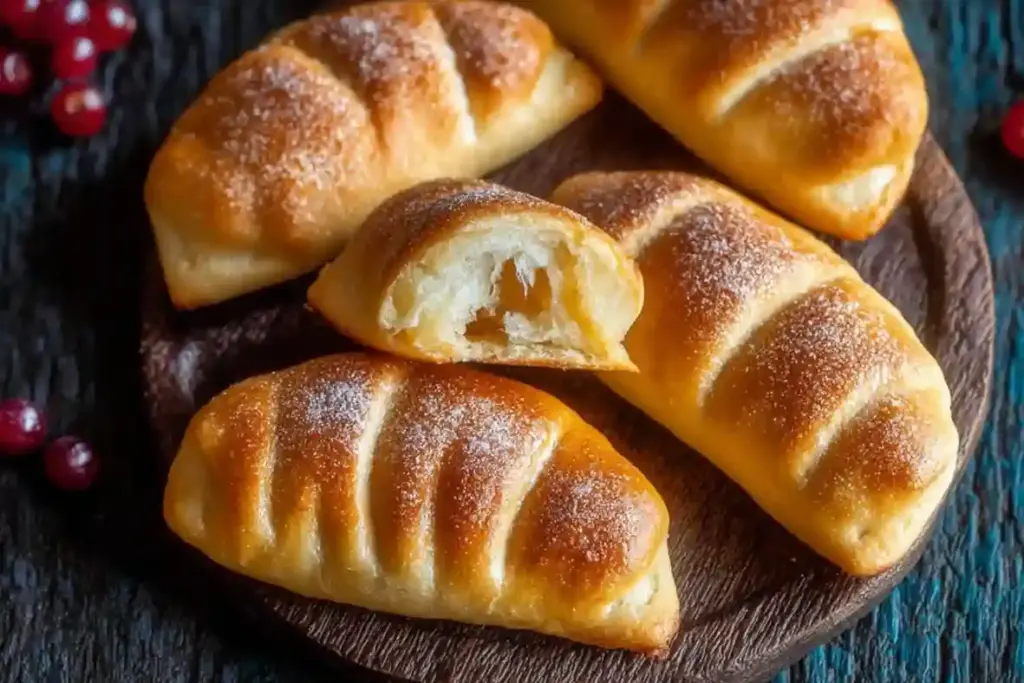
Fruit piroshki, often associated with Russian and Eastern European cuisines, are delightful little pastry pockets filled with fruit preserves or jams. Historically, these pastries were a way to preserve seasonal fruits, encapsulating them in dough for enjoyment throughout the year. Each bite offers a perfect contrast of textures—the flaky golden-brown crust yielding to a luscious, sweet filling.
What makes fruit piroshki unique is not just their flavor; it’s the nostalgia they evoke. Perfect for any occasion, be it a festive gathering or a quiet afternoon snack, these delightful pastries bring people together. Whether you enjoy them warm from the oven or at room temperature, fruit piroshki are best served with a side of family and friends sharing stories, laughter, and maybe even a cup of tea.
Why You’ll Love This Recipe
There are countless reasons to adore my fruit piroshki, and I can’t wait to share them with you:
- Irresistible Freshness: Unlike store-bought varieties, these piroshki are made with fresh ingredients, ensuring you savor every bite of delightful flavor without any preservatives.
- Customizable Filling: Whether you have a stash of homemade jam or store-bought options, you can choose any flavor that tickles your fancy—berry, peach, or even a mix of seasonal fruits.
- Cost-Effective Treat: Making fruit piroshki at home is surprisingly budget-friendly. With basic ingredients, you’ll save money while creating a delicious treat that beats any bakery price.
- Fun for Everyone: Get the whole family involved in the kitchen! Making piroshki can be a bonding experience—the kids will love filling and sealing the dough.
- Satisfyingly Simple: This recipe isn’t complicated; it takes some time, but the process itself is enjoyable. You’ll feel like a professional baker with minimal effort!
So, if you’re ready to elevate your baking repertoire and fill your home with the scent of freshly baked fruit piroshki, keep reading. I promise you, it’s an experience worth having!

Ingredients List
To create the ultimate fruit piroshki, you’ll need just a few simple ingredients. Here’s what I recommend:
For the Perfect Yeast Dough:
- 1 Perfect Yeast Dough: (Homemade or store-bought). Using fresh yeast or high-quality instant yeast makes a significant difference. I love using Red Star Yeast for a consistent rise.
For the Fruit Filling:
- 3 cups Jam: This is where you can let your creativity shine! Choose high-quality fruit preserves—homemade is best, but if you’re short on time, Bonne Maman makes excellent varieties.
For Glazing:
- 1 Egg (for brushing): Ensure it’s at room temperature for better mixing.
Tips on Quality:
Tip: The success of your fruit piroshki largely depends on ingredient quality. When selecting jam, opt for the fruit preserves made with real fruit and minimal additives.
Step-by-Step Instructions
Let’s dive into the exciting part! Here is a detailed guide to making fruit piroshki:
1. Prepare the Dough (about 1 hour)
- In a large mixing bowl, combine your Perfect Yeast Dough. Allow it to rise in a warm place until doubled in size, which typically takes about 1 hour.
2. Divide the Dough (10 minutes)
- Once the dough has risen, divide it into 24 equal pieces. The easiest way is by cutting the dough in half and continuing to divide until you have uniform pieces.
3. Shape the Piroshki (30 minutes)
- Roll out each piece into an oval shape, roughly 3 inches by 4 inches.
- Spoon about 1 tablespoon of jam onto one side of the oval. Fold the dough over to create a pocket, ensuring the filling is sealed inside.
- For extra flair, make minor cuts across the top of the piroshki to create a sliced effect.
4. Let Them Rise Again (30 minutes)
- Lay out the piroshki on a baking sheet lined with parchment paper. Cover them with a kitchen towel and allow them to rise in a warm place for at least 30 minutes.
5. Prepare to Bake (10 minutes)
- Preheat your oven to 350°F (175°C).
- Brush the tops of the piroshki with the whisked egg for a beautiful golden finish.
6. Baking Time (45 minutes)
- Bake for about 30-45 minutes, or until piroshki are beautifully golden brown. Keep a close eye on them!
7. Store Properly
- Once done, transfer to a cooling rack and, once completely cool, keep them in an airtight container. They can stay fresh for several days—though I doubt they’ll last that long!
Chef’s Tips:
- Timing is Key: The texture of your dough can change if you overwork it; knead just until smooth.
- Perfect Jam: Choose jams with low sugar content for a more authentic fruit flavor.
Expert Tips & Tricks
Want to elevate your fruit piroshki game? Here are some professional tips:
- Rest the Dough: If your dough is resistant while rolling, let it rest for 10 minutes to relax the gluten.
- No Jam? No Problem!: Substitute with fresh fruit or cream cheese for adventurous variations!
- Storage Magic: Keep piroshki in the fridge for up to 5 days or freeze for up to 3 months. They reheat beautifully.
- Fill to Taste: For adults, add a spoonful of fruit liqueur to the mix for a unique filling twist.
- Customize Shapes: Feel free to experiment with shapes. Try triangles or circles for a different presentation.
Serving Suggestions
Serve your fruit piroshki warm or at room temperature, paired beautifully with a dollop of whipped cream or a scoop of vanilla ice cream. Perfect for brunch gatherings, festive celebrations, or simply as a delightful afternoon treat! To add some flair, lay them out on a pretty platter with fresh fruit or edible flowers for that Instagram-ready moment!
Variations & Substitutions
Not a fan of fruit jams? No problem! Here are some delightful variations to try:
- Savory Piroshki: Fill with cheese and herbs for a savory twist.
- Seasonal Spices: Add cinnamon or nutmeg to your filling for a festive touch in the fall.
- Diet-Friendly Options: Use gluten-free flour or alternative sweeteners for a healthier option while still enjoying every bite.
Nutrition & Storage Info
- Prep Time: 1 hour
- Cook Time: 45 minutes
- Total Time: About 1 hour 50 minutes
- Yield: About 24 piroshki
- Estimated Calories: Approximately 150 calories per piroshki
- Storage: Store at room temperature for up to 2 days, or in the fridge for 5 days, and freeze up to 3 months.
FAQ Section
- Can I freeze uncooked piroshki?
- Yes! Assemble the piroshki, but freeze before the second rise. Bake straight from frozen, adding a few extra minutes to the baking time.
- What type of filling can I use?
- The options are endless! Feel free to get creative—sweet cheese, chocolate, or even savory fillings work beautifully.
- Do I have to use homemade jam?
- While homemade is always best, high-quality store-bought jam can be a fantastic shortcut.
- Can I use alternative flours for the dough?
- Yes, but ensure you find a gluten-free flour blend designed for yeast recipes for the best results.
- How can I tell when the piroshki are done baking?
- Look for a golden-brown color and a light crust. Tap the bottom; it should sound hollow when baked perfectly!
- What if my dough isn’t rising?
- Ensure your yeast is fresh and your environment is warm. A draft-free area helps the dough rise properly.
- Can I make the dough ahead of time?
- Absolutely! Prepare it the night before and store it in the fridge, covered tightly. Just bring it back to room temperature before usage.
- What’s the best way to reheat piroshki?
- The oven is the best! Preheat to 350°F and warm for about 10-15 minutes until heated through.
- Do I have to use egg for the glaze?
- If you wish to keep it vegan, feel free to skip the egg wash or use a plant-based milk alternative for a light touch.
- Are these piroshki suitable for kids?
- Totally! They make for a great snack or lunchbox treat and can be filled with whatever flavors your kids love!
Conclusion
In conclusion, my Fruit Piroshki Recipe is all about love, warmth, and delicious home-cooked joy! With each bite, you’ll feel the comforts of home and the excitement of sharing these delightful pastries with those you care about most. I encourage you to dive into this baking adventure—your family and friends will be begging for more!
I’d love to hear about your experiences making these piroshki! Please leave a comment below, sharing your favorite jams or any unique adaptations you’ve tried. And don’t forget to explore more delightful recipes on my blog—let’s keep this food journey rolling together!
Heavenly Better Than Anything Bars
Raspberry Cheesecake Crescent Ring
Happy baking!
Print
Homemade Fruit Piroshki
- Total Time: 2 hours 30 minutes
- Yield: 12 piroshki
- Diet: Vegetarian
Description
Traditional Russian hand pies with a sweet fruit filling encased in tender, slightly sweet yeast dough. These golden-brown pastries are perfect for breakfast, dessert, or tea time.
Ingredients
For the Perfect Yeast Dough:
- 1 Perfect Yeast Dough: (Homemade or store-bought).
For the Fruit Filling:
- 3 cups Jam: This is where you can let your creativity shine! Choose high-quality fruit preserves
For Glazing:
- 1 Egg (for brushing): Ensure it’s at room temperature for better mixing.
Instructions
1. Prepare the Dough (about 1 hour)
- In a large mixing bowl, combine your Perfect Yeast Dough. Allow it to rise in a warm place until doubled in size, which typically takes about 1 hour.
2. Divide the Dough (10 minutes)
- Once the dough has risen, divide it into 24 equal pieces. The easiest way is by cutting the dough in half and continuing to divide until you have uniform pieces.
3. Shape the Piroshki (30 minutes)
- Roll out each piece into an oval shape, roughly 3 inches by 4 inches.
- Spoon about 1 tablespoon of jam onto one side of the oval. Fold the dough over to create a pocket, ensuring the filling is sealed inside.
- For extra flair, make minor cuts across the top of the piroshki to create a sliced effect.
4. Let Them Rise Again (30 minutes)
- Lay out the piroshki on a baking sheet lined with parchment paper. Cover them with a kitchen towel and allow them to rise in a warm place for at least 30 minutes.
5. Prepare to Bake (10 minutes)
- Preheat your oven to 350°F (175°C).
- Brush the tops of the piroshki with the whisked egg for a beautiful golden finish.
6. Baking Time (45 minutes)
- Bake for about 30-45 minutes, or until piroshki are beautifully golden brown. Keep a close eye on them!
7. Store Properly
- Once done, transfer to a cooling rack and, once completely cool, keep them in an airtight container. They can stay fresh for several days—though I doubt they’ll last that long!
Notes
Dough can be refrigerated overnight for slow rise (bring to room temperature before shaping).,Use thick jam or preserves as quick filling alternative.,For shiny finish, brush with simple syrup after baking.,Best eaten same day but can be frozen for up to 1 month.
- Prep Time: 30 minutes (plus rising)
- Cook Time: 18 minutes
- Category: Pastry
- Method: Baking
- Cuisine: Russian
Nutrition
- Serving Size: 1 piroshki
- Calories: 210
- Sugar: 12g
- Sodium: 210mg
- Fat: 5g
- Saturated Fat: 3g
- Unsaturated Fat: undefined
- Trans Fat: undefined
- Carbohydrates: 36g
- Fiber: 1g
- Protein: 4g
- Cholesterol: 30mg
Ask the Community
🥗 Free Custom Keto Meal Plan?
Do you want to lose weight while still enjoying delicious Asian & Thai Fusion meals? Take this quick quiz to get your personalized Keto plan based on your favorite foods!
- ✅ No more guessing what to eat
- ✅ Delicious & easy-to-make recipes
- ✅ Tailored to your body type
Get My Custom Plan Now! →
*Over 100,000+ people have transformed their lives with this quiz.