The Ultimate Dutch Baby Pancake: A Deliciously Fluffy Breakfast Delight
Introduction
I still remember the first time I made a Dutch Baby Pancake. It was a lazy Sunday morning, and I felt that urge to whip up something special for my family. I stumbled across this delightful recipe and, let me tell you, it did not disappoint! The kitchen filled with an irresistible aroma as the pancake puffed up in the oven, creating a golden, airy masterpiece that looked almost too beautiful to eat. What makes Dutch Baby Pancakes so absolutely special is their dramatic rise, delicate texture, and the welcoming embrace of flavors that marry beautifully with fresh fruit and syrup. Unlike other pancake recipes that can be heavy or dense, this one offers a light and airy experience that makes breakfast feel like a treat, not just a meal.
Dutch Baby Pancakes evoke comfort and joy, reminding me of family breakfasts spent around the table, swapping stories and laughter. The feeling of sharing this indulgent creation with loved ones is something that warms my heart. In this post, I promise to turn you into a Dutch Baby expert, guiding you through every step of the process, along with tips and tricks that will ensure this dish becomes a staple in your home, just like it has in mine!
What Are Dutch Baby Pancakes?
Dutch Baby Pancakes have an intriguing origin that dates back to the 19th century. Despite the name, they aren’t Dutch but rather a German creation called "pfannkuchen." The unique name “Dutch Baby” comes from an American connection to the Dutch immigrants who settled in Pennsylvania. This pancake is a custardy delight cooked in a skillet, puffing up dramatically in the oven and creating a wonderfully airy texture that’s both crispy and soft.
In terms of taste, think of a sweet, eggy crepe that brings a delightful mixture of flavors with every bite. The outer edge gets beautifully golden brown and crispy, while the inside remains light and fluffy. They are perfect for any occasion—whether it’s a cheerful brunch, a special breakfast, or a cozy holiday morning. You’ll want to make this pancake not just once, but repeatedly, as it continues to impress and delight every time!
Why You’ll Love This Recipe
1. Effortless Elegance
This Dutch Baby Pancake is surprisingly easy to make, with minimal ingredients and time involved. You can whip it up while still in your pajamas, making it a perfect choice for a cozy weekend morning.
2. Cost-Effective
Skip the overpriced brunch spots and enjoy a restaurant-quality dish at home. You’ll only need a few pantry staples—eggs, milk, flour, and butter—to create this culinary masterpiece without breaking the bank.
3. Customizable Excellence
One of the best things about a Dutch Baby Pancake is its versatility. Whether you want to top it with fresh berries, homemade compote, or a dusting of powdered sugar, the sky’s the limit. You can make it seasonal, adding spices like cinnamon in the fall or fresh peaches in the summer.
4. A Showstopper
When you pull this beauty out of the oven, your family and friends won’t believe their eyes! It’s an impressive dish that will definitely earn you culinary bragging rights—just wait for the "oohs" and "aahs" when you serve it.
5. Low Difficulty, High Reward
Even if you’re a beginner baker, this recipe is incredibly straightforward. You’ll enjoy the satisfaction of mastering something that looks complex but comes together quickly and deliciously.
Ingredients
To make your Dutch Baby Pancake, gather the following ingredients:
- 3 large eggs: Room temperature eggs create a fluffier pancake, so aim for that!
- 3/4 cup milk: Whole milk yields the creamiest results, but you can substitute almond or oat milk for dairy-free options.
- 3/4 cup all-purpose flour: All-purpose works like a charm, but feel free to explore gluten-free options if needed.
- 1/4 teaspoon salt: Enhances flavor—don’t skip it!
- 2 tablespoons unsalted butter: Use high-quality butter for rich flavor; I recommend European brands like Kerrygold.
- Maple syrup: The finishing touch—that glorious drizzling sweetness!
- Whipped cream: Homemade is best, but store-bought saves time!
- Fresh fruit: Berries or sliced bananas work beautifully. Seasonal fruits add a lovely touch!
Prep Notes
- Ensure your butter is at room temperature for easy melting.
- For best results, you can even let your eggs and milk sit out for about 20-30 minutes before mixing; this helps the pancake rise even more!
Step-by-Step Instructions
Preheat the oven: Set your oven to 425°F (220°C) to get everything nice and hot in preparation for baking.
Blend the batter: In a blender, combine the eggs, milk, flour, and salt; blend until smooth. This should take about 30 seconds to 1 minute. Make sure there are no lumps!
Melt the butter: In a cast-iron skillet over medium heat, melt the butter until bubbly. Swirl the pan to ensure the entire surface is coated in the melted butter.
Pour the batter: Quickly pour the blended batter into the skillet over the melted butter. Don’t worry if it swirls a bit; that’s part of the charm!
Bake it: Transfer the skillet to the preheated oven and bake for 20-25 minutes, or until the pancake is puffed up and a beautiful golden brown. Keep an eye on it as it bakes; it should rise impressively!
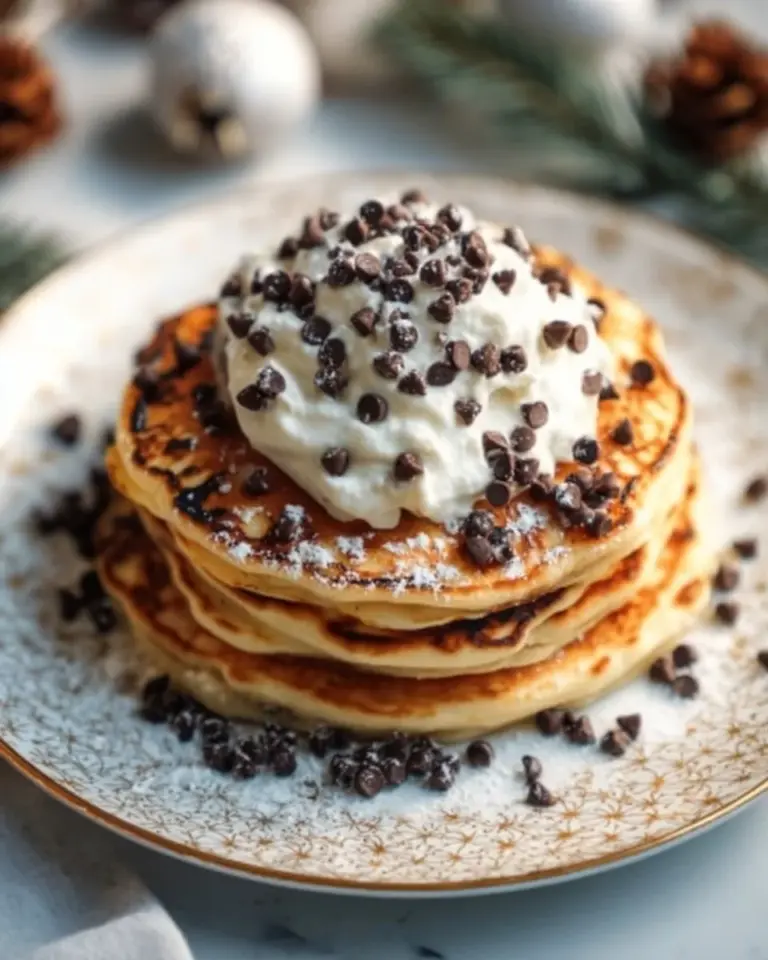
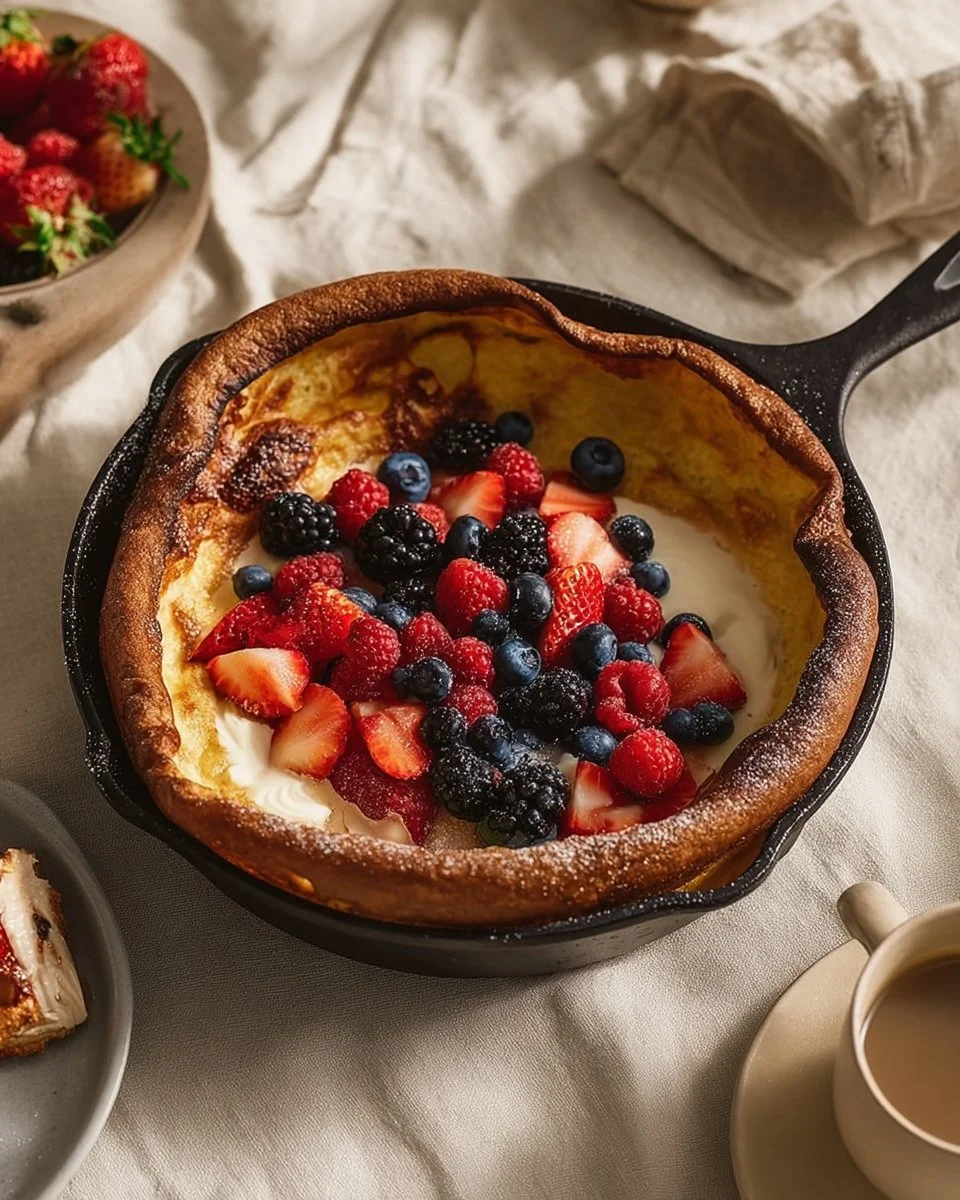
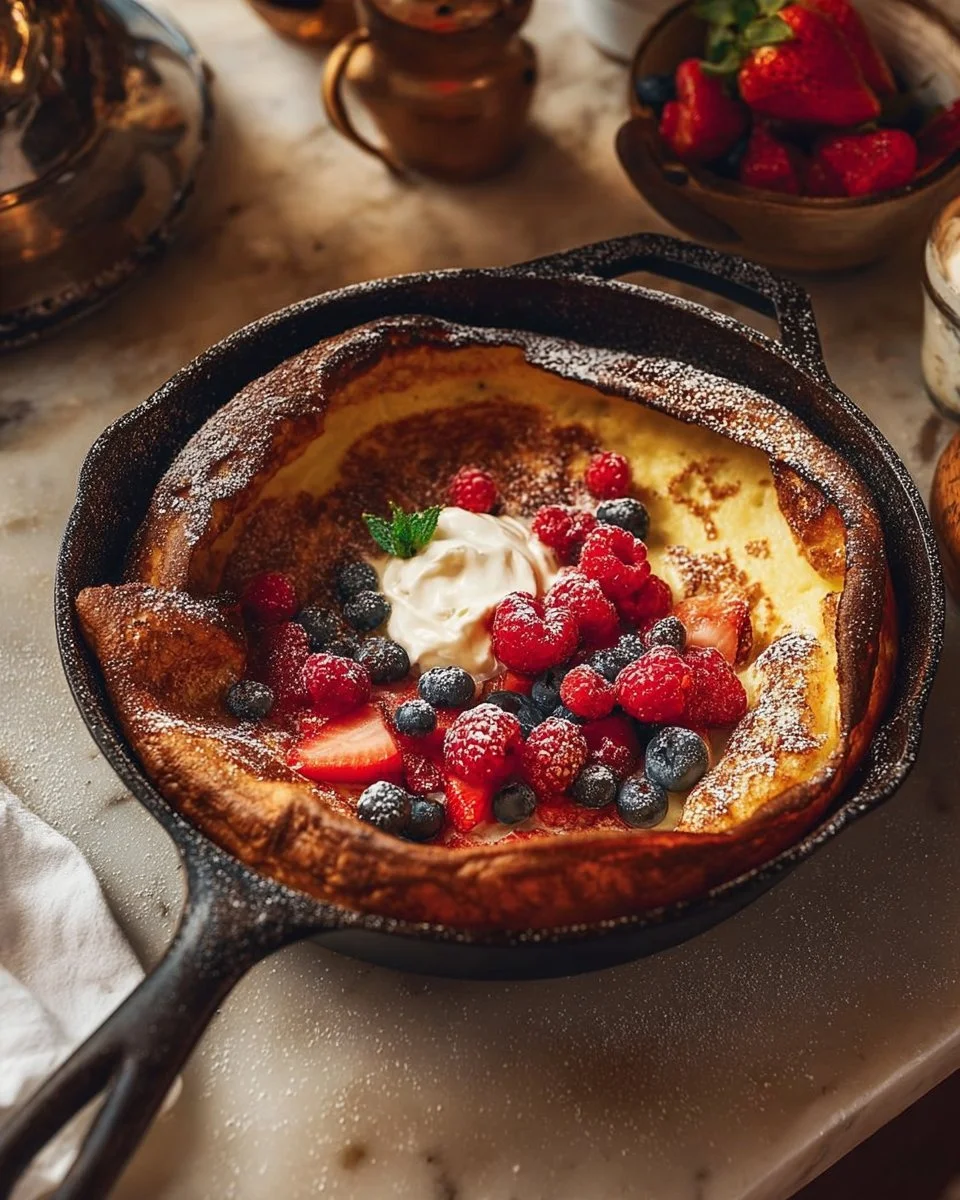
Serve immediately: Remove from the oven carefully. Top with maple syrup, a fluffy dollop of whipped cream, and an assortment of fresh fruits. Serve right away to enjoy its puffed and airy glory!
Chef’s Tips
- Avoid opening the oven while it’s baking; this can cause the pancake to deflate.
- If you don’t have a cast-iron skillet, a regular oven-safe pan works too, but a cast-iron pan gives it a special crunch.
- For added flavor, whisk in a teaspoon of vanilla extract to the batter!
Expert Tips & Tricks
Storage Recommendations: Unfortunately, Dutch Baby Pancakes do not store well as they tend to deflate. Enjoy them freshly baked!
Make-Ahead Instructions: You can prepare the batter ahead of time and refrigerate it for a few hours. Just give it a quick blend before pouring it into the skillet.
Troubleshooting: If your pancake doesn’t rise, make sure your oven was fully preheated, and check your baking powder for potency (if using).
Richer Flavor: For an irresistible buttery flavor, use brown butter instead of regular butter.
Add-ins: Consider adding a pinch of cinnamon or nutmeg for an extra hint of warmth.
Alternative Toppings: Try a dollop of mascarpone cheese with a sprinkle of lemon zest for a delightful twist.
Serving Suggestions
Dutch Baby Pancakes shine best when served fresh out of the oven. Pair yours with a side of crispy bacon or sausage for that classic breakfast combo. A sprinkle of powdered sugar and fresh mint on top creates a beautiful presentation, perfect for special occasions or brunch gatherings. Serve on a vibrant plate, and don’t forget to capture the “ooh” moments before everyone digs in!
Variations & Substitutions
- Berry-licious: Toss in a half cup of blueberries or raspberries directly into the batter before baking for added flavor.
- Spiced Apple: Sauté sliced apples with cinnamon and sugar for a warm topping.
- Chocolate Lovers: Mix in mini chocolate chips to the batter for an indulgent treat.
- Dairy-Free/Dietary Needs: Substitute the milk with nut milk and the butter with a plant-based alternative.
Nutrition & Storage Info
- Prep Time: 10 minutes
- Cook Time: 25 minutes
- Total Time: 35 minutes
- Yield: Serves 4
- Estimated calories per serving: ~220 calories
- Storage Instructions: Best enjoyed fresh, but can be stored in an airtight container in the fridge for up to 2 days.
- Freezing: Not recommended, as texture quality declines after freezing.
FAQ Section
Can I make this recipe in advance?
It’s best to enjoy this pancake fresh, but the batter can be made ahead of time and stored in the fridge for a few hours.Is this pancake gluten-free?
You can use a gluten-free all-purpose blend as a substitute for the flour to make it gluten-free.Why did my Dutch Baby not puff up?
Make sure your oven is at the correct temperature when you bake it; opening the oven door can also cause it to deflate.Can I use a regular skillet instead of cast iron?
Yes, any oven-safe skillet can work, but cast-iron gives it a unique texture and flavor.What toppings do you recommend?
Maple syrup, fresh fruits, whipped cream, or even a sprinkle of powdered sugar work wonders to enhance the flavors.Can I add chocolate chips?
Absolutely! Mini chocolate chips are a delightful addition to the batter for those who enjoy a sweet twist.Is there a vegan version?
You can make it vegan by using flax eggs and plant-based milk and butter.How do I serve leftovers?
While it’s best fresh, you can reheat leftovers in a toaster oven or microwave, though the texture will change.Can I double the recipe?
Yes! Just ensure your skillet is large enough, or bake in two pans simultaneously.How do I know when it’s done baking?
It’s done when it’s puffed up and golden brown, and you will notice it’s firm to the touch in the center.
Conclusion
This Dutch Baby Pancake is not just a recipe; it’s a canvas for creativity, connection, and joyful moments spent with loved ones. With its easy preparation and impressive presentation, it’s bound to become a beloved staple in your kitchen. I encourage you to give it a try and, once you do, please come back and share your experience with me – I love hearing how others enjoy it! Don’t forget to check out my other breakfast recipes on the blog for more inspiration. Happy baking!

The Ultimate Dutch Baby Pancake
- Total Time: 35 minutes
- Yield: 4 servings 1x
- Diet: Vegetarian
Description
A delightfully fluffy breakfast treat that puffs up beautifully in the oven, perfect for a cozy family brunch.
Ingredients
- 3 large eggs
- 3/4 cup milk
- 3/4 cup all-purpose flour
- 1/4 teaspoon salt
- 2 tablespoons unsalted butter
- Maple syrup
- Whipped cream
- Fresh fruit (berries or sliced bananas)
Instructions
- Preheat the oven to 425°F (220°C).
- In a blender, combine the eggs, milk, flour, and salt; blend until smooth.
- Melt the butter in a cast-iron skillet over medium heat until bubbly.
- Pour the blended batter into the skillet over the melted butter.
- Bake in the preheated oven for 20-25 minutes or until puffed and golden brown.
- Serve immediately with maple syrup, whipped cream, and fresh fruits.
Notes
Serve fresh for the best texture. You can prepare the batter ahead of time, but it’s best to bake and enjoy it right away.
- Prep Time: 10 minutes
- Cook Time: 25 minutes
- Category: Breakfast
- Method: Baking
- Cuisine: German
Nutrition
- Serving Size: 1 serving
- Calories: 220
- Sugar: 5g
- Sodium: 200mg
- Fat: 10g
- Saturated Fat: 4g
- Unsaturated Fat: 6g
- Trans Fat: 0g
- Carbohydrates: 30g
- Fiber: 1g
- Protein: 7g
- Cholesterol: 150mg
🥗 Free Custom Keto Meal Plan?
Do you want to lose weight while still enjoying delicious Asian & Thai Fusion meals? Take this quick quiz to get your personalized Keto plan based on your favorite foods!
- ✅ No more guessing what to eat
- ✅ Delicious & easy-to-make recipes
- ✅ Tailored to your body type
Get My Custom Plan Now! →
*Over 100,000+ people have transformed their lives with this quiz.