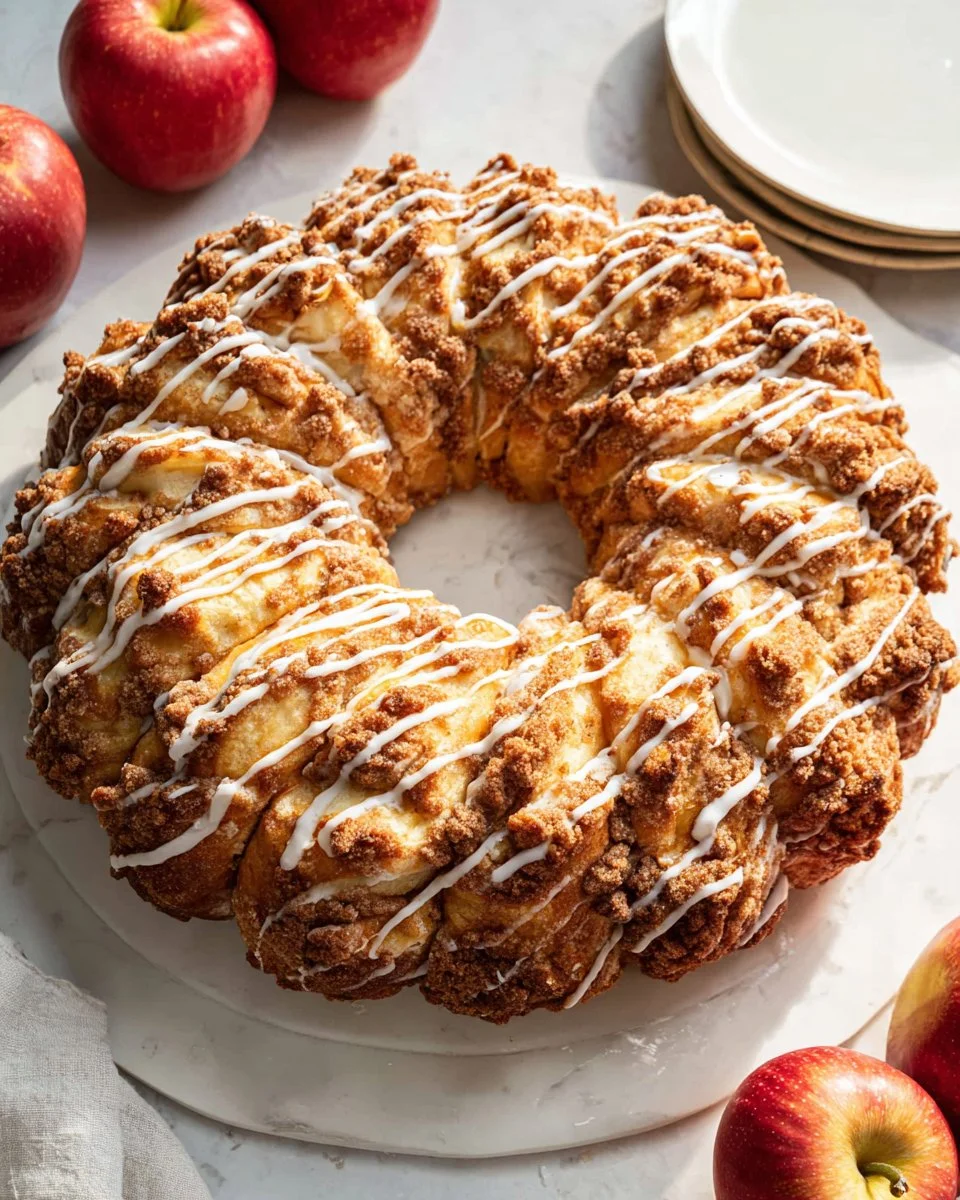
Irresistible Apple Pie Bomb Wreath: A Sweet Family Tradition
I still remember the first time I made an Apple Pie Bomb Wreath. It was a chilly autumn afternoon, the air filled with the scent of cinnamon and freshly carved pumpkins. I had invited my family over for a cozy get-together, and I wanted to create something truly special for them. As I pulled this stunning wreath out of the oven, my heart swelled with pride at the sight of golden-brown rolls glistening with warm apple pie filling. Each bite was a nostalgic journey back to my grandmother’s kitchen, where her homemade apple pies filled the air with warmth and love. What makes this recipe even more special is the way it transforms simple ingredients into a breathtaking centerpiece. Unlike other desserts that can feel heavy or overly sweet, this dreamy wreath strikes the perfect balance of flavors, making it the ultimate comfort food.
Today, I’m excited to share my cherished recipe with you. From effortless preparation to scrumptious taste, I promise you’re going to learn how to create a showstopper that your family will request year after year.
What Are Apple Pie Bomb Wreaths?
The magic of Apple Pie Bomb Wreaths lies in their warm, comforting flavor and inviting aroma. Originating from a blend of classic apple pie and pull-apart bread, this recipe has become a beloved family favorite. Imagine tender, fluffy rolls filled with luscious homemade or store-bought apple pie filling, all beautifully braided into a wreath shape. Each bite delivers delight—crispy on the outside and pillowy-soft within, with a sweet and cinnamon-kissed apple surprise at its core.
These delightful treats are perfect for family gatherings, seasonal celebrations, or just because you deserve a cozy night in. Whether for Thanksgiving, Christmas, or a simple Sunday brunch, this wreath is guaranteed to impress your guests and elicit smiles from every face in the room.
Why You’ll Love This Recipe
Unparalleled Taste Experience: Unlike mass-produced pies, the combination of soft dough with spiced apple filling is truly a delight. The comforting flavors dance on your taste buds, giving you that homestyle feel we all crave.
Cost-Effective Indulgence: This recipe is budget-friendly, allowing you to create a bakery-quality treat at a fraction of the cost. With just a few simple ingredients, you can whip up a stunning centerpiece without breaking the bank.
Customizable Galore: Whether you prefer a classic apple pie filling or want to throw in some caramel or nuts, this recipe adapts to your taste. You can even use different fruits to suit the season, like peaches or cherries!
Easy-to-Follow Steps: You’ll find this recipe simple enough for a baking novice but impressive enough to wow even seasoned bakers. The process is straightforward and broken down into easy steps.
Timeless Memories: This recipe is about more than just delicious flavors; it’s about creating memories with loved ones. Like I did on that fateful autumn afternoon, you’ll create a warm atmosphere filled with laughter and joy.
You’ll be surprised at how simple it is to make your very own Apple Pie Bomb Wreath and the love it spreads in your home!
Ingredients Section

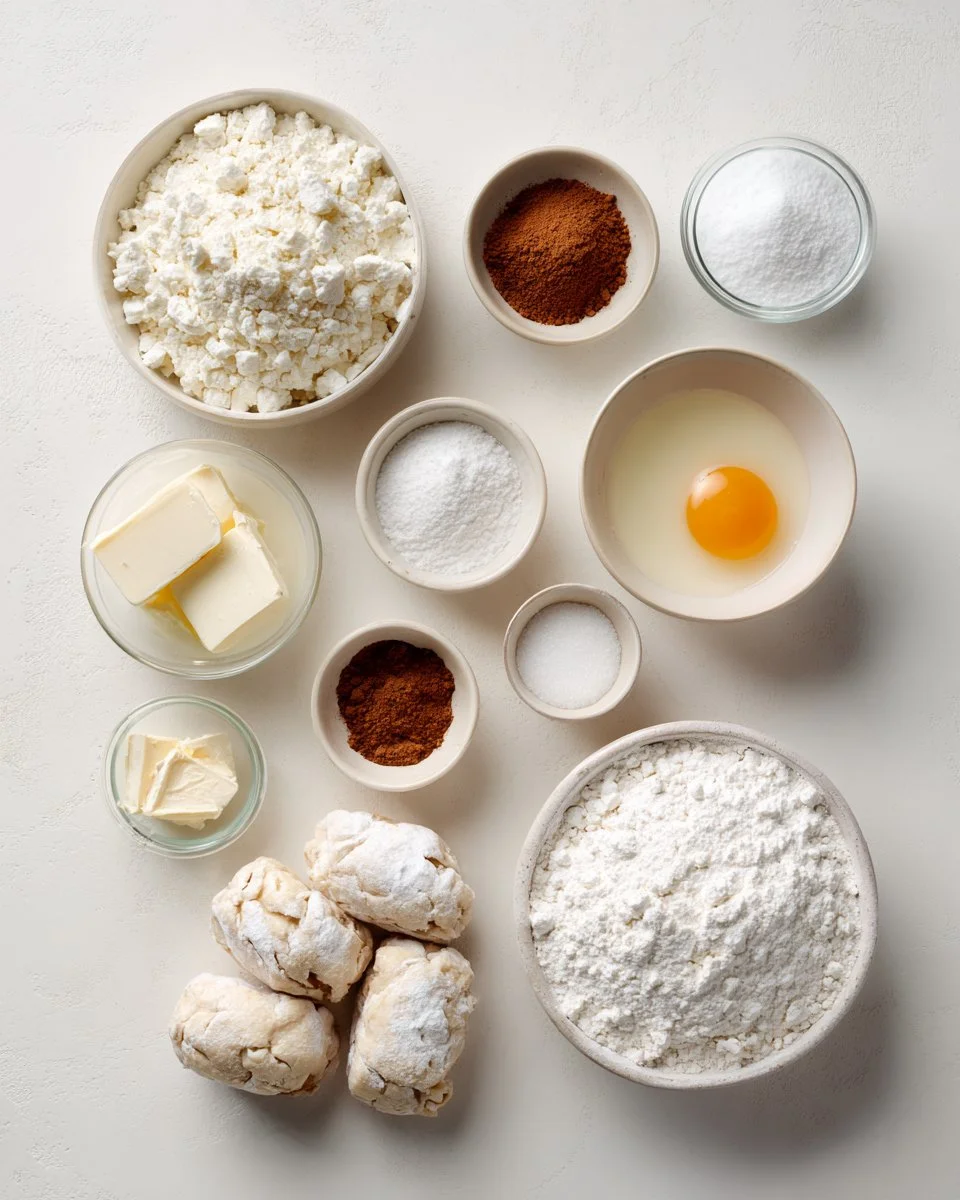
- 25 frozen Rhodes rolls: Always ensure they’re thawed and at room temperature for the best texture.
- 1 recipe homemade apple pie filling or 1 can (21 ounces) store-bought, chopped, divided: For a touching homemade taste, I recommend using apples like Granny Smith for their tartness.
- 1 large egg, beaten: This will give your wreath a beautiful golden color.
- 1 cup all-purpose flour: Essential for your streusel topping.
- ½ cup light brown sugar, packed: Gives a wonderful depth of flavor.
- 1 teaspoon ground cinnamon: A must-have for that comforting warmth.
- ½ teaspoon kosher salt: Enhances the sweetness.
- ½ cup unsalted butter, melted: Always melt it down for the topping; it’s key for that rich flavor.
- 1 cup confectioners’ sugar: For that luscious glaze.
- 2 tablespoons whole milk: To create a smooth and easy-to-pour glaze.
Prep Notes: Make sure your butter is almost room temperature for ease of mixing, and let your Rhodes rolls thaw in the refrigerator overnight for a seamless baking morning!
Step-by-Step Instructions
Thaw the Rolls: Start by removing the Rhodes rolls from the package and placing them onto a large, greased baking sheet. Cover them with greased plastic wrap—this will keep them nice and moist as they thaw. You can either let them sit at room temperature to rise or allow them to thaw gently in the fridge overnight.
Preheat the Oven: Preheat your oven to 375°F (190°C) while the rolls are thawing.
Prepare the Dough: Once thawed, flatten each roll to about 3 inches wide using your hands.
Add the Filling: Add 1 tablespoon of apple pie filling to the center of each flattened roll. Then carefully wrap the dough around the filling, pinching the edges to completely seal in that delicious goodness.
Form the Wreath: Arrange the filled dough balls in a circular pattern on a parchment-lined baking sheet, creating a wreath shape.
Brush with Egg: Gently brush the tops of the rolls with the beaten egg for a beautiful golden finish.
Make the Streusel Topping: In a medium bowl, combine flour, brown sugar, cinnamon, and salt. Pour in the molten butter and mix until crumbly.
Sprinkle and Bake: Sprinkle the streusel mixture over the arranged rolls. Bake for 30-34 minutes, or until golden brown and fragrant.
Prepare the Glaze: While it’s baking, whisk together the confectioners’ sugar and milk in a small bowl until smooth.
Glaze the Wreath: Once the wreath is baked and golden, let it cool slightly before drizzling your delicious glaze over it. Let it cool slightly again before serving, and enjoy the wafting scent of cozy autumn days!
Chef’s Tips
- Avoid over-filling your rolls, as this will make sealing them tricky!
- For extra flavor, add a pinch of nutmeg to your apple filling.
- Make sure to store any leftovers in an airtight container where they’ll last.
Expert Tips & Tricks
Use Fresh Ingredients: Using high-quality butter and fresh spices can elevate your flavor profile.
Storage Recommendations: Leftovers can be stored at room temperature tightly wrapped for up to 2 days. For longer storage, you can freeze individual pieces wrapped in plastic wrap for up to a month.
Make-Ahead Instructions: Prepare the wreath up to the baking step, cover with plastic wrap, and refrigerate overnight. Simply let it sit at room temperature for about 30 minutes before baking the following day.
Troubleshooting Common Problems: If your rolls are dense or undercooked, they may not be thawed adequately. Make adjustments with thawing time next time!
Presentation Tips: Dust with a little extra powdered sugar before serving for that professional touch!
Serving Suggestions
This warm and sweet Apple Pie Bomb Wreath pairs perfectly with a cup of coffee or a tall glass of fresh apple cider. You could serve it alongside a scoop of vanilla ice cream for an indulgent treat! For presentation, serve it on a rustic wooden board or a festive cake stand to impress your guests. It’s perfect for brunch gatherings or as a sweet surprise at holiday parties.
Variations & Substitutions
- Flavor Combinations: Swap out the apple pie filling for peach or cherry filling to cater to different tastes.
- Dietary Adaptations: For a gluten-free version, use gluten-free dough and flour. Vegan friends? Substitute butter with coconut oil or a plant-based butter alternative and use almond milk instead of regular milk!
- Seasonal Variations: For a fall-inspired twist, incorporate pumpkin puree mixed with the apple filling or sprinkle some caramel on top.
Nutrition & Storage Info
- Prep Time: 30 minutes
- Cook Time: 30-34 minutes
- Total Time: Approximately 1 hour
- Yield: 10-12 servings
- Estimated Calories: About 300 calories per serving
- Storage Instructions: Best stored at room temperature for up to 2 days or frozen for up to a month!
FAQ Section
Can I use other fruits for filling?
- Yes, you can definitely mix it up with other fruits like blueberries, peaches, or cranberries!
Can I prepare this without freezing the rolls?
- Yes, you can use fresh dough as a base, adjusting baking time accordingly.
How do I prevent the filling from leaking?
- Be sure to pinch the dough edges tightly to seal, and avoid overfilling.
Is the glaze necessary?
- The glaze adds a beautiful sweetness and shine, but you can serve the bread without it if you prefer!
Can this be made in advance?
- Absolutely! Prepare it up to the baking step and refrigerate overnight.
What can I serve with it?
- Pair it with coffee, tea, or ice cream for a delightful experience.
What’s the best way to reheat leftovers?
- Heat them in the microwave for 15-20 seconds or warm them in the oven at 350°F.
How long will the wreath last?
- Leftovers are best enjoyed within 1-2 days, but they can be frozen as well.
Can I make mini wreaths?
- Yes! Just scale down the size of your dough balls and adjust the baking time accordingly.
What would be a good occasion to make this?
- This wreath is wonderful for Thanksgiving, Christmas, or any sweet celebration where you want to impress!

Conclusion
The Apple Pie Bomb Wreath isn’t just a recipe; it’s a delightful experience filled with warmth, flavor, and precious memories. Try making this for your next gathering, and I assure you, it will become a beloved tradition in your home too. I’d love to hear how yours turned out—don’t forget to share your experiences and any tweaks you made! If you’re looking for more delightful recipes, check out my other baked goods that celebrate seasonal flavors and family favorites.
By following this guide, you’re set to create a stunning masterpiece that will warm hearts and fill plates with joy. Happy baking!
Print
Irresistible Apple Pie Bomb Wreath
- Total Time: 64 minutes
- Yield: 10-12 servings 1x
- Diet: Vegetarian
Description
A stunning and delicious Apple Pie Bomb Wreath that’s a perfect centerpiece for any gathering, combining the flavors of classic apple pie with fluffy pull-apart rolls.
Ingredients
- 25 frozen Rhodes rolls, thawed
- 1 recipe homemade apple pie filling or 1 can (21 ounces) store-bought, chopped, divided
- 1 large egg, beaten
- 1 cup all-purpose flour
- ½ cup light brown sugar, packed
- 1 teaspoon ground cinnamon
- ½ teaspoon kosher salt
- ½ cup unsalted butter, melted
- 1 cup confectioners’ sugar
- 2 tablespoons whole milk
Instructions
- Thaw the rolls on a greased baking sheet, covering them with plastic wrap.
- Preheat the oven to 375°F (190°C).
- Prepare each thawed roll by flattening to about 3 inches wide.
- Add 1 tablespoon of pie filling to the center of each roll and seal the edges.
- Form a wreath by arranging filled rolls in a circular pattern on a parchment-lined baking sheet.
- Brush the tops with beaten egg.
- Make the streusel topping by mixing flour, brown sugar, cinnamon, and salt, then adding melted butter.
- Sprinkle streusel over the rolls and bake for 30-34 minutes until golden brown.
- Prepare the glaze by whisking confectioners’ sugar and milk until smooth.
- Glaze the baked wreath and let it cool slightly before serving.
Notes
Make sure to pinch the dough edges tightly to avoid leaking. Store leftovers in an airtight container.
- Prep Time: 30 minutes
- Cook Time: 34 minutes
- Category: Dessert
- Method: Baking
- Cuisine: American
Nutrition
- Serving Size: 1 serving
- Calories: 300
- Sugar: 10g
- Sodium: 250mg
- Fat: 15g
- Saturated Fat: 8g
- Unsaturated Fat: 5g
- Trans Fat: 0g
- Carbohydrates: 40g
- Fiber: 2g
- Protein: 4g
- Cholesterol: 40mg
🥗 Free Custom Keto Meal Plan?
Do you want to lose weight while still enjoying delicious Asian & Thai Fusion meals? Take this quick quiz to get your personalized Keto plan based on your favorite foods!
- ✅ No more guessing what to eat
- ✅ Delicious & easy-to-make recipes
- ✅ Tailored to your body type
Get My Custom Plan Now! →
*Over 100,000+ people have transformed their lives with this quiz.