Indulge in the Sweetness: A Passionate Guide to Making Traditional Greek Tsoureki
Picture this: it’s early spring, and you’re enveloped by the sweet, fruity aroma of freshly baked bread wafting through the house. It’s a Saturday morning tradition in my family, a moment where all of us gather around the kitchen, flour dusting our noses, laughter echoing off the walls, and in the heart of it all is a beautiful loaf of Traditional Greek Tsoureki. This braided bread, rich with eggs and butter, has been a staple in my home, representing not just nourishment but love, warmth, and the cherished memories of family bonding.
What makes this Traditional Greek Tsoureki truly remarkable isn’t just its soft, fluffy texture or its inviting sweetness; it’s the nostalgia it brings. I’ve tried countless recipes from bakeries and websites, but none have resonated as deeply as my mother’s rendition. It’s not just food—it’s a piece of my heritage, and I believe that every bite can transport you to a sun-drenched Greek island, if only for a moment. So, come along with me as I share my favorite recipe, filled with tips, stories, and a sprinkle of love that’ll make your Tsoureki a masterpiece. You’ll learn how to create a perfect loaf that’ll melt in your mouth and impress everyone around you!
What Are Traditional Greek Tsoureki?
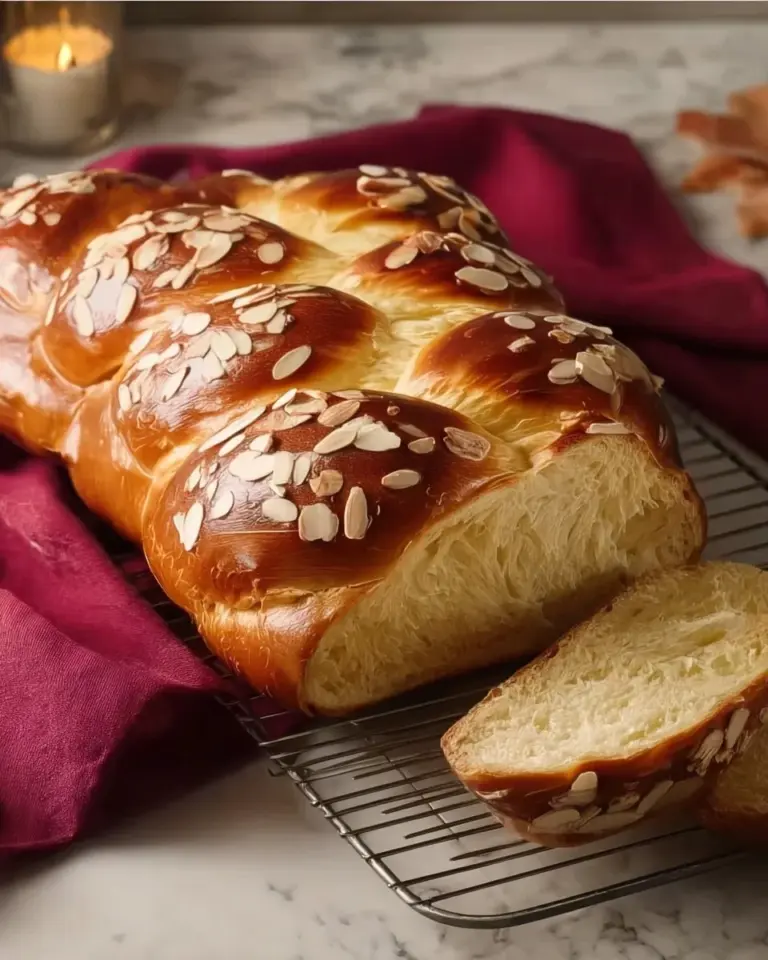
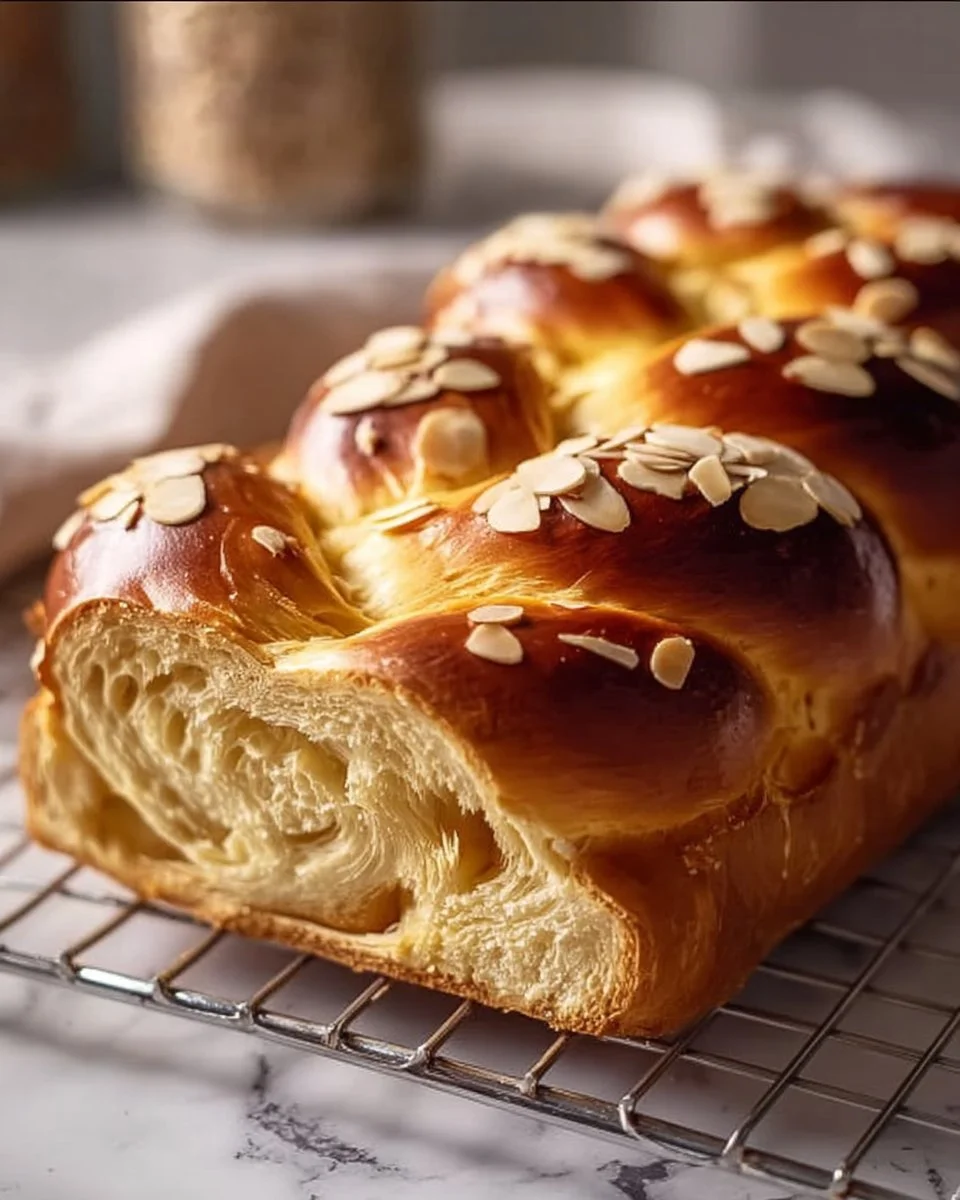
Traditional Greek Tsoureki originates from Greece and is commonly associated with Easter celebrations, although its delicious sweetness makes it perfect for any occasion. This beautiful bread is crafted with a delicate balance of ingredients, which include flour, sugar, and aromatic spices like mastic and mahleb. When baked, it transforms into a slightly sweet, golden-brown delight that boasts a soft, pillowy texture akin to a cozy hug.
But what makes Tsoureki truly unique is its mesmerizing braiding technique, symbolizing unity and fellowship in Greek culture. It’s a bread that beckons joy, ideal for sharing with loved ones over a cup of coffee or tea. You can make Tsoureki to celebrate holidays, family gatherings, or simply to enjoy the comforting ritual of baking—each loaf tells a story, making every bite a cherished memory.
Why You’ll Love This Recipe
Infinitely Better than Store-Bought: Let’s be honest: you can taste the love in homemade bread that you simply won’t find in pre-packaged versions. Each bite of your homemade Tsoureki will be rich in flavor and freshness that can never be replicated by a store.
Customizable to Your Taste: Want to infuse some citrus zest or perhaps even chocolate chips? This recipe offers the flexibility to customize your Tsoureki however you like. Each variation may provide a new twist on a beloved classic, keeping your baking adventure exciting!
Cost-Effective Goodness: Making your own Traditional Greek Tsoureki can be more economical than buying gourmet breads at the bakery. The ingredients are simple and affordable, and the reward is far greater than the sum of its parts.
A Satisfying Quick Bake: While the process of making Tsoureki may seem laborsome, it’s really quite manageable. With about 15 minutes of hands-on time and a couple of rising periods, you can create a stunning homemade treat.
Perfect for All Occasions: Whether it’s a holiday brunch, a gathering of friends, or just an indulgent afternoon snack, Tsoureki fits seamlessly into any occasion, bringing everyone together around the table.
Now that you’re dreaming of the sweet aroma and fluffy texture awaiting you, let’s dive into the mouthwatering details of making your very own Tsoureki!

Ingredients
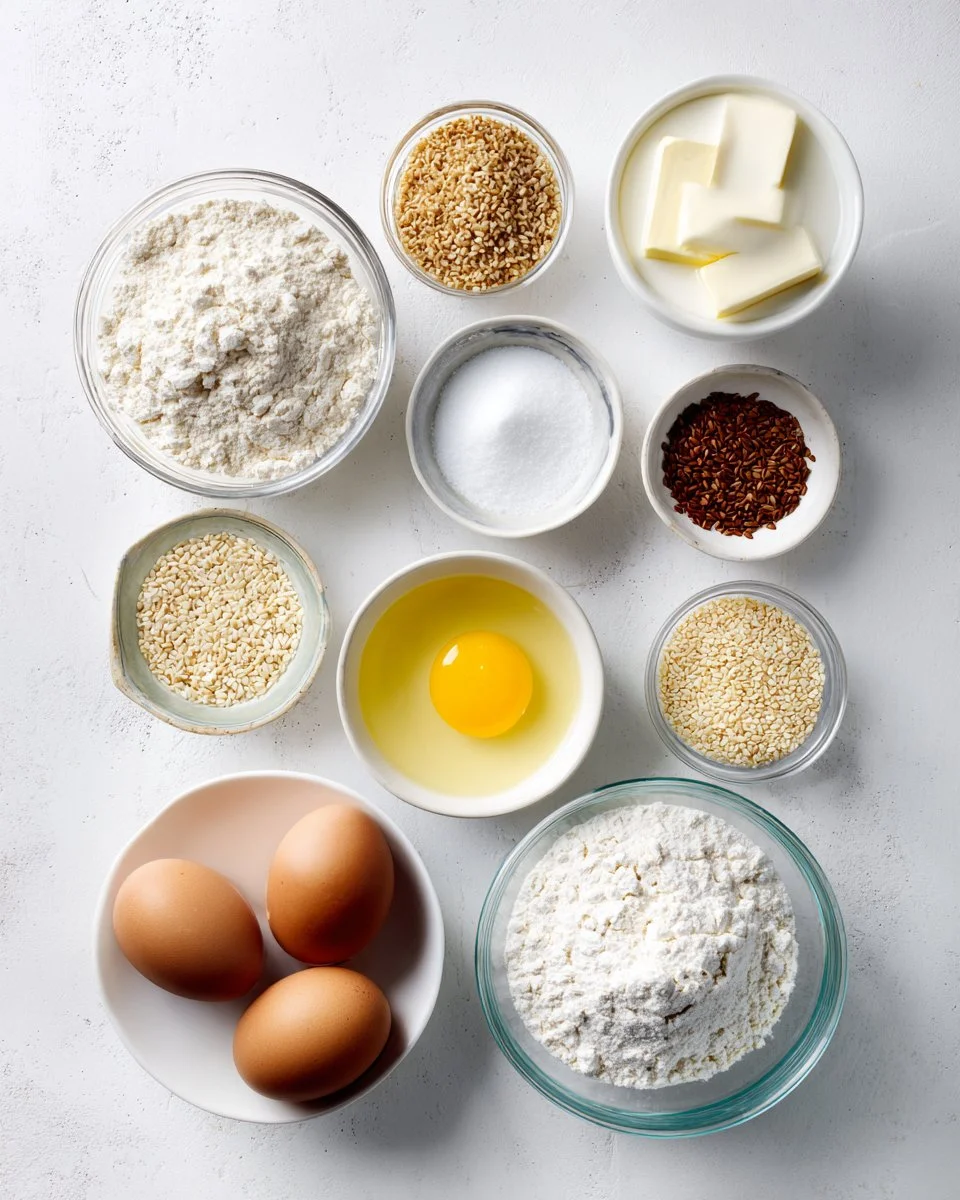
For your Traditional Greek Tsoureki, gather the following high-quality ingredients, which will make your loaf shine:
- 4 cups all-purpose flour (Use King Arthur Flour for a reliable bake)
- 1 cup milk (Opt for whole milk for richness, or almond milk for a dairy-free version)
- 3/4 cup sugar (Granulated sugar will work best)
- 1/2 cup unsalted butter, melted (Let butter come to room temperature for easier mixing)
- 2 large eggs (Fresh eggs from a local farm if available for superior flavor)
- 2 tablespoons active dry yeast (Make sure it’s fresh for a great rise)
- 1/2 teaspoon salt (Fine sea salt enhances flavor)
- 1 teaspoon ground mastic (optional, but brings an authentic, fragrant touch)
- 1 teaspoon ground mahleb (optional, adds a unique, slightly cherry-like taste)
- 1 egg (for egg wash to achieve a beautiful golden crust)
- Sesame seeds (for topping, for added crunch and aesthetics)
Prep Notes:
- Bring your butter and eggs to room temperature to ensure a smooth dough.
- Choose quality ingredients for the best flavor and texture.
Step-by-Step Instructions
Warm the Milk: In a small saucepan, gently heat the milk until it’s lukewarm—about 110°F (43°C). Stir in the active dry yeast and a pinch of sugar, then let it sit for approximately 10 minutes until it becomes foamy. This step is crucial, as it activates the yeast!
Mix the Dry Ingredients: In a large mixing bowl, whisk together the flour, sugar, salt, ground mastic, and ground mahleb. This blend is where the magic begins, so give it a good mix to ensure even distribution of flavors.
Combine Wet and Dry: Make a well in the center of the dry ingredients and add the melted butter, eggs, and the yeast mixture. Mix until a rough dough forms.
Knead the Dough: Transfer the dough to a floured surface and knead for about 10 minutes until it’s smooth and elastic. This process develops the gluten, which gives the Tsoureki its desired texture.
First Rise: Place the dough in a greased bowl, cover it with a cloth, and let it rise in a warm spot until doubled in size, about 1-2 hours. This is the time to go relax with a book while the dough does its magic!
Shape the Dough: Once risen, punch the dough down to release air. Divide it into three equal parts and roll each piece into a long rope, about 12 inches long. Braid the ropes together to form a beautiful loaf; it’s like creating a piece of art!
Second Rise: Carefully transfer the braided dough onto a parchment-lined baking sheet. Cover it again and let it rise for an additional 30-40 minutes.
Preheat the Oven: While the dough rises, preheat your oven to 350°F (175°C).
Prepare for Baking: Brush the top of the braided dough with an egg wash (beaten egg) and sprinkle with sesame seeds for that extra crunch.
Bake: Place the loaf in the oven and bake for 25-30 minutes or until it turns a lovely golden brown. Your kitchen will smell divine!
Cool Before Serving: Allow it to cool slightly before slicing. Enjoy the heavenly aroma and dig into your homemade Tsoureki!
Chef’s Tips:
- Timing Is Everything: Make sure to really take note of the rising times; they can vary based on the temperature of your kitchen. Patience is key!
- Visual Cues: The dough should be slightly tacky but not overly sticky. Adjust flour as needed during kneading.
- Avoiding Dough Over-rising: If left too long, it can collapse. Keep an eye on your dough!
Expert Tips & Tricks
Storage: Store leftover Tsoureki in an airtight container at room temperature for up to 3 days. In the fridge, it can last up to a week, although it may lose a bit of its fluffiness.
Make-Ahead: You can prepare the dough a day in advance; just allow it to rise the first time in the fridge overnight. Bring it back to room temperature before braiding and shaping.
Troubleshooting: If your dough is too dry, add a touch of milk; too wet? Sprinkle a little more flour. Adjustments are okay—just make sure to keep it balanced.
Perfecting Flavor: Feel free to experiment! Adding a hint of orange zest or a splash of vanilla enhances the sweetness beautifully.
Freezing: You can freeze unbaked braided dough if you want to prepare ahead. Just let it thaw and rise before baking.
Serving Suggestions
When it comes to enjoying your Traditional Greek Tsoureki, pair it up with a warm cup of coffee or tea; this bread goes beautifully with a rich a chocolate spread or even classic butter. Consider serving it for brunch during festive occasions or alongside a fruit platter for a colorful dessert spread. Nothing beats pulling apart a slice, revealing its tender crumb while sharing giggles and stories at the table.
Variations & Substitutions
Spice It Up: Want a twist? Add cinnamon or nutmeg for a festive flair, especially around the holidays.
For the Healthy Crowd: Substitute half of the all-purpose flour with whole wheat flour for a heartier version while still keeping moisture.
Seasonal Adaptations: In winter, infusing a small amount of cardamom gives that cozy, warm flavor reminiscent of the holidays.
Dietary Options: For a vegan Tsoureki, use almond milk or coconut milk, and substitute eggs with flaxseed eggs or applesauce for binding.
Nutrition & Storage Info
- Prep Time: 30 minutes
- Cook Time: 30 minutes
- Total Time: 2-3 hours (including rising times)
- Yield: Approximately 10 servings
- Estimated Calories: 220 calories per serving
Storage Instructions:
- Room Temperature: Best consumed fresh, but can be kept for 3 days.
- Fridge: Will last up to a week.
- Freezer: Unbaked dough can be frozen for up to a month. Baked Tsoureki can be frozen for up to 2 months.
FAQ Section
Can I use Instant Yeast instead of Active Dry Yeast?
Absolutely! If you use instant yeast, you can skip the proofing step. Just mix it directly with your dry ingredients.What does mastic taste like?
Mastic has a unique pine or herbal flavor, providing an authentic taste of traditional Tsoureki. However, it can be omitted if unavailable.Can I braid the dough differently?
Yes! While the classic three-strand braid is common, you can certainly experiment with other braiding techniques.Is it necessary to use mahleb?
Mahleb adds a delightful almond and cherry note to the bread but is not essential. You can omit it or replace it with a bit of almond extract.How can I ensure my dough rises properly?
Make sure your yeast is fresh and your kitchen is warm. If it’s too cold, consider warming your oven slightly and turning it off before placing the dough inside to rise.Why is my Tsoureki dense?
A dense loaf often indicates the dough was over-kneaded, or the yeast was not proofed properly. Ensure you’re gentle while kneading and checking yeast viability.How do I know when it’s done baking?
The loaf should be golden brown and sound hollow when tapped on the bottom. A thermometer inserted in the center should read around 190°F (88°C).Can I add fillings like chocolate or nuts?
Yes! You can fold in chocolate chips or nuts after the dough has been kneaded. Just be sure not to add too much as it may affect the rise.Can I double the recipe?
Absolutely! Double the ingredients and follow the same steps. Make sure you have a big enough bowl for the dough to rise!What’s the best way to serve Tsoureki?
Tsoureki can be enjoyed plain, toasted, or with spreads like honey, jam, or Nutella. It’s also wonderful alongside a cup of Greek coffee.

Conclusion
This Traditional Greek Tsoureki recipe holds not just the promise of deliciousness but also an opportunity to create beautiful memories with family around the table. Whether you’ve baked bread for years or are trying it for the first time, I encourage you to give this recipe a whirl. Trust me, you won’t regret it! I’d love to hear how your Tsoureki turned out. Share your experiences or any tweaks that made it your own in the comments below. And, if you’re itching for more delightful recipes, check out my blog for other inspired family favorites. Happy baking!
Print
Traditional Greek Tsoureki
- Total Time: 120 minutes
- Yield: 10 servings 1x
- Diet: Vegetarian
Description
A rich, braided bread filled with love and tradition, perfect for any occasion.
Ingredients
- 4 cups all-purpose flour
- 1 cup whole milk
- 3/4 cup granulated sugar
- 1/2 cup unsalted butter, melted
- 2 large eggs
- 2 tablespoons active dry yeast
- 1/2 teaspoon fine sea salt
- 1 teaspoon ground mastic (optional)
- 1 teaspoon ground mahleb (optional)
- 1 egg (for egg wash)
- Sesame seeds (for topping)
Instructions
- Warm the milk in a saucepan until lukewarm, then stir in yeast and a pinch of sugar; let it sit for 10 minutes.
- Mix the flour, sugar, salt, mastic, and mahleb in a bowl.
- Combine the melted butter, eggs, and yeast mixture into the dry ingredients, mixing until a rough dough forms.
- Knead the dough on a floured surface for about 10 minutes until smooth and elastic.
- Place the dough in a greased bowl, cover it, and let it rise in a warm area for 1-2 hours until doubled in size.
- Punch down the dough, divide it into three parts, and roll each into a 12-inch rope; braid them together.
- Transfer the braided dough to a lined baking sheet, cover it, and let it rise for 30-40 minutes.
- Preheat the oven to 350°F (175°C).
- Brush the dough with egg wash and sprinkle with sesame seeds.
- Bake for 25-30 minutes until golden brown.
- Cool slightly before slicing and serving.
Notes
Store leftover Tsoureki in an airtight container at room temperature for up to 3 days. Consider freezing unbaked dough for future use.
- Prep Time: 30 minutes
- Cook Time: 30 minutes
- Category: Bread
- Method: Baking
- Cuisine: Greek
Nutrition
- Serving Size: 1 serving
- Calories: 220
- Sugar: 12g
- Sodium: 200mg
- Fat: 8g
- Saturated Fat: 5g
- Unsaturated Fat: 3g
- Trans Fat: 0g
- Carbohydrates: 30g
- Fiber: 1g
- Protein: 5g
- Cholesterol: 40mg
🥗 Free Custom Keto Meal Plan?
Do you want to lose weight while still enjoying delicious Asian & Thai Fusion meals? Take this quick quiz to get your personalized Keto plan based on your favorite foods!
- ✅ No more guessing what to eat
- ✅ Delicious & easy-to-make recipes
- ✅ Tailored to your body type
Get My Custom Plan Now! →
*Over 100,000+ people have transformed their lives with this quiz.