Table of Contents
Table of Contents
There’s something utterly magical about the smell of freshly baked bread wafting through your home. I still remember the first time I tasted homemade bread at my grandmother’s kitchen – the crusty exterior giving way to the most tender, airy inside, laced with the warm notes of yeast. It was an experience that tied us as family, a moment of comfort that would linger long after the last slice was devoured. Striving to recreate that childhood joy led me to discover the incredible No Knead Marathon Bread.
What’s fantastic about this recipe is its simplicity: no long kneading sessions or fancy equipment are involved! This bread is not just easy to make; it’s filled with wholesome ingredients like whole grains, seeds, and dried fruits, making it taste as good as it is nutritious. Plus, unlike store-bought bread, it’s customizable to suit your family’s taste and dietary needs.
What will you learn? This comprehensive guide walks you through the steps of making your own No Knead Marathon Bread, sharing tricks, tips, and personal anecdotes along the way. Prepare to fill your home with the comforting aroma of baking bread and create delicious memories that your family will cherish for years to come!
What Are No Knead Marathon Bread?
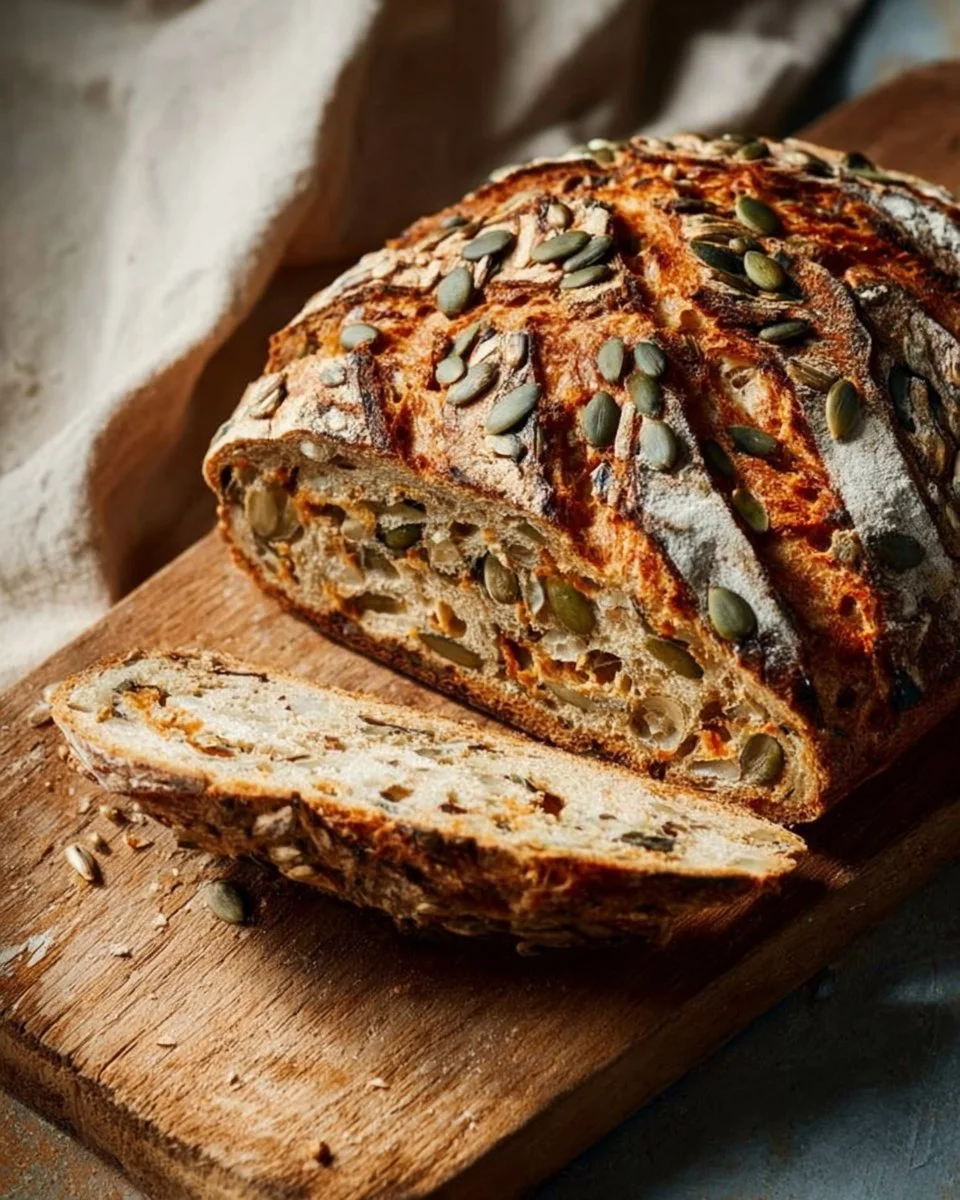
No Knead Marathon Bread is a delightful, low-effort artisan loaf that boasts a crusty exterior and a beautifully soft, airy interior. This type of bread is perfect for beginner bakers or anyone short on time, as it requires minimal hands-on effort while yielding maximum flavor. The origins of no-knead bread date back to artisan bakers who favored longer fermentation processes to develop flavor without the need for manual kneading.
What makes No Knead Marathon Bread unique is its all-natural ingredients, including both all-purpose and whole grains, which provide a nutritional punch while enhancing flavor. Each bite offers a satisfying crunch thanks to the sunflowers and pumpkins seeds, balanced with the sweet, fruity notes of dried goji berries or golden raisins. This bread is perfect for breakfast, lunch, or a snack on your next outdoor adventure – hence the “Marathon” in the name!
Whether it’s for a cozy family dinner or a packed picnic, making No Knead Marathon Bread ensures you’ll have a delicious, wholesome loaf ready to share.
Why You’ll Love This Recipe
Minimal Effort, Maximum Flavor: With just a few simple ingredients and no kneading required, you can achieve an impressive artisan loaf with minimal effort. Say goodbye to the tedious kneading of traditional bread recipes!
Health and Wholesomeness: No Knead Marathon Bread allows you to use quality ingredients, making it a healthier alternative to many store-bought breads filled with preservatives. You can control the ingredients, making adjustments as needed to suit your family’s dietary needs.
Cost-Effective: Baking at home is often cheaper than buying a gourmet loaf from a bakery. Plus, you can make a large batch for a fraction of the cost, perfect for sharing with family and friends.
Customizable Flavors: Want to mix it up? No Knead Marathon Bread acts as your blank canvas. Swap out the dried fruit, add spices, or even throw in some nuts or seeds to create a version that your loved ones will adore.
Beginner-Friendly: Even if you’ve never baked bread before, this recipe is incredibly forgiving. With just waiting time and baking, the process is simple and sure to build your confidence in the kitchen.
So grab your apron, and let’s dive into making this impressive, delicious bread!
Ingredients
- 2 cups all-purpose flour
- 1 cup whole wheat or whole spelt flour
- 1 ½ teaspoons fine sea salt
- 1 teaspoon ground cinnamon (optional)
- ½ teaspoon instant yeast
- ⅓ cup grated carrot from roughly 1 small carrot
- ⅓ cup dried fruit of choice (finely chopped; I prefer goji berries and golden raisins)
- ¼ cup raw sunflower seeds, plus extra for topping
- ¼ cup raw pumpkin seeds, plus extra for topping
- 1 ½ cups room temperature water
Ingredient Notes:
- Flours: Use high-quality, organic flours when possible. Whole wheat flour provides a nutty flavor and numerous health benefits, while spelt flour gives a sweetness that’s hard to beat.
- Seeds and Fruits: Feel free to mix and match fruits and seeds based on your preferences. Chopped dates, dried cranberries, or walnuts can work wonders.
- Water: Ensure your water is at room temperature; this helps with yeast activation.
Prep Notes:
- Take your butter out of the refrigerator the night before to bring it to room temperature if you decide to use it in any variations.
Step-by-Step Instructions
The Night Before:
Combine Ingredients: In a large mixing bowl, whisk together the all-purpose flour, whole wheat flour, salt, cinnamon, and instant yeast.
- Chef’s Tip: Use a fine-mesh sieve to help aerate your flour and keep it light!
Add Water: Gradually pour in the room temperature water, stirring with a wooden spoon until all ingredients are combined into a shaggy dough. It can be sticky – that’s okay!
- Common Mistake: Don’t overmix! Just ensure there are no dry patches of flour.
Add Mix-Ins: Fold in the grated carrot, dried fruit, and seeds using the wooden spoon until evenly distributed.
Let Rise: Cover the bowl tightly with plastic wrap and let it rest at room temperature for 12-18 hours. The dough will expand and become bubbly, signaling it’s ready to bake!
The Next Morning:
Preheat Your Oven: Place your Dutch oven (or heavy pot with a lid) in the oven and preheat to 450°F (232°C).
Prepare Your Surface: Lightly flour a clean work surface. Once the dough has risen, gently scrape it out onto the floured surface without deflating too much.
Shape the Dough: With floured hands, form the dough into a round shape, tucking the edges underneath. Place it seam-side down on a well-floured parchment paper.
Second Rise: Cover the dough with a kitchen towel and let it rest for about 30 minutes while the Dutch oven heats up.
Bake: Once preheated, carefully remove the Dutch oven using oven mitts. Lift the parchment with the dough and place it directly in the hot pot. Cover and bake for 30 minutes.
Uncover and Finish Baking: Remove the lid and continue baking for an additional 15-20 minutes until the bread is golden brown and crusty.
- Visual Cue: It should sound hollow when tapped on the bottom!
Cool: Let the bread cool on a wire rack before slicing. Patience is key, as this makes all the difference in texture!
Expert Tips & Tricks
Even Rising: To ensure a good rise, place your dough in a warm, draft-free area. A turned-off oven with the light on is a perfect spot!
Storage: Store your cooled bread in a paper bag for a crusty exterior or in plastic for a softer crust. To keep it fresh longer, freeze slices in a plastic bag with parchment paper between them.
Make Ahead: The dough can be made days ahead, stored in the fridge after the first rise to develop more flavor – just make sure to let it warm up slightly before baking!
Common Problems: If your bread is too dense, it may be due to too much flour or not allowing enough time for proofing. Make sure to measure carefully and be patient!
Customizing Flavors: Don’t hesitate to experiment! I’ve added spices like nutmeg or herbs like rosemary for a lovely twist each time I bake.
Serving Suggestions
No Knead Marathon Bread is perfect on its own, but it pairs beautifully with a spread of cream cheese, butter, or your favorite preserves for a wonderful breakfast treat. Slice and serve it alongside a hearty soup for lunch, or enjoy it with fresh salad at dinner.
A sprinkle of seeds on top adds a lovely presentation, making it the star of any rustic feast. Consider serving it at gatherings or cookouts, as it appeals to both adults and kids alike!
Variations & Substitutions
Flavor Combinations: Switch the cinnamon for cardamom for an aromatic twist! You can also incorporate mashed bananas or applesauce for sweetness.
Dietary Adaptations: For gluten-free eaters, substitute with a gluten-free all-purpose flour blend and increase the hydration by an additional splash of water.
Seasonal Variations: Try incorporating pumpkin puree in the fall, or fresh herbs and garden veggies in the summer for a fresh take.
Nutrition & Storage Info
- Prep Time: 15 minutes (plus overnight rising)
- Cook Time: 45 minutes
- Total Time: 12-18+ hours (including rising)
- Yield: 1 large loaf (about 12 servings)
- Estimated Calories: Approximately 120 calories per slice
- Storage:
- Room Temp: Up to 3 days in a paper bag.
- Fridge: Not recommended as it will stale quickly.
- Freezer: Up to 3 months. Wrap well and store in an airtight container.
FAQ Section
Can I use active dry yeast instead of instant yeast?
- Yes, just dissolve it in the water first and allow it to activate before adding it to the flour mix.
What if my bread doesn’t rise?
- Ensure the yeast is fresh and your dough was kept in a warm area for rising.
Can I double this recipe?
- Absolutely! Just keep in mind you’ll need a larger bowl and a larger pot or split into two smaller pots.
What’s the best way to reheat the bread?
- Wrap slices in foil and heat in the oven at 350°F (175°C) for 10-15 minutes.
Can I add vegetables to the bread?
- Yes! Just ensure they are finely grated or chopped to avoid excess moisture.
How do I know when my bread is done?
- It should be golden brown and sound hollow when tapped.
What’s the best way to slice the bread?
- Use a serrated knife for clean slices and to avoid smashing the loaf.
How can I make it sweeter?
- Add honey or maple syrup to your dough for extra sweetness.
Are there gluten-free options?
- Yes, using a gluten-free flour blend works great! Increase the water amount slightly for better results.
Can I use flaxseeds instead of sunflower or pumpkin seeds?
- Absolutely! Flaxseeds are a great alternative, but keep in mind they have a different texture.
Conclusion
The No Knead Marathon Bread recipe has become a staple in my baking repertoire, not just for its simplicity but also for the heartfelt memories it creates with family and friends. It’s the perfect way to fill your home with warmth, nostalgia, and delectable aromas. I invite you to try this recipe and share your experiences below! Have your own unique spin on this bread? I’d love to hear about it or share other related recipes from my blog.
Easy No-Knead Gluten-Free Bread
Happy baking, friends!
Print
No Knead Marathon Bread
- Total Time: 12-18 hours
- Yield: 1 large loaf (about 12 servings) 1x
- Diet: Vegetarian
Description
A delightful, low-effort artisan loaf with a crusty exterior and soft, airy interior. Perfect for any meal or snack!
Ingredients
- 2 cups all-purpose flour
- 1 cup whole wheat or whole spelt flour
- 1 ½ teaspoons fine sea salt
- 1 teaspoon ground cinnamon (optional)
- ½ teaspoon instant yeast
- ⅓ cup grated carrot
- ⅓ cup dried fruit of choice (finely chopped)
- ¼ cup raw sunflower seeds, plus extra for topping
- ¼ cup raw pumpkin seeds, plus extra for topping
- 1 ½ cups room temperature water
Instructions
- Combine Ingredients: In a large mixing bowl, whisk together all-purpose flour, whole wheat flour, salt, cinnamon, and instant yeast.
- Add Water: Gradually pour in room temperature water, stirring with a wooden spoon until all ingredients are combined into a shaggy dough.
- Add Mix-Ins: Fold in grated carrot, dried fruit, and seeds.
- Let Rise: Cover the bowl tightly and let it rest at room temperature for 12-18 hours.
- Preheat Your Oven: Place your Dutch oven in the oven and preheat to 450°F (232°C).
- Prepare Your Surface: Lightly flour a clean surface, scrape risen dough onto it.
- Shape the Dough: Form the dough into a round shape and place it seam-side down on well-floured parchment paper.
- Second Rise: Cover with a towel and let it rest for 30 minutes.
- Bake: Place dough in the hot Dutch oven, cover, and bake for 30 minutes.
- Uncover and Finish Baking: Remove the lid and bake for another 15-20 minutes until golden brown.
- Cool: Let the bread cool on a wire rack before slicing.
Notes
For best results, store in a paper bag for a crusty exterior or in plastic for a softer crust. Can also be frozen for longer storage.
- Prep Time: 15 minutes
- Cook Time: 45 minutes
- Category: Bread
- Method: Baking
- Cuisine: American
Nutrition
- Serving Size: 1 slice
- Calories: 120
- Sugar: 7g
- Sodium: 400mg
- Fat: 4g
- Saturated Fat: 0.5g
- Unsaturated Fat: 3g
- Trans Fat: 0g
- Carbohydrates: 20g
- Fiber: 2g
- Protein: 4g
- Cholesterol: 0mg
Ask the Community
🥗 Free Custom Keto Meal Plan?
Do you want to lose weight while still enjoying delicious Asian & Thai Fusion meals? Take this quick quiz to get your personalized Keto plan based on your favorite foods!
- ✅ No more guessing what to eat
- ✅ Delicious & easy-to-make recipes
- ✅ Tailored to your body type
Get My Custom Plan Now! →
*Over 100,000+ people have transformed their lives with this quiz.