Festive Frosted Christmas Brownies: A Sweet Holiday Treat You’ll Love!
The holiday season is a sensory wonderland – sparkling lights, the smell of pine, and the irresistible aroma of freshly baked goodies wafting through the air. Among all the delectable desserts that grace our holiday tables, there’s something about Frosted Christmas Brownies that holds a special place in my heart. I still remember the first time I made these festive treats with my mom every Christmas. These brownies weren’t just desserts; they were the highlight of our holiday celebrations, adorned with colorful frostings and sprinkles, bringing joy to our faces and warmth to our hearts.
What sets my Frosted Christmas Brownies apart is the balance of fudgy brownie goodness topped with smooth, sweet frosting that can be customized to fit any theme or occasion. These treats are more than just a dessert; they’re filled with loving memories and the kind of comfort that only comes from sharing something sweet with those you hold dear. In this post, I’ll walk you through this delightful recipe, sharing tips to make your brownies stand proudly on your holiday dessert table, promising to leave your friends and family asking for seconds!
By the end of this recipe, you will learn how to make these enchanting Frosted Christmas Brownies step by step, along with some fun decorating ideas that’ll spread joy and cheer this holiday season.
What Are Frosted Christmas Brownies?
Frosted Christmas Brownies can be traced back to the rich tradition of holiday baking, where families come together to create something special for their loved ones. These brownies are typically a dense, chocolatey treat that embodies the spirit of Christmas with a vibrant frosting that symbolizes the merriment of the season.
Their taste is a delightful combination of rich cocoa and a melt-in-your-mouth texture that just screams comfort food. The fudgy brownie base is the perfect canvas for the sugary white frosting, creating a layered masterpiece that’s both visually stunning and an indulgent treat for the taste buds.
You can whip up a batch for holiday gatherings, family parties, or just to enjoy at home during cozy nights by the fire. No matter the occasion, these brownies have a magical way of making anyone feel festive—especially when decorated as adorable holiday symbols!
Why You’ll Love This Recipe
If you’re on the fence about making these Frosted Christmas Brownies, let me convince you with a few compelling reasons:
Simplicity Meets Delight: This recipe is easy to follow, using either 2 boxes of brownie mix or a quick double batch of homemade brownies. No complex techniques required! The baking process is quick, making it doable even for beginner bakers.
Versatile And Customizable: The beauty of these brownies lies in their versatility. Whether you want pastel colors for a winter wonderland theme or bold reds and greens for a classic Christmas look, your imagination is the limit! You can make them your own.
Cost-Effective Indulgence: Making these brownies at home is not only fun; it saves a pretty penny compared to buying similar treats from a bakery. Plus, you know exactly what goes into your desserts!
Perfect for Sharing: With a yield of about 16 servings, they are ideal for potlucks, classroom parties, or simply to share with family and friends.
No Fuss: As an experienced baker, I can tell you that these brownies are forgiving. If you make a mistake, you can easily cover it up with frosting or sprinkles! There are no fancy techniques that might intimidate you.
This baked delight offers a joyful experience that comes with the festive spirit of creating something beautiful and delicious to share—all without all the fuss!
Ingredients Section
To make these enchanting Frosted Christmas Brownies, you’ll need the following ingredients:
Brownie Base:
- 2 Boxes of Brownie Mix or a double batch of homemade brownies (I love Ghirardelli’s mix for its rich chocolate flavor!)
Frosting:
- 1-3 jars of White Frosting (Store-bought is a time-saver, but feel free to whip up your own for a gourmet touch!)
Food Coloring:
- Edible Gel Food Coloring (You can also opt for no artificial dye alternatives if you prefer!)
Decorations:
- Edible Gold Stars
- White Pearl Sprinkles
- Icing Bags with Frosting Tips (I recommend a large star tip (1M) for beautiful designs!)
Prep Notes:
- Ensure your butter and eggs are at room temperature if you’re creating homemade brownies—this helps achieve the perfect fudgy texture.
Brand Recommendations:
- For brownie mix, my go-tos are Ghirardelli or Duncan Hines.
- For frosting, Betty Crocker and Pillsbury offer reliable options if you’re going store-bought.
Step-by-Step Instructions
Let’s dive into making these delightful Frosted Christmas Brownies!
1. Preheat oven & Prepare the Pan
Preheat your oven according to the brownie box instructions or to 350°F (175°C) if you’re making homemade brownies. Spray a 9-inch springform pan with non-stick spray for easy removal.
2. Mix and Bake
Combine both boxes of brownie mixes in a large bowl as per the package directions. Pour the mixture into the greased springform pan. Tip: Use a spatula to spread it evenly. Bake according to the packaging instructions or until a toothpick inserted into the center comes out clean, which usually takes about 25-30 minutes.
3. Cool and Cut
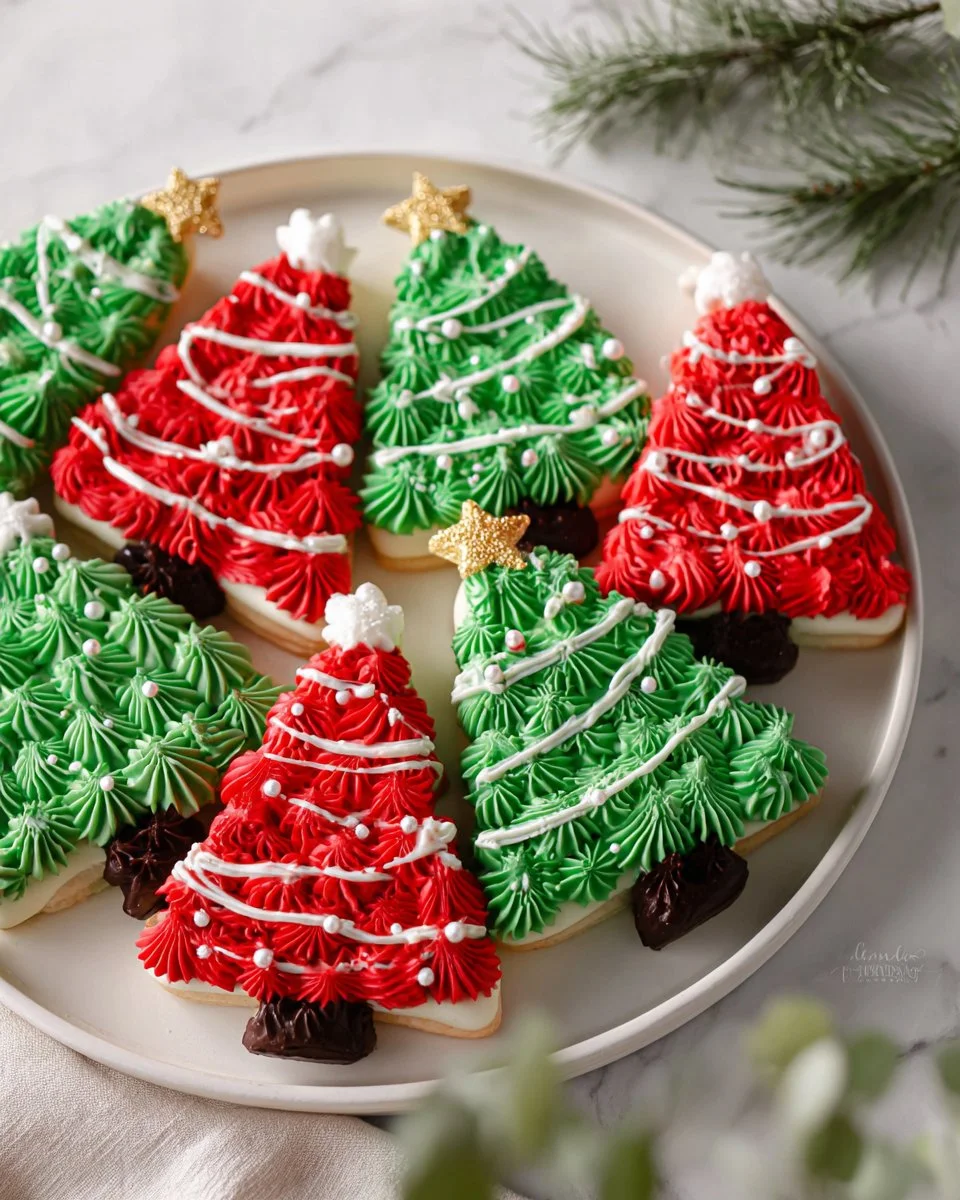
Once baked, allow the brownies to cool for about 20 minutes in the pan before transferring them to a cutting board. Cut the brownies into 8 triangles for Christmas tree shapes or squares for Santa hat designs.
4. Coloring the Frosting
In separate bowls, mix the white frosting with red and green edible gel food coloring to achieve your desired hues. Mix until well combined!
5. Decorate!
Transfer each color of frosting into individual icing bags fitted with the frosting tips. Decorate the Christmas Tree Brownies with green frosting, white pearl sprinkles, and edible gold stars! For Santa Hat Brownies, use the red and white frostings creatively to add a festive flair.
6. Serve and Enjoy
These brownies are now ready to be served! Enjoy with hot cocoa or a glass of milk—your guests will definitely appreciate the effort!
Chef’s Tips:
- To avoid crusty edges, bake for slightly less time, check for doneness often.
- If you’re feeling adventurous, try adding peppermint extract to your frosting for a delightful seasonal twist!
Expert Tips & Tricks
Use Quality Ingredients: The quality of your chocolate and frosting makes a world of difference. Opt for brands you trust for richer flavors!
Storage: Store any leftovers in an airtight container at room temperature for up to 3 days. If you want them to last longer, store in the fridge for up to 1 week.
Make Ahead: Brownies can be made up to 2 days ahead. Just frost them the day you plan to serve to keep everything fresh!
Troubleshooting: If your brownies turn out dry, add a touch of melted butter or a splash of coffee to your frosting to enhance flavor and moisture.
Experiment with Toppings: Feel free to add candy canes, mini marshmallows, or even chocolate chips to make them different each time!
Serving Suggestions
Pair your Frosted Christmas Brownies with a cup of peppermint hot cocoa or a scoop of vanilla ice cream to elevate the experience. They look fabulous arranged on a decorative platter, garnished with fresh mint leaves or holiday-themed decor. Perfect for Christmas parties, school events, or simply as a delightful treat to enjoy while watching holiday movies!
Variations & Substitutions
Chocolate Mint Brownies: Swap out the white frosting for mint chocolate frosting for a refreshing twist.
Dairy-Free/Vegan: Substitute with flax eggs and non-dairy butter, and use coconut or almond milk for the frosting.
Gluten-Free Option: Use gluten-free brownie mix to create a delicious gluten-free version that’s just as satisfying!
Nutrition & Storage Info
- Prep Time: 20 minutes
- Cook Time: 30 minutes
- Total Time: 50 minutes
- Yield: 16 servings
- Estimated Calories per Serving: 250-300 calories, depending on frosting and decorations.
- Storage Instructions: Keep at room temperature for up to 3 days. Refrigerate for up to a week, or freeze for up to 3 months—just thaw at room temperature before serving!
FAQs
Can I use a different pan size?
Yes! You can use an 8×8 pan, but baking times may differ slightly.Do I need to mix the brownie batter from scratch?
Not at all! The boxed mix is quick and convenient, but you can experiment with homemade if you prefer.Can I double the recipe?
Absolutely! Simply use two panfuls for larger gatherings, but adjust cooking times as needed.What should I do if my brownies sink in the middle?
They likely needed a bit more time in the oven. Make sure to bake until the toothpick comes out mostly clean.How can I make it festive for New Year’s?
Switch out the colors for silver, gold, and deep blue for an elegant New Year’s twist!Can I freeze these?
Yes! Just ensure they are well-wrapped, and they can last up to 3 months.How do I achieve more distinct colors in my frosting?
Adding a gel food coloring gradually allows for better control over the final hue.Can I use cream cheese frosting instead?
Of course! Cream cheese frosting gives a delightful tang that pairs well with chocolate.What’s the best way to decorate?
Use a light hand and steady pressure as you pipe. Don’t be afraid to get creative; there’s no such thing as too many sprinkles!Why did my edges brown too much?
Ensure your oven temperature is accurate and check them a bit earlier next time to avoid overbaking.
Conclusion
These Frosted Christmas Brownies are not just another dessert; they’re a heartfelt tradition that can bring sweetness and smiles to your holiday gatherings. Whether you’re channeling your inner artist with the frosting or sharing stories around your holiday table, these brownies provide a slice of joy with every bite. I can’t wait for you to try them!
I’d love to hear about your baking adventures and any variations you come up with. Don’t forget to check out my other holiday recipes on the blog, and happy baking! 🎄🍫

Frosted Christmas Brownies
Ingredients
Brownie Base
- 2 boxes Brownie Mix Ghirardelli’s mix is recommended for rich chocolate flavor.
Frosting
- 1-3 jars White Frosting Store-bought is convenient; homemade for a gourmet touch.
Coloring and Decorations
- Edible Gel Food Coloring Optional, for customizing frosting colors.
- Edible Gold Stars For decoration.
- White Pearl Sprinkles For decoration.
- Icing Bags with Frosting Tips A large star tip (1M) is recommended for decorating.
Instructions
Preparation
- Preheat oven according to the brownie box instructions or to 350°F (175°C) if making homemade brownies.
- Spray a 9-inch springform pan with non-stick spray for easy removal.
Mixing and Baking
- Combine both boxes of brownie mixes in a large bowl as per the package directions.
- Pour the mixture into the greased springform pan and spread it evenly with a spatula.
- Bake according to the packaging instructions or until a toothpick inserted into the center comes out clean, about 25-30 minutes.
Cooling and Cutting
- Allow the brownies to cool for about 20 minutes in the pan before transferring them to a cutting board.
- Cut the brownies into 8 triangles for Christmas tree shapes or squares for Santa hat designs.
Frosting Preparation
- In separate bowls, mix the white frosting with red and green edible gel food coloring to achieve desired hues.
Decoration
- Transfer each color of frosting into individual icing bags fitted with the frosting tips.
- Decorate the Christmas Tree Brownies with green frosting, white pearl sprinkles, and edible gold stars!
- For Santa Hat Brownies, use the red and white frosting creatively for a festive flair.
Serving
- The brownies are ready to be served! Enjoy with hot cocoa or a glass of milk.
Notes
🥗 Free Custom Keto Meal Plan?
Do you want to lose weight while still enjoying delicious Asian & Thai Fusion meals? Take this quick quiz to get your personalized Keto plan based on your favorite foods!
- ✅ No more guessing what to eat
- ✅ Delicious & easy-to-make recipes
- ✅ Tailored to your body type
Get My Custom Plan Now! →
*Over 100,000+ people have transformed their lives with this quiz.