Table of Contents
Table of Contents
There’s something incredibly nostalgic about baking, isn’t there? I remember the countless afternoons spent in my grandmother’s cozy kitchen, where she would pull out her trusty cast iron skillet to prepare the most decadent upside-down cakes. The aroma of caramelizing fruits and warm spices would fill the air, drawing the whole family into that little haven. Every slice was a celebration of flavors, complete with a tender, moist cake that seemed to melt in your mouth.
While browsing my favorite Pinterest boards, I stumbled upon the “Best Upside-Down Cakes” and it instantly reignited those cherished memories. These cakes are exceptional not just because they look stunning but also because they bring that deliciously sweet and slightly tangy flavor right to your table. What sets these recipes apart is the magic of a perfectly caramelized topping that caramelizes beautifully as they bake, adding a depth of flavor that is simply irresistible.
In this post, I’ll guide you through the ins and outs of creating mouthwatering upside-down cakes that will become your family’s new comfort food! Whether you’re looking for a cozy dessert for a quiet night in or planning to impress guests, you’re in for a treat. Trust me; by the end of this journey, you’ll have the confidence to whip up the best upside-down cakes that will leave everyone begging for more.
What Are Upside-Down Cakes?
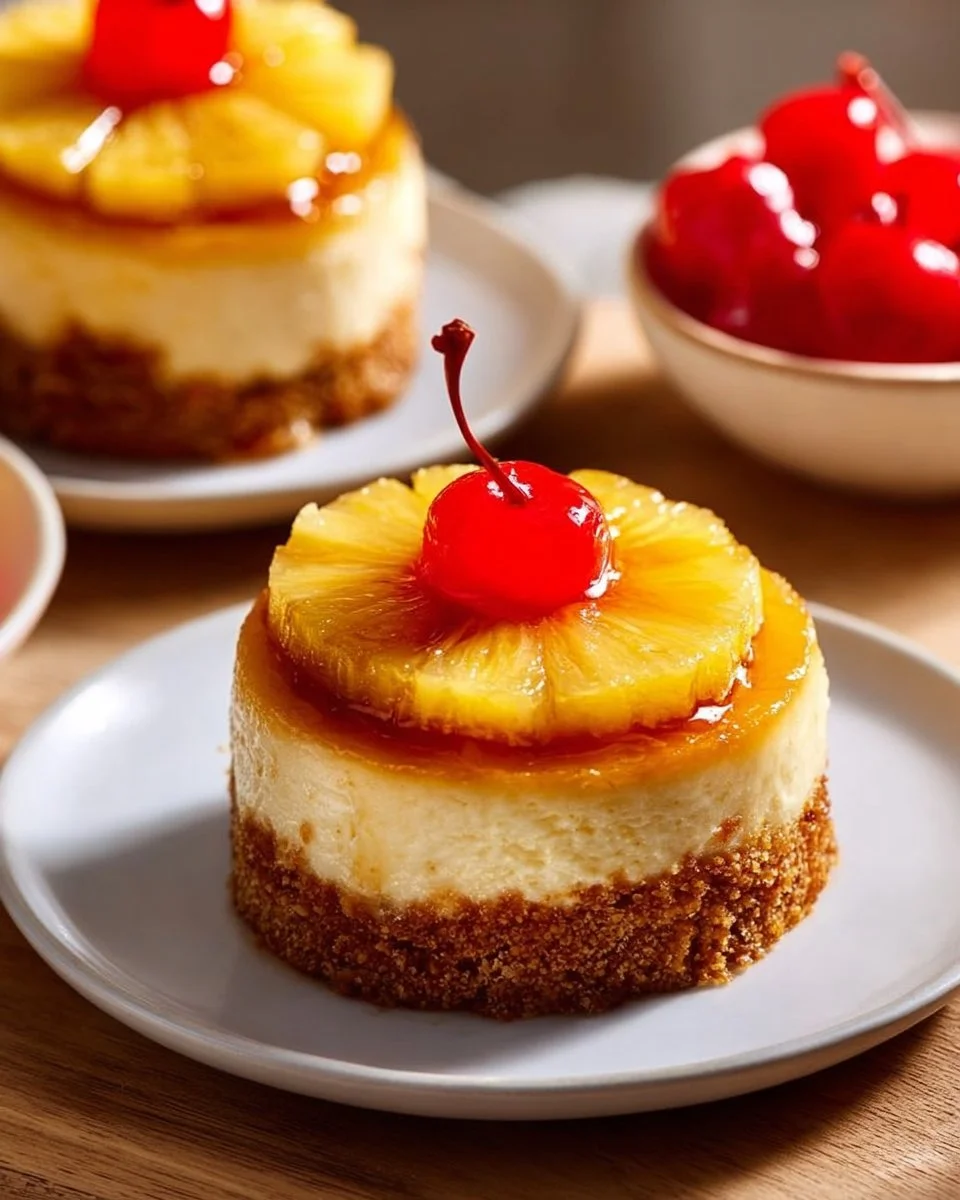
Originating in the United States during the 1920s, upside-down cakes were born out of resourcefulness, bringing together a delicious blend of fruit and cake. Traditionally made with pineapple, these delightful desserts can be customized with a variety of fruits, such as peaches, cherries, and seasonal berries.
The magic of an upside-down cake lies in its preparation – fruits are caramelized at the bottom of the pan before the batter is poured over them. As it bakes, the cake rises and forms a fluffy, moist texture that perfectly contrasts the rich, sticky topping. The result? Every bite bursts with irresistible sweetness and just enough tang, making it a quintessential dessert for gatherings, family meals, or a simple indulgence.
When should you make these beauties? Think family gatherings, potlucks, or even a cozy weekend treat. They’re perfect for any occasion when you want to impress without the fuss!
Why You’ll Love This Recipe
Unmatched Flavor: Picture biting into a warm slice topped with caramelized fruit, just bursting with flavor, blended perfectly with the soft, moist cake below. Store-bought versions simply can’t compete!
Easy to Customize: One of the best parts about upside-down cakes is their versatility! You can mix and match fruits based on your personal preferences, budget, or even the season.
Budget-Friendly Baking: When I think back to my baking days, I always appreciate recipes that don’t break the bank. Most upside-down cakes come together with simple ingredients you likely have on hand, making them a great option for those on a budget.
Perfect for Beginners: This recipe is incredibly forgiving, making it perfect for novice bakers. The process is simple, and the results are stunning, which boosts your confidence in the kitchen!
Make Ahead & Store: You can easily bake these cakes ahead of time, leaving you stress-free for any event. Plus, they store well, ensuring that you can enjoy leftovers (if there are any!) for a few days.
Ingredients
Fresh Fruit: I highly recommend using fresh, ripe fruit for the best flavor. Pineapple, peaches, or apples are delightful, but feel free to use whatever you love. Canned fruit works too but may lack that fresh bright taste.
Butter: Use unsalted room-temperature butter for a rich flavor. I love using brands like Kerrygold for its creamy taste.
Granulated Sugar: Regular white sugar is used for the batter and brown sugar for caramelizing the fruit.
All-Purpose Flour: Stick to a high-quality brand for the best texture.
Baking Powder & Baking Soda: These ensure the cake rises beautifully.
Eggs: Make sure your eggs are fresh and at room temperature for better incorporation.
Milk: You can substitute with plant-based milk if you prefer. Just ensure it’s unsweetened.
Vanilla Extract: A splash of pure vanilla makes all the difference!
Prep Notes: Ensure your butter and eggs are at room temperature before starting to achieve a fluffy batter.
Step-by-Step Instructions
Preparation:
- Preheat your oven to 350°F (175°C).
- Grease a 9-inch skillet or baking dish with butter.
Caramelizing the Fruit:
- In a medium saucepan, melt ¼ cup of butter and 1 cup of brown sugar over medium heat. Stir constantly until it’s bubbly and evenly combined (about 3-5 minutes).
- Pour the mixture into your prepared skillet, then layer your sliced fruit on top. (Chef’s Tip: Arrange the fruit in a pattern for a beautiful presentation!)
Make the Batter:
- In a large bowl, cream together ½ cup of softened unsalted butter and 1 cup of granulated sugar until fluffy (about 3 minutes).
- Beat in 2 eggs, one at a time, followed by 1 teaspoon of vanilla extract.
- In a separate bowl, whisk together 1 ½ cups of all-purpose flour, 1 teaspoon of baking powder, and ½ teaspoon of baking soda.
- Gradually mix in the dry ingredients, alternating with ½ cup of milk until just combined. (Common Mistake: Don’t overmix! This can lead to a tough cake.)
Bake the Cake:
- Pour the batter over the caramelized fruit in the pan.
- Bake for 30-35 minutes, or until a toothpick inserted into the center comes out clean. (Visual Cue: The top should be golden brown.)
Cool and Serve:
- Let the cake cool for about 10 minutes, then carefully invert onto a serving plate.
- Serve warm or at room temperature with whipped cream or vanilla ice cream. (Chef’s Tip: A pinch of sea salt on top of the whipped cream takes it to the next level!)
Expert Tips & Tricks
Use Ripe Fruit: The secret to an exceptional upside-down cake is ripe fruit. The riper, the better for sweetness and flavor!
Don’t Rush the Caramel: Allow the butter and sugar to melt fully before adding the fruit. This will ensure a smooth, sweet layer.
Check Oven Temperature: Always check your oven’s calibration. A thermometer can ensure you’re baking at the correct temperature.
Storage: Wrap leftovers tightly in plastic wrap or store in an airtight container. They last about 3-4 days on the counter or a week in the fridge.
Make-ahead Option: You can prepare the fruit and batter ahead of time. Just store them separately in the fridge and combine before baking.
Bad Hair Day?: If the top looks uneven after baking, don’t fret! Just flip it back over and dust with powdered sugar for a beautiful finish.
Serving Suggestions
Serve this luscious upside-down cake with a dollop of freshly whipped cream or a scoop of vanilla ice cream for a decadent pairing. It also works beautifully as the centerpiece of a brunch table, surrounded by fruit salads and warm coffee. For decoration, consider fresh mint leaves or a light dusting of powdered sugar to elevate the presentation. Whether it’s a birthday party, holiday celebration, or a simple weeknight dessert, this cake will surely steal the show!
Variations & Substitutions
Flavor Combos: Experiment with different fruits like apple-cinnamon or berry blends for a unique twist.
Dietary Adaptations: Need a gluten-free option? Substitute with a 1-to-1 gluten-free flour blend. For dairy-free, try coconut oil or a dairy-free yogurt in place of the butter and milk.
Seasonal Touch: During the holidays, why not infuse some spices like nutmeg and cinnamon for a cozy autumn vibe? Pile on some seasonal fruits like pear or cranberries for added flair!
Nutrition & Storage Info
- Prep Time: 15 minutes
- Cook Time: 35 minutes
- Total Time: 50 minutes
- Yield: 8 servings
- Estimated Calories: 250 calories per serving
Storage Instructions:
- Room Temperature: Keeps well for up to 3 days.
- Refrigerator: Store in an airtight container for up to a week.
- Freezer: Wrap tightly and freeze for up to 3 months; thaw before serving.
FAQ Section
Can I use frozen fruit?
- Yes, but ensure they are thawed and drained to avoid extra moisture in your cake.
What’s the best way to flip the cake?
- Use a large plate and place it on top of the cake. Hold tightly and flip it over in one swift motion.
Can I use a different pan?
- Absolutely! A round cake pan works just as well.
What if my fruit sinks to the bottom?
- Ensure your batter is thick enough; this helps hold the fruit in place.
Can I make mini versions?
- Definitely! Use muffin tins for delightful individual servings.
How do I know when it’s done baking?
- A toothpick should come out clean from the center, and the edges should be lightly golden.
Can the recipe be halved?
- Yes, just adjust the baking time accordingly.
Can I add nuts?
- Certainly! Chopped walnuts or pecans would add a wonderful crunch.
What’s the best way to store leftovers?
- Wrap tightly or place in an airtight container.
Is there a vegan version?
- Yes, substitute eggs with a flaxseed mixture and use non-dairy milk and butter.
Conclusion
Baking up one of these mouthwatering upside-down cakes transforms any day into something special. They’re not just a treat; they’re a way to connect with loved ones and create lasting memories. I invite you to give this recipe a try and relish in the joy of baking! I’d love to hear your thoughts or any creative twists you put on this classic. Don’t forget to check out more delightful recipes on the blog that make every gathering a celebration!
Happy baking!
Print
Pin on Best Upside-Down Cakes
- Total Time: 50 minutes
- Yield: 8 servings 1x
- Diet: Vegetarian
Description
A classic dessert featuring caramelized fruit topped with a moist, tender cake that’s inverted after baking to reveal a beautiful glazed topping. Perfect for showcasing seasonal fruits and creating an impressive presentation.
Ingredients
- 1/4 cup butter (for topping)
- 1 cup brown sugar (for topping)
- 2–3 cups fresh fruit (pineapple, peaches, or apples)
- 1/2 cup unsalted butter, softened
- 1 cup granulated sugar
- 2 large eggs
- 1 teaspoon vanilla extract
- 1 1/2 cups all-purpose flour
- 1 teaspoon baking powder
- 1/2 teaspoon baking soda
- 1/2 cup milk
Instructions
- Preheat oven to 350°F (175°C). Grease 9-inch skillet or baking dish.
- Melt 1/4 cup butter with brown sugar in saucepan until bubbly. Pour into prepared pan.
- Arrange fruit in pattern over caramel mixture.
- Cream softened butter and granulated sugar until fluffy. Beat in eggs one at a time, then vanilla.
- Whisk together flour, baking powder, and baking soda.
- Alternately add dry ingredients and milk to butter mixture, mixing until just combined.
- Spread batter evenly over fruit in pan.
- Bake 30-35 minutes until toothpick comes out clean.
- Cool 10 minutes, then invert onto serving plate.
- Serve warm with whipped cream or ice cream.
Notes
- Use ripe, fresh fruit for best flavor and presentation.
- Do not overmix batter to maintain tender texture.
- Let cake cool slightly before inverting to prevent breaking.
- Store covered at room temperature for 3 days or refrigerate for 1 week.
- Experiment with different fruits based on seasonality.
- Prep Time: 15 minutes
- Cook Time: 35 minutes
- Category: Dessert
- Method: Baking
- Cuisine: American
Nutrition
- Serving Size: 1 slice
- Calories: 250
- Sugar: 25g
- Sodium: 150mg
- Fat: 10g
- Saturated Fat: 6g
- Unsaturated Fat: 3g
- Trans Fat: 0g
- Carbohydrates: 38g
- Fiber: 1g
- Protein: 3g
- Cholesterol: 55mg
Ask the Community
🥗 Free Custom Keto Meal Plan?
Do you want to lose weight while still enjoying delicious Asian & Thai Fusion meals? Take this quick quiz to get your personalized Keto plan based on your favorite foods!
- ✅ No more guessing what to eat
- ✅ Delicious & easy-to-make recipes
- ✅ Tailored to your body type
Get My Custom Plan Now! →
*Over 100,000+ people have transformed their lives with this quiz.