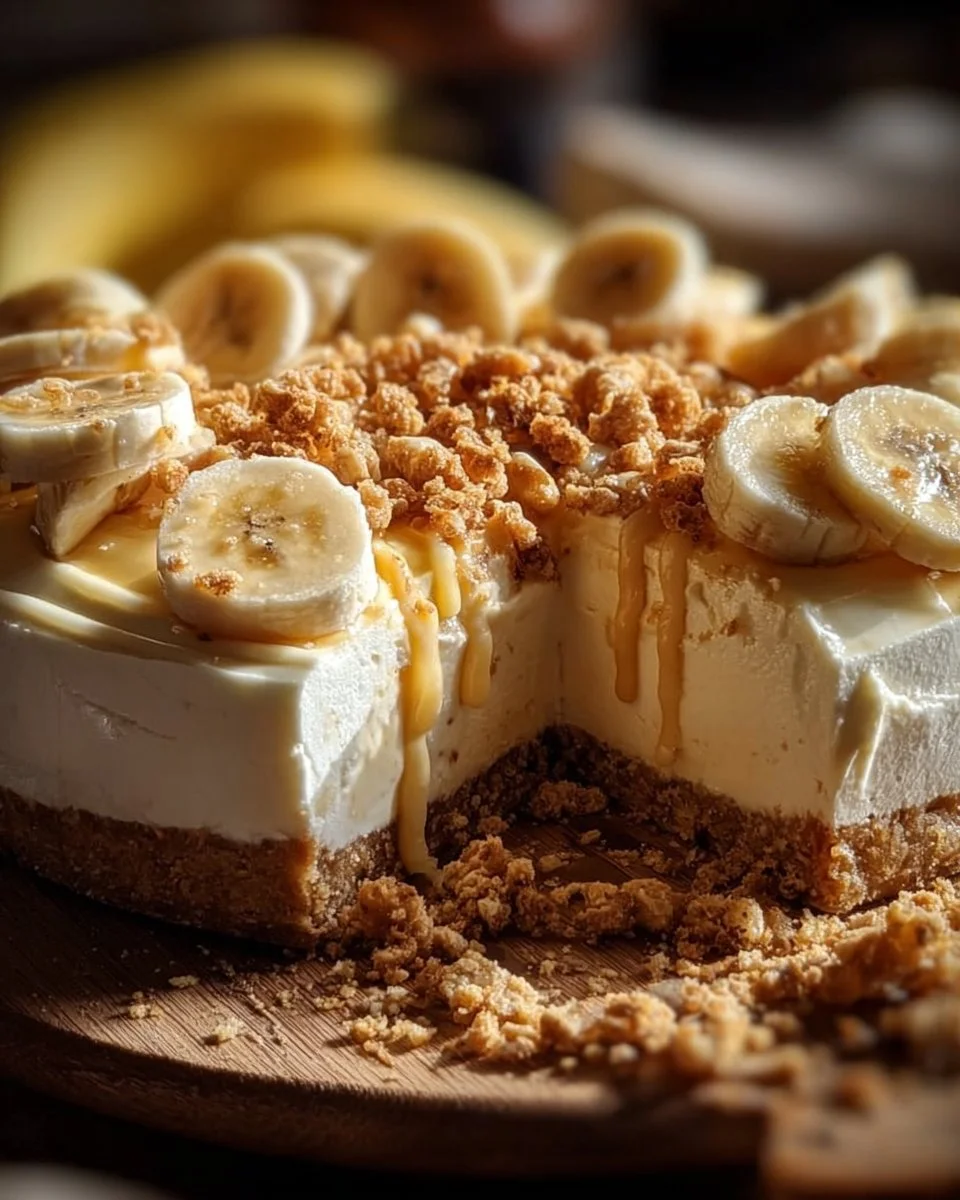
Heavenly Banana Pudding Crunch Cheesecake: A Delightful Twist on a Classic Favorite
As a lifelong fan of baked goods, I vividly remember the first time I tried banana pudding at my grandmother’s house. It was one of those unforgettable moments when your taste buds come alive, and nostalgia washes over you like a warm hug. Fast forward to today, and I’ve combined that enchanting flavor with one of my other obsessions—cheesecake! Enter the Banana Pudding Crunch Cheesecake. This dessert is not your average cheesecake; it’s a luscious blend of creamy banana goodness layered with a crunchy topping that has become a family favorite at gatherings.
What makes this recipe truly special is that it encapsulates the comforting flavors of childhood while elevating them into a dessert that feels just a little bit fancy. Unlike many store-bought cheesecakes, my version is packed with real bananas, a buttery crunch, and rich cream cheese, all coming together to create a harmonious bite. It’s a dessert that tells a story—one of love, laughter, and cherished family moments.
In today’s blog post, I’m excited to walk you through the step-by-step process of making this delightful Banana Pudding Crunch Cheesecake. By the end, you’ll know the secrets to achieving that perfect balance of flavors and textures!
What Are Banana Pudding Crunch Cheesecakes?
Banana Pudding Crunch Cheesecakes are an inventive mash-up of two beloved desserts—banana pudding and cheesecake. This delightful creation is believed to have emerged from the Southern United States, where both banana pudding and cheesecake reign supreme as comfort food staples.
Taste-wise, these cheesecakes boast a smooth, creamy filling that bursts with the flavor of ripe bananas. The texture is a marriage of luscious creaminess and a satisfying crunch from the layers of crushed vanilla wafers and pecans. What truly sets this dessert apart is the addition of those iconic layers, making every bite a delicious adventure—a creamy center followed by a satisfying crunch.
These cheesecakes are perfect for any occasion, whether it’s a family gathering, a picnic, or a special celebration. They bring smiles and sweet nostalgia to the table, making them a heartwarming treat for anyone who takes a bite.
Why You’ll Love This Recipe
Taste Explosion: The rich cream cheese filling pairs beautifully with the natural sweetness of the bananas, while the crunchy topping adds an exciting textural contrast that keeps you coming back for more.
Cost-Effective: Unlike pricey restaurant desserts, I assure you this Banana Pudding Crunch Cheesecake can be made at home for a fraction of the cost, without compromising on flavor or quality.
Customization Options: You can easily tweak this recipe to suit your taste. Want a hint of chocolate? Throw in some cocoa powder. Prefer a nut-free version? Swap out the pecans for some graham crackers!
Beginner-Friendly: If you’re a novice baker, fear not! This recipe is straightforward and forgiving, making it an excellent choice for those just starting to explore the world of baking.
Make Ahead: This cheesecake tastes even better after a night in the fridge, allowing flavors to meld. You can whip it up a day in advance and have a stunning dessert ready to impress!
Ingredients
To create the perfect Banana Pudding Crunch Cheesecake, gather the following ingredients:
For the crust:
- 1 1/2 cups crushed vanilla wafers (I prefer Nabisco for that classic flavor)
- 1/4 cup granulated sugar
- 1/4 cup unsalted butter, melted (Ensure it’s at room temperature for a better mix)
For the filling:
- 24 oz cream cheese, softened (Philadelphia is my go-to for creaminess)
- 1 cup granulated sugar
- 3 ripe bananas, mashed (The riper, the better!)
- 3 large eggs (room temperature for easy mixing)
- 1 tsp vanilla extract
- 1/4 cup sour cream (adds richness)
- 1/4 cup all-purpose flour (to help bind the filling)
For the topping:
- 1 cup crushed vanilla wafers
- 1/4 cup chopped pecans (optional but highly recommended)
- 2 tbsp unsalted butter, melted (to bind the topping together)
Preparation Notes:
- Make sure your cream cheese is softened; this ensures a smooth filling.
- If you want a gluten-free option, substitute with gluten-free vanilla wafers.
Step-by-Step Instructions
Preheat Your Oven: Set your oven to 325°F (160°C) and grease a 9-inch springform pan to prepare for the cheesecake.
Make the Crust: In a mixing bowl, combine the crushed vanilla wafers, sugar, and melted butter for the crust. Mix until the texture resembles wet sand. Press the mixture evenly into the bottom of the prepared springform pan, creating a firm layer.
Prepare the Cream Cheese Filling: In another bowl, beat the softened cream cheese and sugar until smooth and fluffy (about 2-3 minutes). This step is vital for a creamy texture!
Blend in the Goodies: Add the mashed bananas, eggs, vanilla extract, sour cream, and flour to the cream cheese mixture. Beat until everything is creamy and well combined.
Fill the Pan: Pour the luscious filling over the prepared crust, spreading it evenly with a spatula.
Make the Topping: In a small bowl, mix the crushed vanilla wafers, chopped pecans, and melted butter until combined. Sprinkle this mixture evenly over the cheesecake filling.
Bake: Place the springform pan on a baking sheet to catch any drips, and bake for 55-60 minutes. You’ll know it’s done when the edges are set, but the center is still slightly jiggly.
Cooling Time: Turn off the oven and leave the cheesecake inside with the door slightly ajar for 1 hour—this helps prevent cracking.
Chill: Remove from the oven and let it cool completely at room temperature. Once cooled, refrigerate for at least 4 hours or overnight.
Serve: Carefully remove the cheesecake from the pan, slice, and serve. Enjoy the compliments coming your way!
Chef’s Tips:
- Avoid overmixing the filling to prevent a grainy texture.
- If cracks do appear, don’t fret! A dollop of whipped cream can cover them beautifully.
Expert Tips & Tricks
Storage: Keep any leftovers in an airtight container in the fridge for up to 5 days. Alternatively, you can freeze the cheesecake for up to 2 months—just be sure to wrap it well!
Make-ahead Instructions: Whip this cheesecake up to 2 days in advance for an even better taste. Fridge resting helps meld all those sumptuous flavors.
Troubleshooting: If the filling cracks while baking, try gradually cooling the oven next time by leaving the door ajar and cooling the cheesecake slowly.
Scaling the Recipe: Planning a big event? You can easily double this recipe to make a larger cheesecake. Just adjust your baking time slightly to account for the larger volume.
Serving Enhancements: Top with fresh whipped cream, banana slices, or a drizzle of caramel sauce before serving for that extra touch of elegance.
Serving Suggestions
This Banana Pudding Crunch Cheesecake is as delightful on its own as it is with a few accompaniment options:
- Serve: A side of fresh fruit salad is a refreshing contrast to the richness of the cheesecake.
- Presentation Idea: Consider garnishing each slice with a sprinkle of crushed nuts and a dollop of whipped cream for a beautiful finish.
- Occasion Recommendations: This dessert is perfect for birthday parties, family reunions, or holiday celebrations. It’s sure to be a talking point at any gathering!
Variations & Substitutions
Explore different flavor combinations and dietary adaptations with this Banana Pudding Crunch Cheesecake:
- Flavor Variations: Want a hint of chocolate? Add chocolate chips to the filling. For a caramel twist, layer caramel sauce between the cheesecake and topping.
- Dietary Adaptations: To make this cheesecake gluten-free, swap out the vanilla wafers for gluten-free options. For a vegan version, use cream cheese alternatives and flax eggs.
- Seasonal Variations: Add in spices like cinnamon or pumpkin for a fall-inspired version, or top it with fresh berries during summer.
Nutrition & Storage Info
- Prep Time: 20 minutes
- Cook Time: 60 minutes
- Total Time: 6 hours (including cooling)
- Yield: 12 servings
- Estimated Calories per Serving: 350 calories
Storage Instructions:
- Room Temperature: Serve fresh for the best result.
- Fridge: Store in an airtight container for up to 5 days.
- Freezer: Wrap tightly and freeze for up to 2 months.
FAQ Section
Can I use ripe bananas?
Yes! Ripe bananas work beautifully in this recipe for maximum flavor.Do I have to use a springform pan?
While a springform pan is ideal for easy release, you can use a regular pie dish—just be careful when serving.Can I use other nuts instead of pecans?
Absolutely! Chopped walnuts or almonds can be great substitutes.How do I know when the cheesecake is fully baked?
The edges should be set and the center slightly jiggly. It will firm up as it cools.Can I make this cheesecake ahead of time?
Yes! In fact, it tastes better when made a day ahead and chilled overnight.How can I prevent my cheesecake from cracking?
Gradually cooling in the oven and avoiding overmixing can help prevent cracks.What should I do if my cheesecake doesn’t set?
If the cheesecake is still jiggly after baking, you may need to bake it longer, or you can chill it for a bit more time.How do I remove the cheesecake from the pan?
Let it cool completely, then run a knife around the edges before unlatching the springform pan.Can I freeze leftover cheesecake?
Yes, it freezes well! Just be sure it’s fully cooled and tightly wrapped.What’s the best way to serve it?
It’s delicious served chilled, topped with whipped cream and banana slices for a burst of freshness!
Conclusion
This Banana Pudding Crunch Cheesecake is not just a dessert; it’s an experience that brings people together, evoking memories and creating new ones with every slice. Its unique flavor profile and delightful texture are sure to impress your family and friends.
I encourage you to try out this recipe and to let me know how it turns out for you! Your feedback means the world to me. If you love this Banana Pudding Crunch Cheesecake, be sure to check out other delightful recipes on my blog—your taste buds will thank you! Happy baking!
Print
Heavenly Banana Pudding Crunch Cheesecake
- Total Time: 360 minutes
- Yield: 12 servings 1x
- Diet: Vegetarian
Description
A delightful twist on classic banana pudding and cheesecake combining creamy banana goodness with a crunchy topping.
Ingredients
- 1 1/2 cups crushed vanilla wafers
- 1/4 cup granulated sugar
- 1/4 cup unsalted butter, melted
- 24 oz cream cheese, softened
- 1 cup granulated sugar
- 3 ripe bananas, mashed
- 3 large eggs
- 1 tsp vanilla extract
- 1/4 cup sour cream
- 1/4 cup all-purpose flour
- 1 cup crushed vanilla wafers (for topping)
- 1/4 cup chopped pecans (optional)
- 2 tbsp unsalted butter, melted (for topping)
Instructions
- Preheat your oven to 325°F (160°C) and grease a 9-inch springform pan.
- Combine the crushed vanilla wafers, sugar, and melted butter for the crust. Press it evenly into the bottom of the springform pan.
- In a bowl, beat the softened cream cheese and sugar until smooth and fluffy.
- Add the mashed bananas, eggs, vanilla extract, sour cream, and flour to the cream cheese mixture and beat until creamy.
- Pour the filling over the prepared crust and spread evenly.
- Mix the crushed vanilla wafers, chopped pecans, and melted butter for the topping. Sprinkle it over the cheesecake filling.
- Bake for 55-60 minutes until the edges are set but the center is slightly jiggly.
- Turn off the oven, leave the cheesecake inside with the door slightly ajar for 1 hour.
- Let it cool completely at room temperature, then refrigerate for at least 4 hours or overnight.
- Remove from the pan, slice, and serve.
Notes
For a gluten-free option, substitute with gluten-free vanilla wafers. Store leftovers in an airtight container for up to 5 days or freeze for up to 2 months.
- Prep Time: 20 minutes
- Cook Time: 60 minutes
- Category: Dessert
- Method: Baking
- Cuisine: American
Nutrition
- Serving Size: 1 slice
- Calories: 350
- Sugar: 22g
- Sodium: 300mg
- Fat: 20g
- Saturated Fat: 10g
- Unsaturated Fat: 6g
- Trans Fat: 0g
- Carbohydrates: 40g
- Fiber: 1g
- Protein: 8g
- Cholesterol: 80mg
🥗 Free Custom Keto Meal Plan?
Do you want to lose weight while still enjoying delicious Asian & Thai Fusion meals? Take this quick quiz to get your personalized Keto plan based on your favorite foods!
- ✅ No more guessing what to eat
- ✅ Delicious & easy-to-make recipes
- ✅ Tailored to your body type
Get My Custom Plan Now! →
*Over 100,000+ people have transformed their lives with this quiz.