Table of Contents
Table of Contents
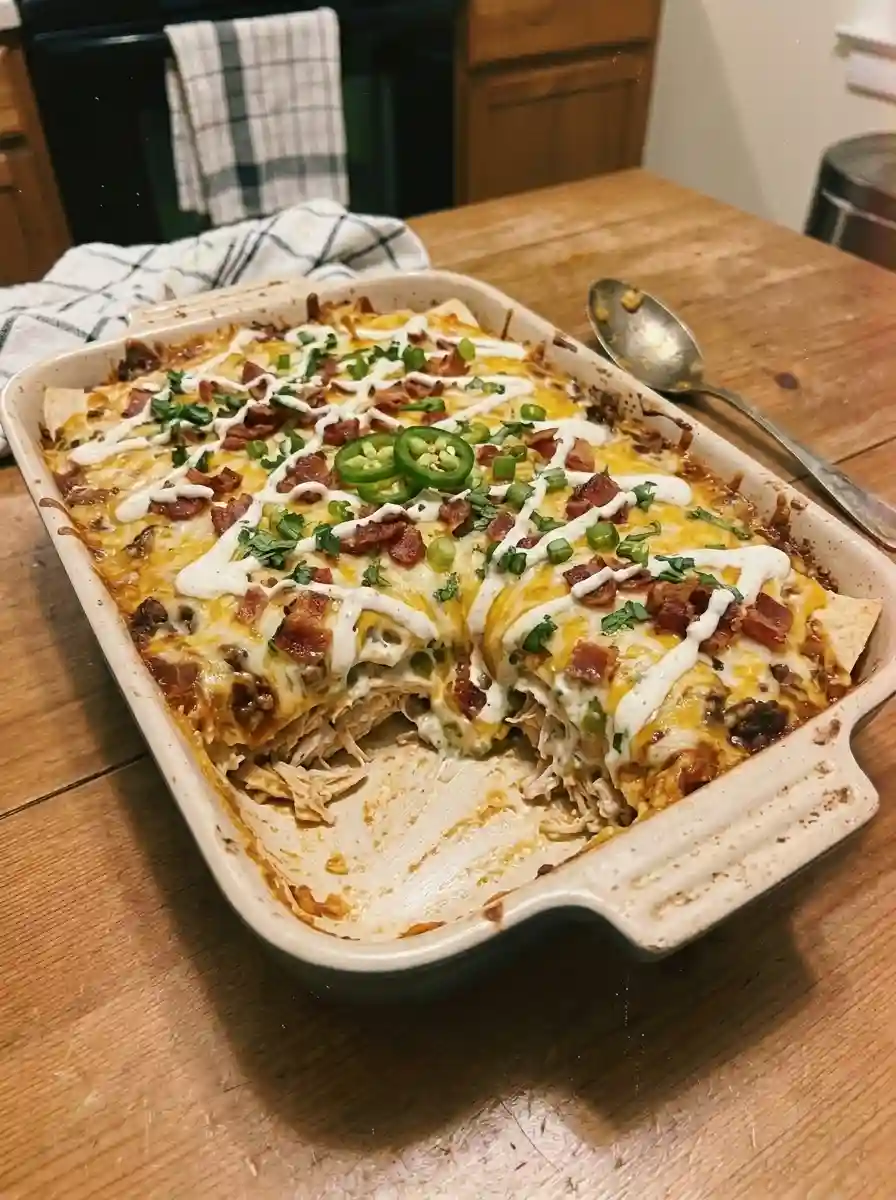
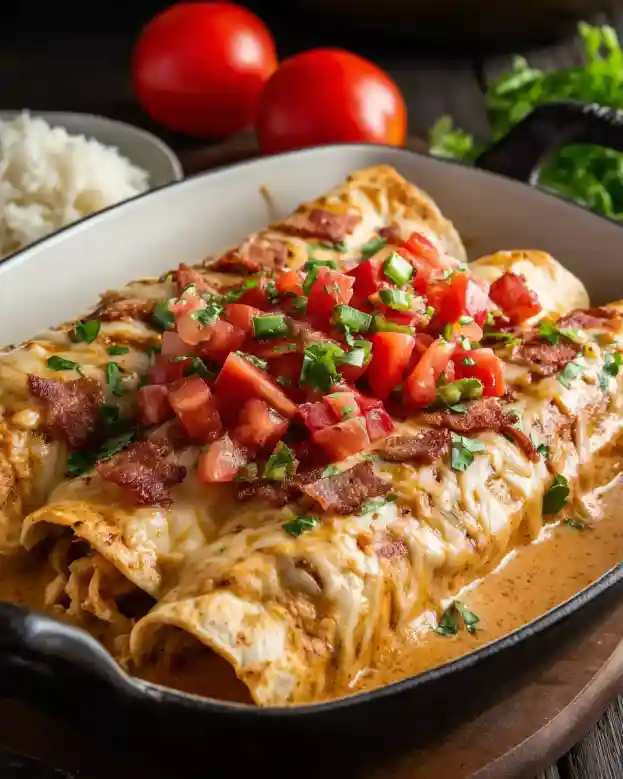
These Bacon Ranch Chicken Enchiladas are the ultimate weeknight dinner: tender shredded chicken, crispy bacon, creamy ranch dressing, and melted cheese, all rolled in soft tortillas and baked in a zesty enchilada sauce. It’s a deliciously creamy twist on classic enchiladas that will have everyone asking for seconds!
Note: Total time is just 40 minutes (15 min prep + 25 min bake). Make-ahead and freezer-friendly!
Dietary Badges
- Family-Friendly (Kid-Approved!)
- Make-Ahead & Freezer-Friendly
- One-Pan Cleanup
- Gluten-Free Option (Use corn tortillas + GF ranch/sauce)
- Uses Leftover Rotisserie Chicken
The 3 Biggest Mistakes People Make with Bacon Ranch Enchiladas
Even simple enchiladas can turn into a soggy, bland, or falling-apart mess if you fall into these common traps. Avoid these to guarantee perfect, creamy, flavorful enchiladas every time:
- Drowning the Filling in Ranch (The Soggy Disaster): If you mix too much ranch dressing into the chicken filling, it becomes watery and leaks out during baking, making your tortillas soggy. The Fix: Add the ranch-sour cream mixture “a spoonful at a time, just enough to lightly coat” the chicken. You want creamy, not soupy!
- Using Cold, Stiff Tortillas (The Tear Trap): Trying to roll cold tortillas is a recipe for cracks and tears. The Fix: Warm your tortillas for 30 seconds in the microwave (wrapped in a damp paper towel) or 15 seconds per side in a dry skillet. This makes them pliable and easy to roll without breaking.
- Cutting Too Soon (The Collapse Effect): It’s tempting to dig in the second the enchiladas come out of the oven. But if you slice immediately, the creamy filling hasn’t had time to set, and you’ll get a sloppy, sliding mess. Let the enchiladas rest for 5-10 minutes after baking. This allows the cheese and sauce to firm up slightly, giving you clean, beautiful servings.
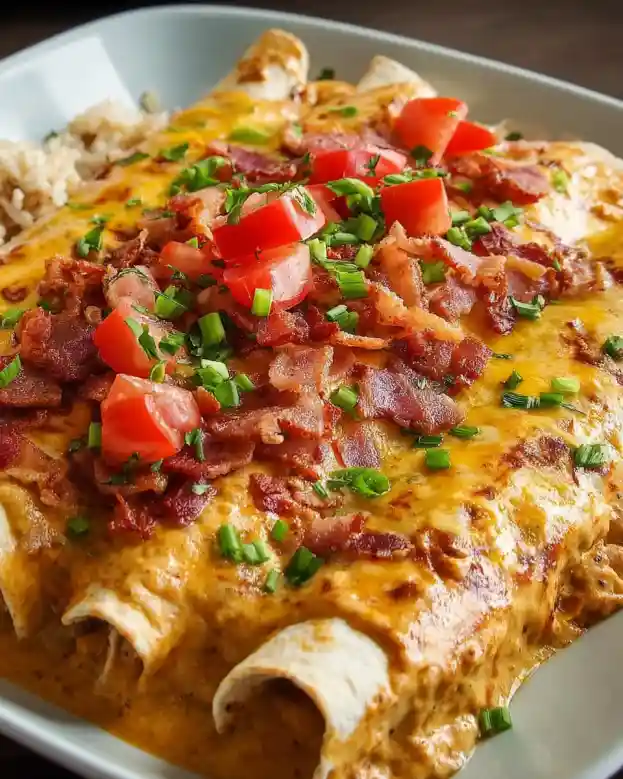
Why This Works: The Science of the Perfect Creamy Enchilada
- The “Double Ranch” Technique: Using ranch seasoning in the filling (for concentrated flavor) AND ranch dressing in the sauce (for creamy texture) creates layers of ranch flavor without making the dish too wet. The seasoning adheres to the chicken, while the dressing emulsifies with the enchilada sauce for a stable, creamy topping.
- The Cream Cheese + Sour Cream Binder: Combining cream cheese with sour cream creates a rich, stable emulsion that:
- Binds the chicken and bacon together without separating
- Adds a tangy depth that balances the richness of the bacon and cheese
- Stays creamy when reheated (unlike sauces that can break)
- High-Heat Baking (450°F / 230°C): Baking at a higher temperature for a shorter time (15-20 min) ensures:
- The cheese melts and gratinates quickly without overcooking the chicken
- The tortilla edges get slightly crisp, adding textural contrast
- The sauce bubbles and thickens without making the tortillas mushy
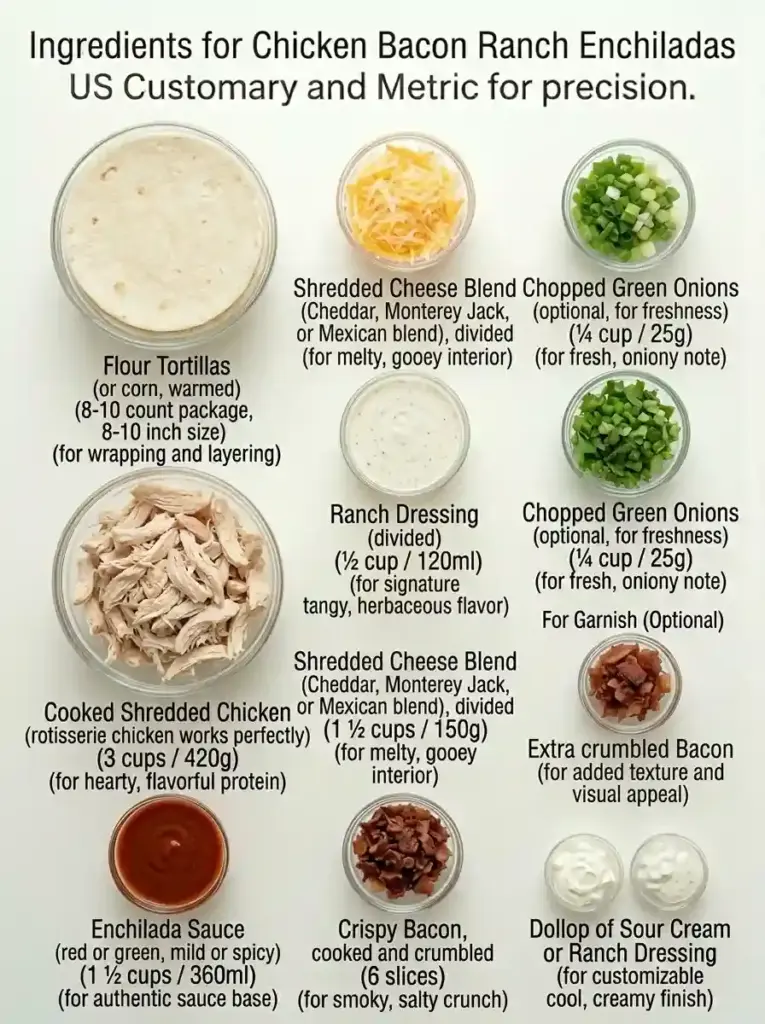
Ingredients
Measurements are provided in both US Customary and Metric for precision. Your exact ingredients are kept intact, with quantities added for reproducibility.
The Filling:
- 3 cups (420g) cooked shredded chicken (rotisserie chicken works perfectly)
- 6 slices bacon, cooked until crispy and crumbled
- 4 oz (115g) cream cheese, softened to room temperature
- ½ cup (120ml) ranch dressing, divided (see instructions)
- 1 ½ cups (150g) shredded cheese (Cheddar, Monterey Jack, or Mexican blend), divided
- ¼ cup (25g) chopped green onions (optional, for freshness)
The Assembly:
- 8-10 large (8-10 inch) flour tortillas (or corn tortillas, warmed)
- 1 ½ cups (360ml) enchilada sauce (red or green, mild or spicy, your preference)
- 2 tablespoons sour cream (to mix with remaining ranch for the sauce)
For Garnish (Optional):
- Extra chopped green onions or fresh cilantro
- Extra crumbled bacon
- Dollop of sour cream or ranch dressing
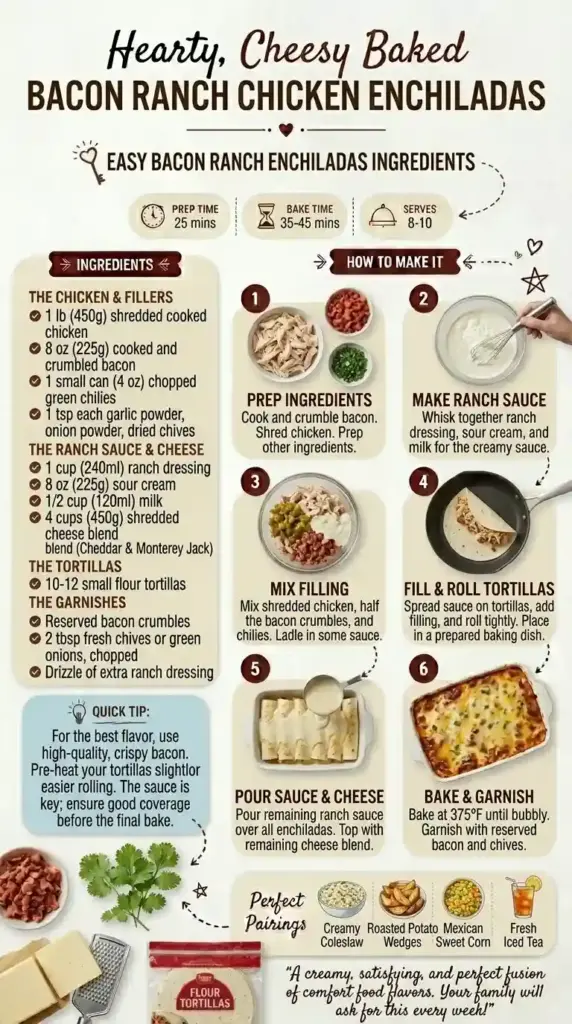
Step-by-Step Instructions (Optimized for Perfect Results)
1. Prep & Preheat
Preheat your oven to 450°F (230°C). Lightly grease a 9×13-inch (23×33 cm) baking dish with cooking spray or a thin layer of oil. Pro-Tip: For easier cleanup, line the dish with parchment paper, leaving an overhang on the long sides to use as “handles” for lifting out servings.
2. Prepare the Filling (The “Barely Coat” Method)
In a large mixing bowl, combine the shredded chicken, crumbled bacon, and softened cream cheese. Critical Step: In a small bowl, mix ¼ cup (60ml) of the ranch dressing with the sour cream. Add this mixture to the chicken bowl a spoonful at a time, stirring gently, until the chicken is just lightly coated. You want it creamy, not swimming in sauce. Stir in 1 cup (100g) of the shredded cheese and the chopped green onions (if using). Set aside.
3. Warm the Tortillas (Anti-Tear Step)
Stack your flour tortillas, wrap them in a damp paper towel, and microwave for 30 seconds. This makes them soft and pliable, preventing tears when you roll. (If using corn tortillas, warm each one for 15 seconds per side in a dry skillet instead.)
4. Assemble Like a Pro (The “Anchor & Jam” Technique)
- Base Layer: Spread a thin layer (about ¼ cup) of enchilada sauce on the bottom of your prepared baking dish. (This prevents sticking!)
- Fill & Roll: Place a warmed tortilla on a clean surface. Spoon about ⅓ cup of the chicken filling down the center. Roll it up tightly and place it seam-side down in the baking dish.
- Anchor the First Roll: Place the first rolled enchilada against the short end of the dish. This “anchors” it so it won’t unroll.
- Pack Them Snug: Continue filling and rolling, placing each new enchilada snugly against the previous one. The dish should be “jammed full”—this helps them hold their shape during baking.
5. Sauce & Cheese Topping
Pour the remaining enchilada sauce evenly over the rolled enchiladas. Aim to cover them without drowning them. Sprinkle the remaining ½ cup (50g) of shredded cheese generously over the top.
6. Bake Hot & Fast
Bake in the preheated oven for 15-20 minutes, or until the cheese is fully melted, bubbly, and starting to turn golden at the edges. Optional Pro Move: For an extra-gratinated top, switch your oven to Broil (Grill) for the last 1-2 minutes, watching closely to prevent burning.
7. Rest Before Serving (Non-Negotiable!)
Remove the enchiladas from the oven and let them rest on a wire rack for 5-10 minutes before serving. This allows the creamy filling to set slightly, ensuring you get clean, beautiful portions instead of a sloppy scoop. Garnish with extra green onions, cilantro, crumbled bacon, or a dollop of sour cream if desired.
Scaling & Pan Size Notes
- Standard Recipe (9×13-inch pan): Yields 8-10 enchiladas, perfect for family dinners or potlucks.
- Smaller Batch (8×8-inch pan): Halve all ingredients for a cozier meal (4-5 enchiladas). Baking time may reduce by 5 minutes—check for bubbly cheese.
- Double Batch: Use two 9×13 pans. Do not overcrowd a single pan, as the enchiladas need space to heat evenly.
- Tortilla Tip: If your tortillas are small, you may need 10-12 to fill the dish. Slight overlaps are good—they prevent gaps!
Pro-Tips for Next-Level Enchiladas
- The “Double Ranch” Flavor Boost: For maximum ranch flavor, add 1 tablespoon of dry ranch seasoning mix to the chicken filling in addition to the ranch dressing. This gives a concentrated flavor punch without adding extra liquid.
- Make-Ahead Magic: Assemble the entire dish up to 24 hours in advance. Cover tightly and refrigerate. When ready to bake, let it sit at room temperature for 20 minutes while the oven preheats, then bake as directed (may need +5 minutes).
- Freezer-Friendly: Assemble the enchiladas (unbaked), wrap the entire dish tightly in plastic wrap + foil, and freeze for up to 3 months. To bake from frozen: thaw overnight in the fridge, then bake as directed. Or bake from frozen at 350°F, covered, for 45 minutes, then uncover and bake 15-20 more minutes until hot and bubbly.
- Gluten-Free Swap: Use certified gluten-free flour tortillas or corn tortillas. Ensure your ranch dressing and enchilada sauce are also GF-certified.
- Spice Level Control: For a milder dish, use “mild” enchilada sauce and regular ranch. For extra heat, use “spicy” enchilada sauce, add a diced jalapeño to the filling, or use a spicy ranch variety.
Troubleshooting Table
| Problem | Cause & Solution |
|---|---|
| Enchiladas are soggy/watery | Cause: Too much liquid in the filling, or over-saucing. Solution: Use the “barely coat” method for the ranch mixture. Don’t drown the enchiladas in sauce—just cover them. |
| Tortillas tore while rolling | Cause: Tortillas were cold or dry. Solution: Always warm tortillas before rolling (microwave with damp paper towel or dry skillet). Handle gently. |
| Cheese didn’t melt smoothly / is greasy | Cause: Oven temp too low, or pre-shredded cheese with anti-caking agents. Solution: Bake at 450°F. Shred your own cheese from a block for best melt. |
| Filling is dry or bland | Cause: Not enough seasoning or moisture. Solution: Ensure you’re using the full amount of ranch dressing and cream cheese. Season the chicken filling with salt & pepper to taste. |
| Enchiladas unrolled during baking | Cause: Not packed snugly, or seam-side up. Solution: Pack them “jammed full” in the dish, always place seam-side down, and anchor the first roll against the pan edge. |
Storage & Reheating
- Refrigerator: Store leftovers in an airtight container for up to 4 days. Reheat individual portions in the microwave (add a splash of water to prevent drying) or the whole dish in a 350°F oven, covered with foil, for 15-20 minutes.
- Freezer: Freeze unbaked or baked enchiladas for up to 3 months. Wrap tightly in plastic + foil. Thaw overnight in the fridge before reheating as above.
- Meal Prep: Portion into individual containers for easy grab-and-go lunches. Reheat from fridge in microwave for 2-3 minutes.
Nutrition Information (Per Serving)
Based on 8 servings (using standard ingredients). This is an estimate and may vary based on specific brands and portion sizes.
- Calories: ~380 kcal
- Total Fat: 24g (Saturated Fat: 10g)
- Carbohydrates: 22g
- Sugars: 3g
- Protein: 22g
- Sodium: 720mg
- Dietary Fiber: 2g
- Cholesterol: 75mg
Disclaimer: This recipe can be made Gluten-Free by using certified GF tortillas, ranch, and enchilada sauce. For a Dairy-Free version, use dairy-free cream cheese, ranch, sour cream, and cheese alternatives.
Frequently Asked Questions
Can I make these enchiladas ahead of time?
Yes! These Bacon Ranch Chicken Enchiladas are perfect for make-ahead meals. Assemble the entire dish, cover tightly with plastic wrap or foil, and refrigerate for up to 24 hours before baking. When ready to cook, let it sit at room temperature for 20 minutes while the oven preheats, then bake as directed (you may need to add 5 extra minutes if baking from cold).
Can I freeze these enchiladas?
Absolutely! You can freeze these enchiladas either before or after baking. For best results: assemble (unbaked), wrap tightly in plastic wrap + foil, and freeze for up to 3 months. To bake from frozen: thaw overnight in the fridge, then bake as directed. Or bake from frozen at 350°F, covered, for 45 minutes, then uncover and bake 15-20 more minutes until hot and bubbly.
Can I use corn tortillas instead of flour?
Yes! Corn tortillas work great for a gluten-free version and add a more traditional texture. Pro tip: warm each corn tortilla for 15 seconds per side in a dry skillet (or microwave wrapped in damp paper towels for 30 seconds) before rolling. This makes them pliable and prevents tearing. You may need 10-12 corn tortillas since they’re usually smaller than flour tortillas.
How do I keep the enchiladas from getting soggy?
Soggy enchiladas are usually caused by excess moisture. To prevent this: 1) Use the “barely coat” method—add the ranch-sour cream mixture to the chicken just until lightly coated, not swimming. 2) Don’t over-sauce the top; just cover the enchiladas without drowning them. 3) Bake at 450°F for a shorter time to evaporate excess moisture quickly. 4) Let the enchiladas rest 5-10 minutes after baking to allow the filling to set.
What can I substitute for cream cheese?
Great substitutes include: Greek yogurt (for a tangier, lighter option), mascarpone (for extra richness), or dairy-free cream cheese for a plant-based version. If using Greek yogurt, strain it first to remove excess whey and prevent a watery filling. All substitutes should be at room temperature for easy mixing.
Can I use rotisserie chicken?
Yes! Rotisserie chicken is actually the recommended choice for this recipe. It’s already cooked, flavorful, and shreds easily. Use about 3 cups (420g) of shredded rotisserie chicken. This is a fantastic way to repurpose leftovers and cut down on prep time!
How spicy is this recipe?
The spice level depends on your choices! For a mild, family-friendly version: use mild enchilada sauce and regular ranch dressing. For medium heat: use medium enchilada sauce or add a diced jalapeño to the filling. For extra spice: use spicy enchilada sauce, hot ranch variety, or add a pinch of cayenne or chipotle powder to the filling.
Can I add vegetables to the filling?
Definitely! Great additions include: diced bell peppers or jalapeños (sauté with the onions), corn kernels (frozen or canned, drained), black beans (rinsed), or spinach (wilted and squeezed dry). Just be sure to drain any excess liquid from canned or cooked veggies to prevent a soggy filling.
How do I reheat leftovers without drying them out?
For best results: reheat individual portions in the microwave with a damp paper towel over the top (adds steam) for 1-2 minutes. For larger portions or the whole dish: cover with foil and reheat in a 350°F oven for 15-20 minutes. Adding a tiny splash of enchilada sauce or broth before reheating helps restore creaminess.
What should I serve with these enchiladas?
Classic pairings include: Mexican rice or cilantro-lime rice; refried beans or black bean salad; a crisp green salad with lime vinaigrette; tortilla chips with salsa, guacamole, or queso; or roasted vegetables like corn, zucchini, or bell peppers. For a lighter meal, serve with pico de gallo and a dollop of Greek yogurt instead of sour cream.
Bacon Ranch Chicken Enchiladas (The Ultimate Creamy Comfort Food)
- Total Time: 40 mins
- Yield: 8 enchiladas (4 servings) 1x
Description
Creamy ranch-seasoned chicken and crispy bacon wrapped in tortillas, smothered with cheese sauce, and baked to bubbly perfection. A crowd-pleasing twist on classic enchiladas!
Ingredients
- Chopped green onions or cilantro for garnish
- 2 cups cooked shredded chicken
- 1 cup cooked bacon, chopped
- 1 cup ranch dressing
- 8 oz cream cheese, softened
- 2 cups shredded cheese (cheddar or Mexican blend)
- 8 flour tortillas
- 2 cups enchilada sauce
- Chopped green onions or cilantro for garnish
Instructions
- Make filling: Mix chicken, bacon, ranch seasoning, sour cream, mayo, cheddar, and green onions.
- Prepare sauce: Melt butter, whisk in flour. Gradually add milk, simmer until thickened. Stir in Monterey Jack until melted.
- Assemble: Spread 1/2 cup sauce in baking dish. Fill tortillas with chicken mixture, roll tightly. Place seam-side down.
- Bake: Pour remaining sauce over top. Bake at 375°F (190°C) for 20 mins until bubbly.
- Garnish: Top with lettuce, tomatoes, cilantro, and extra ranch dressing.
Notes
- Shortcut: Use rotisserie chicken and pre-cooked bacon.
- Spicier version: Add 1 diced jalapeño to filling.
- Make ahead: Assemble unbaked enchiladas; refrigerate up to 24 hours.
- For crispier tops, broil 2-3 minutes after baking.
- Prep Time: 20 mins
- Cook Time: 20 mins
- Category: Main Course
- Method: Baking
- Cuisine: Tex-Mex
Nutrition
- Serving Size: 2 enchiladas
- Calories: 680
- Sugar: undefined
- Sodium: 1,240mg
- Fat: 42g
- Saturated Fat: 18g
- Unsaturated Fat: undefined
- Trans Fat: undefined
- Carbohydrates: undefined
- Fiber: 3g
- Protein: 42g
- Cholesterol: undefined
🥗 Free Custom Keto Meal Plan?
Do you want to lose weight while still enjoying delicious Asian & Thai Fusion meals? Take this quick quiz to get your personalized Keto plan based on your favorite foods!
- ✅ No more guessing what to eat
- ✅ Delicious & easy-to-make recipes
- ✅ Tailored to your body type
Get My Custom Plan Now! →
*Over 100,000+ people have transformed their lives with this quiz.