Crispy Fried Shallots: The Ultimate Crunch for Your Dishes!
Growing up, our family gatherings were often a flavorful feast of memories, filled with laughter and aromatic dishes simmering in the kitchen. One ingredient that always seemed to bring everything together was Crispy Fried Shallots. My grandmother had a special touch—she’d fry up a batch, and the whole house would be enveloped by the comforting scent of caramelized shallots. These little nuggets of flavor not only added crunch but also an irresistible taste to our dishes, turning simple meals into something extraordinary.
This recipe is my homage to that tradition, but with a twist that sets it apart from any store-bought version. Using Gogi tempura flour elevates the texture, creating that perfect golden crispness that you crave, while keeping the flavor profile beautifully rich and savory. Plus, it’s not just a recipe; it’s a slice of my heritage and a way for you to create your own cherished family moments.
In this post, I’ll guide you step-by-step on how to make your own Crispy Fried Shallots, complete with tips, tricks, and variations along the way. You’ll learn how to achieve that restaurant-quality crunch right in your kitchen, turning your everyday meals into something special. So, grab your shallots, and let’s get frying!
What Are Crispy Fried Shallots?
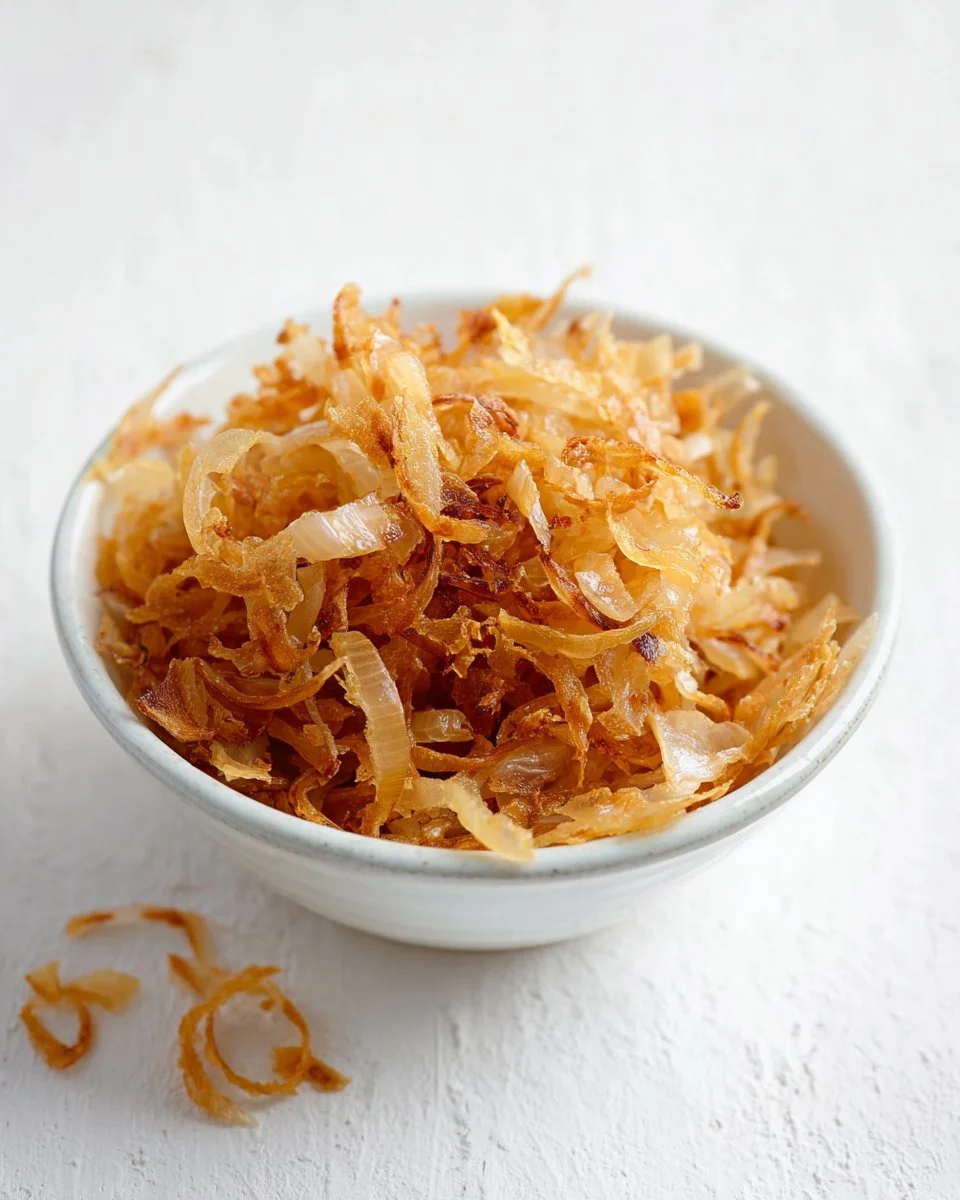
Crispy Fried Shallots are more than just a crunchy topping; they are a beloved staple in many Asian cuisines. Originating from Southeast Asia, these shallots are thinly sliced, fried until perfectly golden, and sprinkled over dishes like noodle soups, salads, and even simple rice meals, giving them a delightful flavor and texture boost.
The taste is a perfect balance of sweetness and savory—think of it as an umami-packed pop that elevates any dish. The texture? Divine. Once you bite into one, you’re greeted with that satisfyingly crunchy exterior followed by a soft, flavorful interior that adds layers to your palate.
You’ll want to whip up a batch when you need to impress guests or simply want to indulge in a little comfort food. They’re the perfect way to transform an ordinary meal into something truly memorable.
Why You’ll Love This Recipe
Homemade Goodness: There’s something magical about making your own Crispy Fried Shallots. Unlike store-bought versions—which can be overly oily or stale—this recipe guarantees freshness and crispiness that you can see and taste.
Cost-Effective: If you’ve ever bought fried shallots at the store, you know they can be shockingly pricey! Making your own not only saves you money but also allows you to create larger batches to store for later use—all while knowing exactly what goes into them.
Customization Options: Feel free to play with flavors! You can infuse the oil with garlic for a garlicky-sweet aroma or even experiment with different flours to create your preferred texture.
Simplicity at its Best: This recipe is easy enough for any beginner. You’ll only be spending about 30 minutes from prep to crunch, making it a quick addition to your cooking routine.
Versatile Uses: From adding a delicate crunch to a simple green salad to sprinkling over a bowl of pho, these crispy shallots enhance virtually any dish. They are versatile little gems that complement countless recipes.
With just a touch of effort and love, you’ll have a delightful batch of Crispy Fried Shallots that will not only bring joy to your taste buds but also elevate your cooking skills to a whole new level.
Ingredients
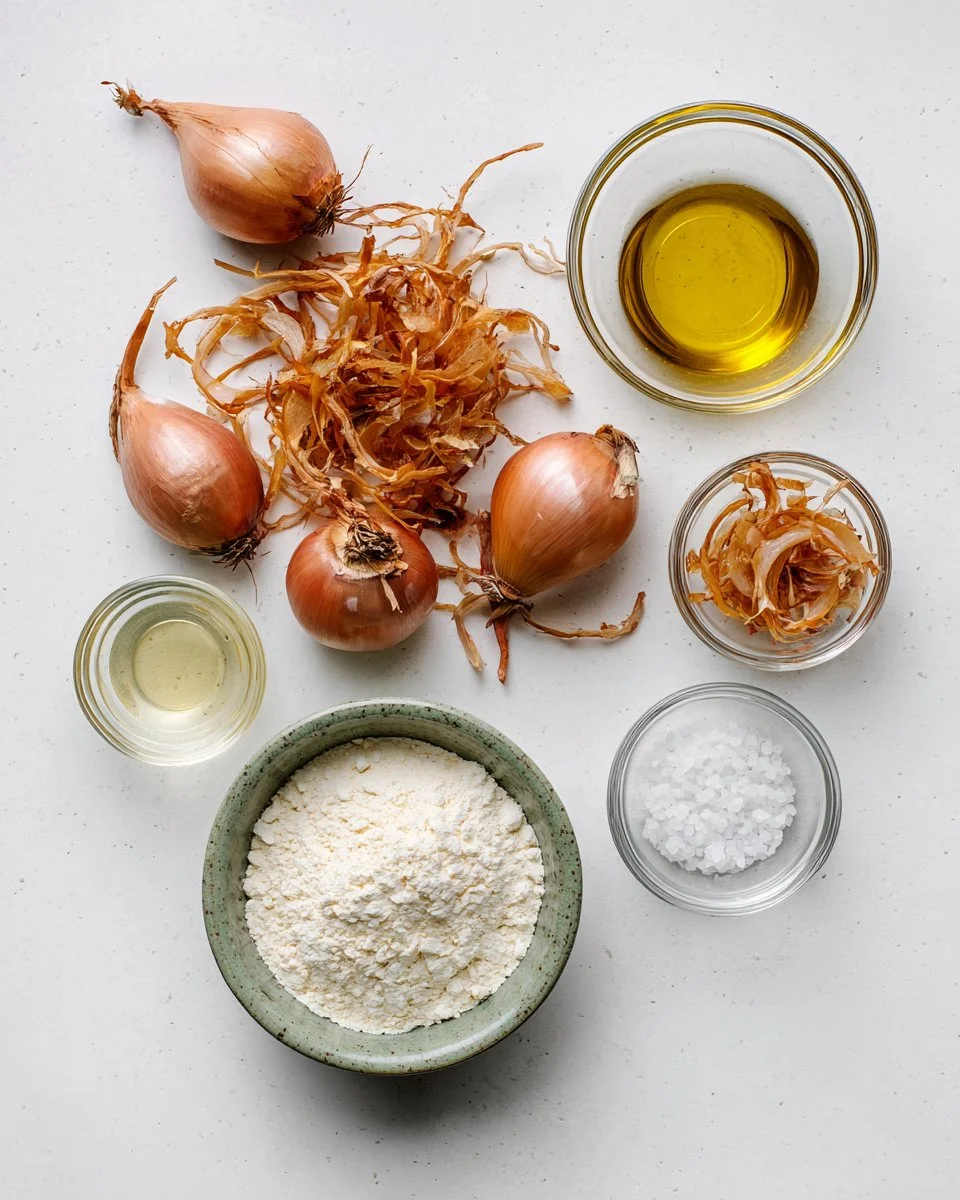
To create these flavorful Crispy Fried Shallots, you’ll need just a handful of ingredients:
- 15 shallots: Look for firm, dry shallots. Purple or yellow, both will work—just be sure they’re fresh!
- 1 pinch of salt: Enhances the flavor. Sea salt is a great choice for its mild flavor.
- 1 tablespoon Gogi tempura flour: This flour creates ultra-crispy results. If unavailable, you can use regular tempura flour or all-purpose flour, but Gogi tempura flour definitely has a unique texture.
- 1/2 cup oil: Use a neutral oil with a high smoke point like vegetable or canola oil. Avoid olive oil as it may impart too strong a flavor.
Prep Notes: Make sure your shallots are at room temperature before slicing to avoid uneven frying. If you prefer a little more seasoning, consider adding spices like cayenne or garlic powder to the flour mix!
Step-by-Step Instructions
1. Peel and Slice
Begin by peeling the shallots carefully, ensuring you remove all the papery skin. Slice them thinly and evenly—about 1/8 inch thick. (Using a mandoline slicer can help achieve uniform slices and save time!)
2. Remove Excess Water
Once sliced, spread the shallots out on a paper towel. Place another paper towel on top to absorb moisture. Let them sit for about 10 minutes—this step is essential to achieve that crispy texture when frying!
3. Prepare the Flour Coating
In a mixing bowl, combine the tempura flour with a pinch of salt. You’re looking for a light, airy mixture to ensure a delicate coating that crisps beautifully.
4. Heat the Oil
In a deep pan or skillet, pour in the oil and heat over medium heat. Ensure you have enough oil to fully submerge the shallots. A good indicator is to test the oil by dropping in a small piece of shallot; if it sizzles, it’s ready!
5. Coat the Shallots
After letting the shallots sit for ten minutes, toss them in your flour mixture until thoroughly coated. Shake off any excess flour to prevent clumping.
6. Fry the Shallots
Carefully add the coated shallots to the hot oil in small batches, avoiding overcrowding. Fry for about 2-3 minutes or until they start turning golden brown. Chef’s Tip: Stir occasionally with a slotted spoon to ensure even cooking.
7. Drain Excess Oil
Using a slotted spoon, remove the crispy shallots from the oil and place them on a bowl lined with paper towels. This helps drain off any excess oil.
8. Cool and Store
Let the fried shallots cool completely. Once cooled, store them in an airtight container for up to a week—if they last that long!
Expert Tips & Tricks
Oil Temperature is Key: Make sure your oil isn’t too hot, as this could burn the shallots. If it’s too cold, they’ll absorb too much oil and become soggy.
Batch Frying: Avoid frying all your shallots at once. Fry in batches to maintain the oil temperature and ensure crispness.
Storage: Keep fried shallots in a dry, cool place away from moisture. They can last for up to a week in an airtight container—but good luck keeping them around that long!
Make Ahead: You can make a large batch ahead of time and freeze them. Just reheating them in a warm oven can restore some of that crunch.
Troubleshooting: If your shallots turn out too dark, lower the heat next time. If they end up chewy, they may not have been fried long enough or the oil was too cool.
Serving Suggestions
Crispy Fried Shallots are an easy way to elevate your meals! Sprinkle them over Asian-style salads for added richness, or layer them over a steaming bowl of ramen for that perfect crunch. They also work wonders on roasted vegetables, adding that much-needed texture contrast.
For a stunning presentation, serve them alongside homemade dipping sauces or as a garnish over a creamy soup. Great for gatherings, they can add flair to holiday dinners, potlucks, or any casual meal.
Variations & Substitutions
Garlic Infusion: Add minced garlic to the oil for a fragrant twist. The garlic will also become crispy alongside the shallots!
Spicy Option: Mix in cayenne pepper or chili powder with the flour for a spicy kick.
Herb Coating: Combine dried herbs like thyme or rosemary with the flour mix for an herbal twist.
Dietary Adaptations: For gluten-free options, try using chickpea flour or a certified gluten-free flour blend.
Seasonal Twists: In fall, consider adding a pinch of cinnamon or nutmeg for a warm holiday flavor!
Nutrition & Storage Info
- Prep Time: 10 minutes
- Cook Time: 20 minutes
- Total Time: 30 minutes
- Yield: Approximately 2 cups
- Estimated Calories per Serving: 80 calories (for a tablespoon serving)
Storage:
- Room Temperature: Up to 5 days in an airtight container.
- Refrigerate: Not recommended as they lose their crunch.
- Freezer: Up to 1 month. Re-crisp in the oven.
FAQ Section
Can I use regular onions instead of shallots?
Yes! However, regular onions will impart a different flavor. Shallots are milder and sweeter.How do I know when the oil is hot enough?
Test it with a small piece of shallot. If it sizzles upon contact, the oil is ready!What if my shallots are burning quickly?
Lower the heat slightly. Cooking at medium heat is key to avoid burning while achieving crispiness.Can I use flavored oil for frying?
Absolutely! Just be mindful that it will affect the final flavor of your shallots.Are they fine for a vegan diet?
Yes, Crispy Fried Shallots are naturally vegan-friendly.What dishes are best served with crispy shallots?
They enhance almost any dish but work particularly well with salads, soups, and Asian-inspired meals!Can I make them in advance?
Yes! Just store in an airtight container once cooled, and they should stay crispy for about a week.What should I do if they become soggy?
Reheat them in a low oven or air fryer to revive their crispiness.Is there a way to make them healthier?
Try baking them instead of frying, though they may not achieve the same crispy quality.How does altitude affect frying?
At high altitudes, food can cook faster. Keep an eye on your shallots to avoid overcooking.
Conclusion
Crispy Fried Shallots are not just a delicious texture to add to your dishes; they’re a way to connect with family traditions and memories while creating new moments in your kitchen. Every crunch is a reminder of those comforting family gatherings, and I’m excited for you to try this recipe!
Once you whip up a batch and sprinkle them over your meals, I hope you see how simple ingredients can revolutionize your cooking. I’d love to hear your thoughts on this recipe and any variations you tried. Don’t forget to check out other delightful, easy recipes on the blog that can complement your crispy shallots!
Crispy Fried Shallots
- Total Time: 30 minutes
- Yield: 2 cups 1x
- Diet: Vegan
Description
Deliciously crunchy and aromatic Crispy Fried Shallots, perfect for elevating your dishes with a delightful topping.
Ingredients
- 15 shallots
- 1 pinch of salt
- 1 tablespoon Gogi tempura flour
- 1/2 cup oil
Instructions
- Peel and slice the shallots carefully, ensuring you remove all the papery skin.
- Remove excess water by spreading the sliced shallots on a paper towel.
- Prepare the flour coating by combining tempura flour with a pinch of salt.
- Heat the oil in a deep pan or skillet over medium heat.
- Coat the shallots in the flour mixture until thoroughly covered.
- Fry the shallots in small batches for about 2-3 minutes until golden brown.
- Drain excess oil using a slotted spoon and place on a bowl lined with paper towels.
- Cool completely and store in an airtight container.
Notes
Make sure shallots are at room temperature before slicing for even frying. Consider infusing oil with garlic for extra flavor.
- Prep Time: 10 minutes
- Cook Time: 20 minutes
- Category: Snack
- Method: Frying
- Cuisine: Southeast Asian
Nutrition
- Serving Size: 1 tablespoon
- Calories: 80
- Sugar: 1g
- Sodium: 10mg
- Fat: 7g
- Saturated Fat: 1g
- Unsaturated Fat: 5g
- Trans Fat: 0g
- Carbohydrates: 9g
- Fiber: 1g
- Protein: 1g
- Cholesterol: 0mg
🥗 Free Custom Keto Meal Plan?
Do you want to lose weight while still enjoying delicious Asian & Thai Fusion meals? Take this quick quiz to get your personalized Keto plan based on your favorite foods!
- ✅ No more guessing what to eat
- ✅ Delicious & easy-to-make recipes
- ✅ Tailored to your body type
Get My Custom Plan Now! →
*Over 100,000+ people have transformed their lives with this quiz.