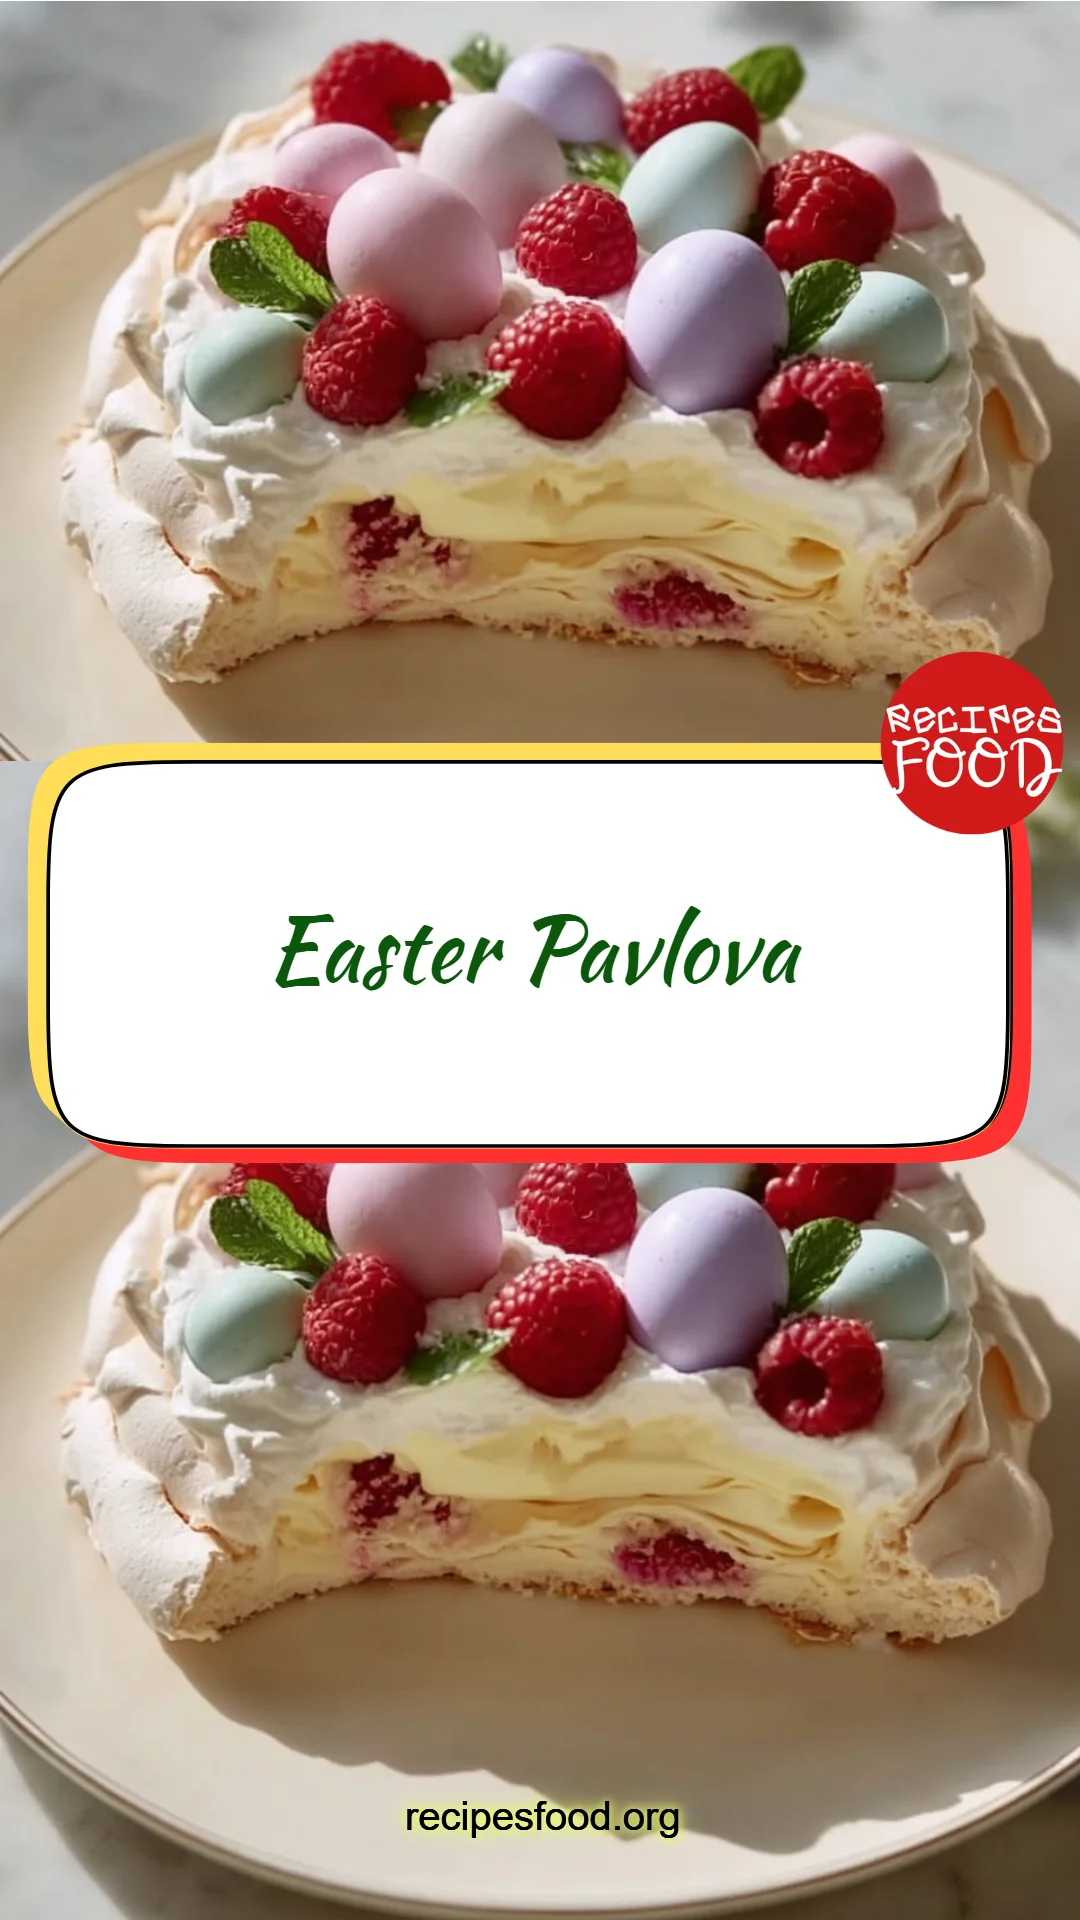
Heavenly Easter Pavlova: A Delightful Twist on a Classic Treat
Easter is not just about the colorful eggs and bunny-shaped chocolates; for my family and me, it means the sweet, melt-in-your-mouth experience of Pavlova. The first time I took a bite of a homemade Easter Pavlova, I was transported to a sunlit kitchen filled with laughter and the fragrance of vanilla wafting through the air. Memories of my mom mastering this delicate dessert come to life every spring as we gather around the table, enjoying the light and airy meringue topped with luscious whipped cream and seasonal fruits.
What makes this Easter Pavlova recipe stand out from the rest is the simplicity, balanced sweetness, and satisfying texture that offers a perfect crunch outside with a soft, marshmallow-like center. It brings a sense of comfort and nostalgia with every bite, reminding me of the love and joy shared amongst family. Through this blog post, I promise to guide you through the process of making your own Easter Pavlova that will surely impress your guests and create cherished memories. You’ll learn the secrets to achieving that perfect meringue and how to assemble a stunning dessert that will steal the show at any gathering. So, roll up your sleeves, and let’s get baking!
What Are Easter Pavlovas?
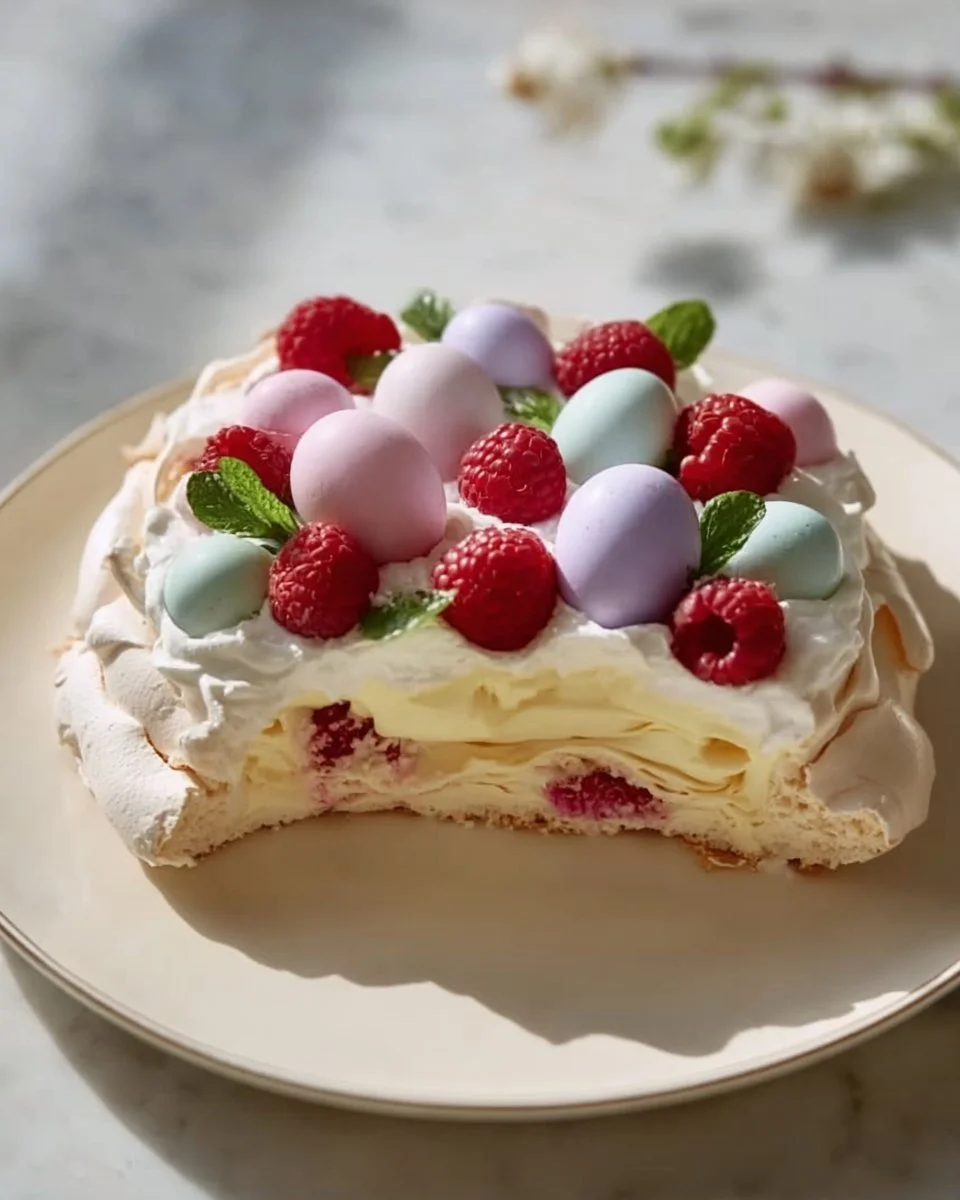
Easter Pavlovas are a classic dessert that originated in Australia and New Zealand, named after Russian ballerina Anna Pavlova. This festive dessert has become a staple during spring celebrations, especially Easter, when vibrant, seasonal fruits grace the top. With a light, airy meringue base, traditional Pavlovas offer a delightful combination of crispness on the outside and softness on the inside, creating an experience that dances on your taste buds.
The unique aspect of Easter Pavlovas lies in their ability to be customized with various toppings, such as whipped cream and a medley of seasonal fruits like strawberries, kiwi, and passion fruit. These delightful contrasts—sweet, tart, and creamy—make the dessert irresistible. Pavlovas are often served as the grand finale at holiday gatherings, embodying the spirit of celebration, warmth, and togetherness.
Why You’ll Love This Recipe
Simple Yet Elegant: This Easter Pavlova couldn’t be easier to make. With just a handful of ingredients, you will impress your guests while enjoying the process. Homemade goodness beats store-bought any day!
Cost-Effective: This recipe is not only a showstopper but also budget-friendly. You can make an impressive dessert without breaking the bank, which is always a win!
Fully Customizable: The beauty of Pavlova lies in its versatility. You can top it with whatever seasonal fruits you love or have on hand, making each creation unique—perfect for personalizing it for your family’s taste.
Charming Presentation: Serving a stunning Pavlova creates an astonishing centerpiece for your table, making it look like you’re hosting a fancy dinner party without the extra effort.
Easy to Make Ahead: Pavlovas store well before it’s time to serve. Simply prepare the meringues the day before, and you can whip up the fruit and cream topping just before your guests arrive.
Ingredients
4 large egg whites: Use room temperature eggs for better volume and consistency. Fresh, organic eggs will yield the best results.
1 cup granulated sugar: Fine sugar dissolves nicely into the egg whites creating that glossy, stiff meringue.
1 teaspoon cornstarch: This helps stabilize your meringue, giving it height and keeping it from becoming too dry.
1 teaspoon white vinegar: A crucial ingredient to add a touch of acidity, enhancing the texture and taste of the meringue.
1 cup heavy cream: Opt for organic, heavy cream, as it whips up beautifully and adds a rich flavor to your Pavlova.
1 teaspoon vanilla extract: For that wonderful aromatic note, choose pure vanilla extract for the best flavor.
Assorted seasonal fruits: Strawberries, kiwi, passion fruit, berries, or any favorite fruits will add a burst of color and flavor to your dessert.
Step-by-Step Instructions
Preheat the oven to 250°F (120°C) and line a baking sheet with parchment paper. This low temperature allows for the slow drying of the meringue, giving it that perfect crispy exterior.
In a large mixing bowl, using an electric mixer, beat the egg whites on medium speed until soft peaks form—about 2-3 minutes.
Gradually add the granulated sugar, one tablespoon at a time, continuing to beat on high until the mixture becomes glossy and stiff peaks form. This may take an additional 3-5 minutes. You should be able to hold the bowl upside down without fear!
Gently fold in cornstarch and vinegar until just combined using a rubber spatula; be careful not to deflate the mixture.
Spoon the meringue mixture onto the prepared baking sheet, shaping it into a circular nest about 8 inches in diameter, creating a slight well in the center for the whipped cream filling.
Bake for 1 hour, then turn off the oven, crack the door open slightly, and let the meringue cool completely inside for several hours or overnight. This helps to prevent cracking and ensures a soft center.
Whip together the heavy cream and vanilla extract until soft peaks form, about 3-4 minutes with an electric mixer. Feel free to add a tablespoon of powdered sugar for sweetness if desired.
Once the meringues are cooled, fill each nest with whipped cream and generously top with assorted seasonal fruits. Serve immediately and enjoy the deliciousness!
Expert Tips & Tricks
Stability: For extra stability, add a tablespoon of powdered sugar when whipping cream. This helps keep the whipped cream from deflating.
Storage Recommendations: Keep meringue shells in an airtight container at room temperature for up to 2 days. This way, you can prepare ahead of time!
Make-Ahead Instructions: Assemble your Pavlova shortly before serving to ensure the meringue remains crisp. Store the meringue on its own if making ahead.
Troubleshooting Common Problems: If your meringue weeps or becomes sticky, it may be due to humidity or insufficient baking time. A little experimentation and practice will yield perfect results over time!
Serving Suggestions
Pair your Easter Pavlova with a light afternoon tea, a refreshing glass of sparkling wine, or even a scoop of citrus sorbet for a delightful contrast. The key is to make it a visual spectacle! Arrange the fruits in a stunning pattern on top of the whipped cream, perhaps even adding a sprig of mint for garnish to elevate the presentation.
It’s also the perfect showstopper to feature at springtime celebrations, family gatherings, or Easter brunch. Trust me, your guests will rave about it!
Variations & Substitutions
- Flavor Combinations: Try adding lemon or orange zest to the whipped cream for a citrus twist!
- Dietary Restrictions: For a dairy-free version, substitute the heavy cream with coconut cream or whipped aquafaba (chickpea water) for vegan-friendly options.
- Seasonal Variations: In the fall, top with poached pears and spiced caramel. In summer, consider grilled peaches with a touch of honey.
Nutrition & Storage Info
- Prep Time: 30 minutes
- Cook Time: 1 hour
- Total Time: 1 hour 30 minutes
- Yield: 8 servings
- Estimated Calories: 220 calories per serving
- Storage Instructions: Store meringue in an airtight container at room temperature to keep fresh for 1-2 days. Keep the assembled Pavlova in the fridge and consume within a few hours for best texture.
FAQ Section
- Can I use pasteurized egg whites?
- Why did my Pavlova crack?
- How do I know when the meringue is done?
- Can I make the Pavlova ahead of time?
- What fruits work best on top?
- Why do I need cornstarch and vinegar?
- How should I store leftover Pavlova?
- Can I add food coloring to the meringue?
- What if I don’t have cream of tartar?
- How do I prevent the whipped cream from deflating?

Conclusion
This Easter Pavlova recipe is special because it combines tradition with personal flair, turning a classic dessert into a heartwarming experience that celebrates family, love, and springtime joy. I encourage you to embrace this recipe and make your own Pavlova—after all, it’ll bring smiles and satisfaction like no other dessert can.
I would love to hear how your Pavlova turns out! Share your feedback and any variations you’ve tried in the comments. And if you’re looking for more sweet inspirations, be sure to check out my other dessert recipes on the blog. Let’s celebrate baking together!
Print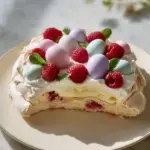
Heavenly Easter Pavlova
- Total Time: 90 minutes
- Yield: 8 servings 1x
- Diet: Vegetarian
Description
A delightful twist on a classic treat, this Easter Pavlova features a light and airy meringue topped with luscious whipped cream and seasonal fruits, creating a melt-in-your-mouth experience.
Ingredients
- 4 large egg whites
- 1 cup granulated sugar
- 1 teaspoon cornstarch
- 1 teaspoon white vinegar
- 1 cup heavy cream
- 1 teaspoon vanilla extract
- Assorted seasonal fruits (e.g., strawberries, kiwi, passion fruit)
Instructions
- Preheat the oven to 250°F (120°C) and line a baking sheet with parchment paper.
- Beat the egg whites on medium speed until soft peaks form—about 2-3 minutes.
- Add the granulated sugar gradually, beating on high until glossy and stiff peaks form (3-5 minutes).
- Fold in cornstarch and vinegar until just combined; avoid deflating the mixture.
- Spoon the meringue onto the prepared baking sheet, shaping it into a circular nest about 8 inches in diameter.
- Bake for 1 hour, then turn off the oven, crack the door, and let the meringue cool completely inside.
- Whip the heavy cream and vanilla extract until soft peaks form, about 3-4 minutes.
- Fill the cooled meringue nests with whipped cream and top with seasonal fruits. Serve immediately.
Notes
Stability of whipped cream can be enhanced by adding powdered sugar. Store meringue in an airtight container at room temperature for up to 2 days.
- Prep Time: 30 minutes
- Cook Time: 60 minutes
- Category: Dessert
- Method: Baking
- Cuisine: Australian
Nutrition
- Serving Size: 1 serving
- Calories: 220
- Sugar: 18g
- Sodium: 40mg
- Fat: 11g
- Saturated Fat: 7g
- Unsaturated Fat: 4g
- Trans Fat: 0g
- Carbohydrates: 26g
- Fiber: 1g
- Protein: 3g
- Cholesterol: 15mg
🥗 Free Custom Keto Meal Plan?
Do you want to lose weight while still enjoying delicious Asian & Thai Fusion meals? Take this quick quiz to get your personalized Keto plan based on your favorite foods!
- ✅ No more guessing what to eat
- ✅ Delicious & easy-to-make recipes
- ✅ Tailored to your body type
Get My Custom Plan Now! →
*Over 100,000+ people have transformed their lives with this quiz.