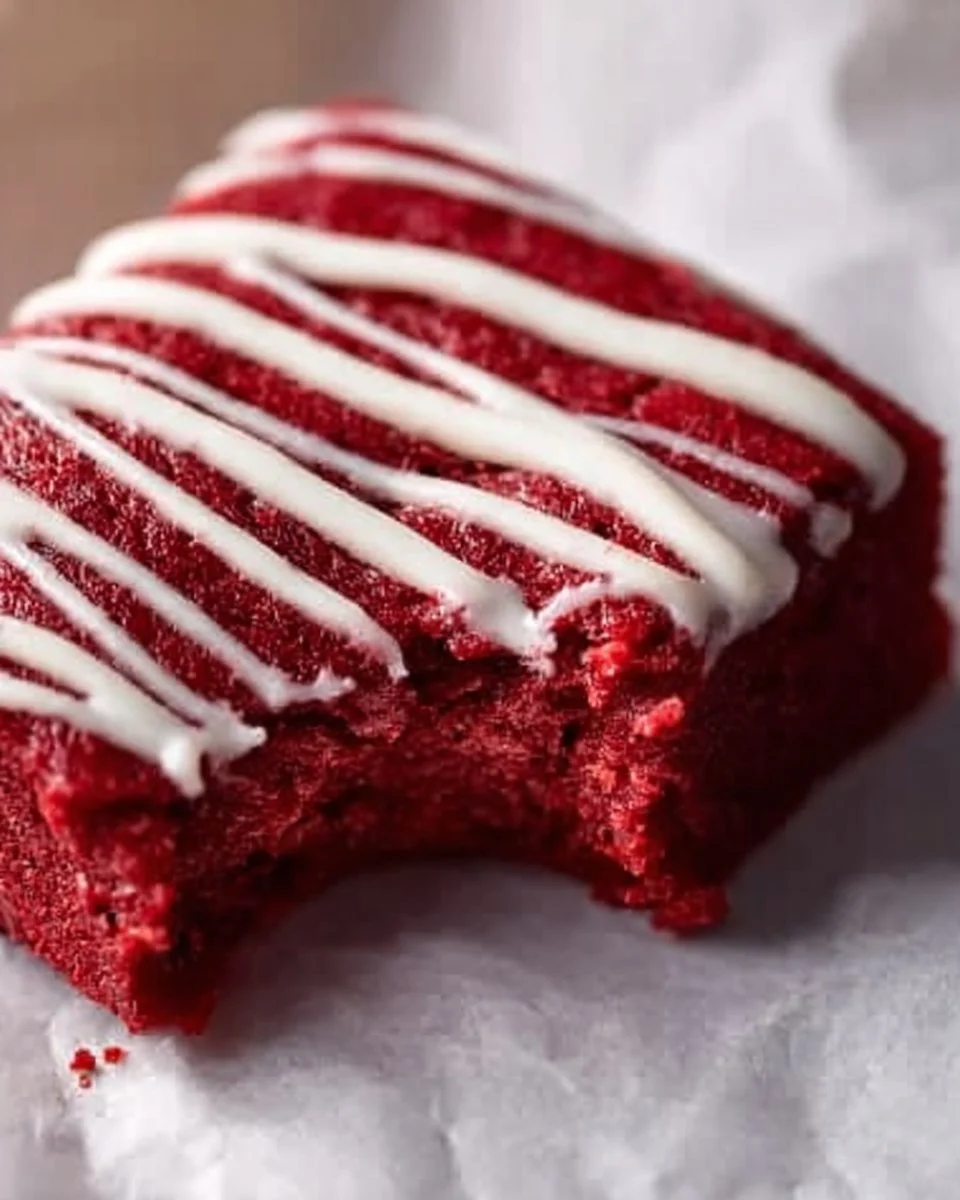
Decadent Red Velvet Brownies: Irresistible Comfort in Every Bite
Growing up, one of my fondest memories was watching my grandmother whip up her favorite treats in the kitchen. The smell of freshly baked brownies would waft through the air, a comforting hug that promised warmth and sweetness. Fast forward to today, and I’ve taken those cherished memories and given them a vibrant twist with my Red Velvet Brownies. These delicious treats echo the nostalgic flavors of classic brownies while introducing the signature richness of red velvet cake.
What makes my recipe stand out? It’s simple yet indulgent, combining gooey chocolate goodness with a visual feast that’s perfect for any occasion. The hint of cocoa powder and the festive red hue make these brownies not just a dessert but an experience to share with family and friends.
In the coming sections, you’ll discover how to recreate this mouthwatering dessert, complete with tips and techniques to ensure your Red Velvet Brownies turn out perfectly every time. So grab your apron, and let’s bring a bit of that cozy kitchen magic into your home!
What Are Red Velvet Brownies?
Red Velvet Brownies are a delightful fusion of two beloved desserts—the classic brownie and red velvet cake. Originating from the Southern United States, red velvet cake is known for its striking red color and rich cocoa flavor. When you transform this cake into brownies, you create a wonderfully dense dessert that’s both fudgy and velvety smooth, all while clad in that eye-catching crimson hue.
The taste? It’s a harmonious blend of rich chocolate, a subtle tang from the buttermilk or vinegar, and a hint of vanilla that dances on your palate. The texture is the real star—crisp edges with a soft, chewy center that practically melts in your mouth.
These brownies are perfect for celebrations, cozy nights in, or even as a surprise treat for someone special. Whether you’re a fan of chocolate, or simply looking to impress, these Red Velvet Brownies never disappoint.
Why You’ll Love This Recipe
Easy to Make: You don’t need to be a professional baker to whip up these fudgy delights. This recipe features simple ingredients and straightforward steps, making it accessible for bakers of all levels.
Cost-Effective: When compared to store-bought or bakery versions, homemade brownies save money and allow you to control the quality of your ingredients. Plus, they taste so much better!
Customization Options: Want to make it your own? Feel free to mix in things like chopped nuts, or swirl in some cream cheese for that classic red velvet cake flavor. You can also adjust the sweetness to your liking!
Perfect for Any Occasion: Whether it’s a birthday party, a holiday gathering, or a casual movie night, these brownies add an elegant touch that’s sure to impress.
Make-ahead Friendly: These brownies can be prepared in advance, making them perfect for busy days. Just bake, cool, and store them in an airtight container until you’re ready to enjoy!
Ingredients Section
Before diving into the delicious world of Red Velvet Brownies, ensure you’ve gathered the best ingredients. Here’s what you’ll need:
- 3/4 cup unsalted butter (melted): Use high-quality butter for richness; I love Kerrygold for its creamy taste.
- 2 oz chopped semi-sweet chocolate bar: A good quality chocolate (such as Ghirardelli) adds depth to the flavor.
- 1 & 1/4 cup granulated sugar: White sugar helps with that chewy texture.
- 2 large eggs: Ensure they are at room temperature for easy mixing.
- 2 teaspoons vanilla extract: Pure vanilla gives the best flavor.
- 1 teaspoon white vinegar: This reacts with the baking soda for a soft, moist brownie.
- 1/2 tablespoon red gel food coloring: Gel food coloring gives a vibrant hue without adding too much liquid.
- 2 tablespoons unsweetened cocoa powder: Use Dutch-processed cocoa for a richer taste.
- 1 & 1/4 cup all-purpose flour: Spoon it into your measuring cup and level it off.
- 1/4 teaspoon salt: A pinch of salt enhances the sweetness.
- 1/2 cup white chocolate chips (optional): These can be mixed into the batter or melted for drizzling on top.
Prep Notes
- Always use room temperature ingredients for a smoother batter.
- Measure your flour properly to avoid dense brownies.
Step-by-Step Instructions
Let’s get into the delicious part—making our Red Velvet Brownies.
Preheat the Oven: Begin by preheating your oven to 350°F (180°C). Line your 8×8 inch baking pan with parchment paper, leaving some overhang on the sides for easy removal after baking.
Melt Ingredients: In a large microwave-safe mixing bowl, melt the butter and chopped chocolate together in the microwave. Do this in 30-second increments, stirring each time until fully melted and smooth.
Incorporate Sugar and Eggs: Add the granulated sugar to the melted mixture, stirring until well combined. Then, add the eggs one at a time, beating well after each addition to incorporate air for that delightful chewiness.
Flavor Additions: Stir in the vanilla extract, white vinegar, and red food coloring, mixing until evenly colored.
Combine Dry Ingredients: In a separate bowl, sift together the cocoa powder, flour, and salt.
Mix Wet and Dry Ingredients: Gradually add the dry ingredients to the wet mixture, mixing until just combined—not a moment longer. Overmixing can lead to tough brownies. If desired, fold in the white chocolate chips at this stage.
Bake: Pour the brownie batter into the prepared pan, spreading it evenly. Bake in the preheated oven for 30-35 minutes. Check for doneness by inserting a toothpick into the center; it should come out with a few moist crumbs, not wet batter.
Cool: Allow the brownies to cool completely in the pan on a wire rack before cutting them into squares.
Optional Drizzle: If you want to elevate these brownies even further, melt some white chocolate and drizzle it on top. Allow it to set before slicing.
Chef’s Tips
- Keep an eye on the brownies near the end of the baking time to prevent overbaking.
- If the top gets too dark, cover it lightly with aluminum foil.
- To check for doneness, it’s better to err on the side of underbaking rather than overbaking for that fudgy texture.
Expert Tips & Tricks
Storage: Once cooled, store these brownies in an airtight container. They’ll stay fresh at room temperature for 3-4 days, or up to a week in the fridge.
Make-ahead: You can bake these brownies a day ahead and keep them in the fridge, enhancing the flavors. Just allow them to come to room temperature before serving.
Troubleshooting: If your brownies come out too dry, you may have overbaked them. Next time, check for doneness a few minutes early.
Fudgier Brownies: For an ultra-fudgy brownie, reduce the flour slightly, or increase the chocolate amount.
Topping Ideas: Try adding fresh raspberries, whipped cream, or a scoop of vanilla ice cream when serving for added flair.
Year-Round Delight: Change up the color for different holidays with corresponding food coloring—think green for St. Patrick’s Day or orange for Halloween!
Serving Suggestions
These Red Velvet Brownies are not just delicious on their own. Here’s how to create a delightful dessert spread:
- Serve with Ice Cream: Pair warm brownies with a scoop of vanilla or cream cheese ice cream for a heavenly treat.
- Add Fresh Berries: Top with fresh raspberries or strawberries for a tart contrast to the sweet brownies.
- Presentation Ideas: Dust the top with powdered sugar or cocoa powder for an elegant finish.
These brownies are perfect for events like Valentine’s Day, anniversaries, or even a cozy dinner with friends—not to mention they make splendid gifts wrapped in lovely packaging!
Variations & Substitutions
- Nutty Crunch: Fold in some chopped pecans or walnuts for added texture.
- Gluten-Free Option: Substitute all-purpose flour with a 1-to-1 gluten-free baking mix.
- Dairy-Free: Use coconut oil in place of butter and dairy-free chocolate to create a vegan version.
- Seasonal Flavors: Add a dash of cinnamon or nutmeg during fall for a seasonal touch.
Nutrition & Storage Info
- Prep time: 15 minutes
- Cook time: 30-35 minutes
- Total time: 45-50 minutes
- Yield: 16 servings (cut into 2×2 inch squares)
- Estimated calories: Approximately 180 calories per brownie.
- Storage instructions: Store in an airtight container at room temperature for up to 4 days, in the fridge for a week, or freeze for up to 3 months.
FAQ Section
Can I use natural cocoa powder instead of unsweetened cocoa powder?
Yes! Just note that it might affect the final taste slightly. Natural cocoa has a more acidic profile.Can I substitute the white vinegar?
If you don’t have white vinegar, lemon juice will work in a pinch; both create a reaction that keeps the brownies moist and tender.What if I don’t have gel food coloring?
Liquid food coloring can work, but it may alter the consistency. You can also use beet juice for a natural coloring alternative.Can I add chocolate frosting on top?
Absolutely! Adding a layer of chocolate frosting will take your brownies over the top, but you can also enjoy them plain.How do I know when my brownies are done?
The toothpick test is your best bet. Look for moist crumbs attached to the toothpick, but not wet batter.Can I make this recipe in a larger pan?
Yes! You can double the ingredients to fit a 9×13 inch pan; just be sure to adjust the baking time.Could I add cream cheese frosting?
Yes! Swirling cream cheese in before baking will create a delicious cream cheese marble effect.What’s the best way to cut brownies?
Use a sharp knife and run it under hot water to make clean cuts. Wipe the knife in between cuts for perfect squares.Can this recipe be halved?
Yes! Simply divide all ingredients in half and use a smaller pan, adjusting the baking time as needed.How long can these brownies be frozen?
When frozen properly, these brownies can last for up to three months. Just be sure to wrap them tightly in plastic wrap or foil.

Conclusion
These Red Velvet Brownies are more than just a treat; they embody comfort, nostalgia, and a touch of celebration in every bite. With their rich flavor and fudgy texture, they are sure to become a family favorite in no time. I encourage you to give this recipe a try, and don’t forget to share your experiences in the comments below! For more delightful dessert options, check out my other sweet creations on the blog. Happy baking!
Print
Decadent Red Velvet Brownies
- Total Time: 50 minutes
- Yield: 16 servings 1x
- Diet: Vegetarian
Description
Irresistible Red Velvet Brownies, combining the classic brownie and red velvet cake for a fudgy and vibrant dessert experience.
Ingredients
- 3/4 cup unsalted butter, melted
- 2 oz chopped semi-sweet chocolate bar
- 1 & 1/4 cup granulated sugar
- 2 large eggs
- 2 teaspoons vanilla extract
- 1 teaspoon white vinegar
- 1/2 tablespoon red gel food coloring
- 2 tablespoons unsweetened cocoa powder
- 1 & 1/4 cup all-purpose flour
- 1/4 teaspoon salt
- 1/2 cup white chocolate chips (optional)
Instructions
- Preheat the oven to 350°F (180°C). Line an 8×8 inch baking pan with parchment paper.
- Melt the butter and chopped chocolate in a large microwave-safe bowl, stirring in 30-second increments until smooth.
- Add granulated sugar and stir until combined. Add eggs one at a time, beating well after each addition.
- Incorporate vanilla extract, white vinegar, and red food coloring; mix until even in color.
- Sift together cocoa powder, flour, and salt in a separate bowl.
- Gradually mix dry ingredients into wet mixture until just combined. Fold in white chocolate chips if desired.
- Pour batter into the prepared pan and bake for 30-35 minutes. Check for doneness with a toothpick.
- Let cool completely in the pan before cutting into squares.
- Optional: Drizzle melted white chocolate on top before serving.
Notes
For fudgier brownies, reduce flour slightly or increase chocolate amount. Store in an airtight container at room temperature for up to 4 days.
- Prep Time: 15 minutes
- Cook Time: 35 minutes
- Category: Dessert
- Method: Baking
- Cuisine: American
Nutrition
- Serving Size: 1 serving
- Calories: 180
- Sugar: 28g
- Sodium: 100mg
- Fat: 10g
- Saturated Fat: 6g
- Unsaturated Fat: 4g
- Trans Fat: 0g
- Carbohydrates: 23g
- Fiber: 1g
- Protein: 2g
- Cholesterol: 50mg
🥗 Free Custom Keto Meal Plan?
Do you want to lose weight while still enjoying delicious Asian & Thai Fusion meals? Take this quick quiz to get your personalized Keto plan based on your favorite foods!
- ✅ No more guessing what to eat
- ✅ Delicious & easy-to-make recipes
- ✅ Tailored to your body type
Get My Custom Plan Now! →
*Over 100,000+ people have transformed their lives with this quiz.