Discover the Joy of Walking S’mores: Ultimate Campfire Desserts for 2025
Ah, the classic s’more—a quintessential camping treat that brings back floods of nostalgia. As a kid, I remember those balmy summer nights gathered around the crackling campfire, the tantalizing aroma of melted chocolate mingling with the sweet smell of toasted marshmallows. It was pure magic. Fast forward to 2025, and I’m ecstatic to share my latest take on this beloved dessert: Walking S’mores. These delightful camping desserts, or as I like to call them, campfire masterpieces, elevate traditional s’mores to a whole new level.
What makes these Walking S’mores so special? Picture golden graham cracker crusts, layers of rich chocolate, and fluffy marshmallows—all packed into convenient, delicious hand-held bites. They are the perfect blend of nostalgia and modern convenience, ideal for sharing with family or savoring solo. Unlike average s’mores, these beauties enhance the classic experience by making them easier to enjoy, allowing you to wander the campsite without a sticky mess. Trust me, the memories you’ll create while indulging in these little gems will warm your heart for years to come. In this blog post, you’ll learn how to create these delightful treats that are not only fun but are bound to establish new traditions for your family.
What Are Walking S’mores?
Walking S’mores aren’t just another trendy dessert; they’re a creative spin on the beloved campfire classic. Originating from the need to make s’mores more mobile, they incorporate all the timeless elements of s’mores while adding a twist: they’re crafted into handheld bites, making them perfect for on-the-go munching.
These delightful morsels feature a graham cracker crust, layered with gooey chocolate and perfectly toasted marshmallows, giving you a sensational balance of crispy and chewy with each bite. What sets them apart is the ingenious method of assembly, which allows you to enjoy messy s’mores without needing to be anchored to the campfire for assembly.
Walking S’mores are perfect for many occasions—whether it’s a camping trip, family movie night in the backyard, or even an indoor winter treat. Whenever you’re craving the comfort of s’mores but don’t want to deal with the hassle, these treats will be your go-to solution.
Why You’ll Love This Recipe
Convenience meets nostalgia: Store-bought s’mores never quite capture that campfire spirit. These Walking S’mores, however, bring back those cherished memories while being ready to enjoy wherever you go—no sticky fingers involved!
Cost-effective goodness: Making your own s’mores is a fraction of the price you’ll pay for pre-packaged versions, and with this recipe, you can make enough to share with your fellow campers or evening guests without breaking the bank.
Versatility and customizations: The canvas of walking s’mores is incredibly adaptable. Want to swap out the chocolate for some peanut butter or caramel? Go for it! Love a bit of spice? Toss in some cinnamon or even some chili powder for a delicious kick!
Easy assembly: This recipe is straightforward and user-friendly, making it perfect for budding bakers of all skill levels. With a minimal time investment of about 30-40 minutes, you can whip up a batch that’s bound to impress.
A treat for everyone: Got dietary restrictions? No worries! With a few ingredient swaps—like gluten-free graham crackers or vegan marshmallows—everyone can partake in the deliciousness.
Ingredients
For the Graham Cracker Crust:
- 2 cups graham cracker crumbs (I recommend using Honey Maid for that classic taste)
- 1/2 cup unsalted butter, melted (room temperature)
For the Filling:
- 1 cup chocolate chips (semi-sweet or milk chocolate, your choice!)
- 2 cups mini marshmallows (or substitute with dairy-free options for a vegan treat)
For Drizzling:
- 1/4 cup melted chocolate or caramel sauce for drizzling on top
Prep Notes:
- Let your butter sit out until it reaches room temperature for easier mixing.
- If making ahead, consider using high-quality chocolate for the best flavor.
Step-by-Step Instructions
Preheat Your Oven:
Preheat your oven to 350°F (175°C). This step is crucial for achieving a perfectly baked crust.Prepare the Graham Cracker Mixture:
In a mixing bowl, combine graham cracker crumbs with melted butter until well incorporated. It should resemble wet sand.Chef’s Tip: Ensure all crumbs are coated with butter; this is what holds the crust together!
Form Your Crust:
Press the mixture firmly into the bottom of a greased 9×9-inch baking dish. Use the bottom of a measuring cup for even pressing.Visibility Cue: You should see a compact layer without loose crumbs.
Bake the Crust:
Bake the crust in the preheated oven for 8-10 minutes until lightly golden. Remove and let cool slightly.Layer Your Fillings:
Scatter the chocolate chips evenly over the crust, followed by a generous layer of mini marshmallows.Broil to Perfection:
Switch your oven to broil and place the dish back in for 2-3 minutes, keeping a CLOSE eye until the marshmallows puff up and turn golden brown.Chef’s Tip: This step is key for achieving that campfire flavor—don’t walk away!
Drizzle & Cool:
Once perfectly toasted, drizzle melted chocolate or caramel on top for that extra oomph, then allow it to cool for 10-15 minutes before slicing.Common Mistake: For the best slices, let it cool fully; this will prevent it from falling apart!
Expert Tips & Tricks
- Storage Recommendations: Store in an airtight container for up to a week. They might not last that long, though—they’re that good!
- Make-Ahead Instructions: You can prepare the graham cracker crust a day in advance and store it until you’re ready to fill and broil.
- Troubleshooting: If your marshmallows brown too quickly, keep the oven door slightly ajar while broiling to control the heat.
- Freshness: Always use fresh marshmallows; stale ones may not toast well and won’t provide that perfect texture.
Serving Suggestions
Pair your Walking S’mores with a scoop of vanilla ice cream or a drizzle of fresh fruit compote for an elevated dessert experience. Serve them up on a rustic wooden board for a lovely presentation that beckons everyone to dig in. These delightful treats fit seamlessly into any gathering, whether it’s a weekend camping trip or a cozy family night at home.
Variations & Substitutions
Feel free to get creative with variations! Try these fun ideas:
- Chocolate Irresistible: Use dark chocolate chips or flavored chocolate for a unique taste.
- Nutty Delight: Incorporate crunchy peanut butter into the chocolate layer for a nutty twist.
- Spiced Up: Sprinkle cinnamon or chili powder into the chocolate for a spicy kick.
- Seasonal Treats: Swap in pumpkin spice or peppermint for a seasonal touch.
Nutrition & Storage Info
- Prep Time: 15 minutes
- Cook Time: 10 minutes
- Total Time: 25 minutes
- Yield: Approximately 16 servings
- Estimated Calories: 150 calories per serving
- Storage: Keep at room temperature for a few days or refrigerate if you prefer. They’ll last about a week lined in an airtight container.
FAQ Section
Can I make these s’mores ahead of time?
Absolutely! Assemble the crust and fillings, then store them in the fridge until you’re ready to broil.What if I don’t have graham crackers?
You can substitute with crushed cookies like Digestives or even shortbread for an equally tasty crust.Can I use different types of chocolate?
Yes! Feel free to mix it up with dark chocolate, white chocolate, or even flavored chocolate.Is there a vegan alternative?
Certainly! Use vegan chocolate, coconut cream, and dairy-free graham crackers to make it vegan-friendly.How do I transport them for camping?
Keep them in a sturdy container, and separate layers with parchment paper to maintain that fresh, gooey goodness.Can I use fresh marshmallows instead of mini?
Yes, though you may need to cut them down for even distribution across the crust.What’s the best way to reheat leftovers?
You can gently microwave them for about 10 seconds for that melty experience.How do I prevent the marshmallows from burning?
Keep a close eye during broiling, as it can happen quickly! Consider lowering the rack if you have a high broiler.Can I freeze these Walking S’mores?
Yes, wrap them tightly in plastic wrap and then foil. They can last up to three months in the freezer.Why do my s’mores keep falling apart?
Ensure your crust is firmly pressed and fully cooled before trying to cut them. A little patience goes a long way!
Conclusion
Walking S’mores truly revolutionize the classic campfire experience, allowing you to relive cherished moments without the mess. They’re not just a treat; they’re a ticket to nostalgia and new family memories! I wholeheartedly encourage you to gather your ingredients and give this recipe a try. If you do, I’d love to hear how your Walking S’mores turned out. And don’t forget to check out my other delicious camping dessert recipes on the blog to keep the sweet memories rolling! Happy baking!
Print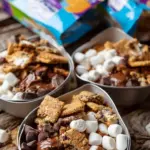
Walking S’mores
- Total Time: 25 minutes
- Yield: 16 servings 1x
- Diet: Vegetarian
Description
A delightful take on the classic camping treat, Walking S’mores are hand-held bites featuring a graham cracker crust, layered with gooey chocolate and toasted marshmallows.
Ingredients
- 2 cups graham cracker crumbs
- 1/2 cup unsalted butter, melted
- 1 cup chocolate chips
- 2 cups mini marshmallows
- 1/4 cup melted chocolate or caramel sauce for drizzling
Instructions
- Preheat your oven to 350°F (175°C).
- In a mixing bowl, combine graham cracker crumbs with melted butter until well incorporated.
- Press the mixture into the bottom of a greased 9×9-inch baking dish.
- Bake the crust in the preheated oven for 8-10 minutes until lightly golden. Let cool slightly.
- Scatter chocolate chips evenly over the crust, followed by mini marshmallows.
- Switch your oven to broil and broil for 2-3 minutes until the marshmallows are golden brown.
- Drizzle melted chocolate or caramel on top and cool for 10-15 minutes before slicing.
Notes
For best results, use fresh marshmallows and allow the crust to cool fully before slicing.
- Prep Time: 15 minutes
- Cook Time: 10 minutes
- Category: Dessert
- Method: Baking
- Cuisine: American
Nutrition
- Serving Size: 1 serving
- Calories: 150
- Sugar: 12g
- Sodium: 80mg
- Fat: 8g
- Saturated Fat: 5g
- Unsaturated Fat: 3g
- Trans Fat: 0g
- Carbohydrates: 18g
- Fiber: 1g
- Protein: 1g
- Cholesterol: 15mg
🥗 Free Custom Keto Meal Plan?
Do you want to lose weight while still enjoying delicious Asian & Thai Fusion meals? Take this quick quiz to get your personalized Keto plan based on your favorite foods!
- ✅ No more guessing what to eat
- ✅ Delicious & easy-to-make recipes
- ✅ Tailored to your body type
Get My Custom Plan Now! →
*Over 100,000+ people have transformed their lives with this quiz.