Delightfully Chewy S’more Bars: A Campfire Classic in Every Bite
INTRODUCTION
Growing up, summers were synonymous with camping trips and evenings spent around a crackling fire. My family had a tradition: we’d gather around, roasting marshmallows, and creating the perfect s’mores—huddled together, laughter echoing under a starlit sky. Fast forward to today, and while I might not venture into the woods as often, that nostalgia still lingers in my heart. That’s why I adore making S’more Bars! They capture that nostalgic flavor, delivering the comforting essence of those family camping nights right into your kitchen.
These S’more Bars are unlike any you’ve tried before. They blend a crunchy base of graham crackers, melty chocolate, and fluffy marshmallows into a gooey treat that feels like a hug from your childhood. What sets this recipe apart is its simplicity—no complex steps, just pure indulgence. Plus, these bars bring everyone together—friends, family, or just you with a cup of coffee—offering a slice of home with every bite.
Join me as I guide you through this delightful recipe, filled with cherished memories and endless possibilities. Trust me; you won’t be able to resist a second (or third!) helping!
WHAT ARE S’MORE BARS?
S’more Bars are a delightful, no-fuss baking treat inspired by the classic campfire snack. The origins of s’mores date back to the early 20th century, with the first printed recipe appearing in a Girl Scouts publication in 1927. The combination of toasted marshmallows, chocolate, and graham crackers has become a summertime staple.
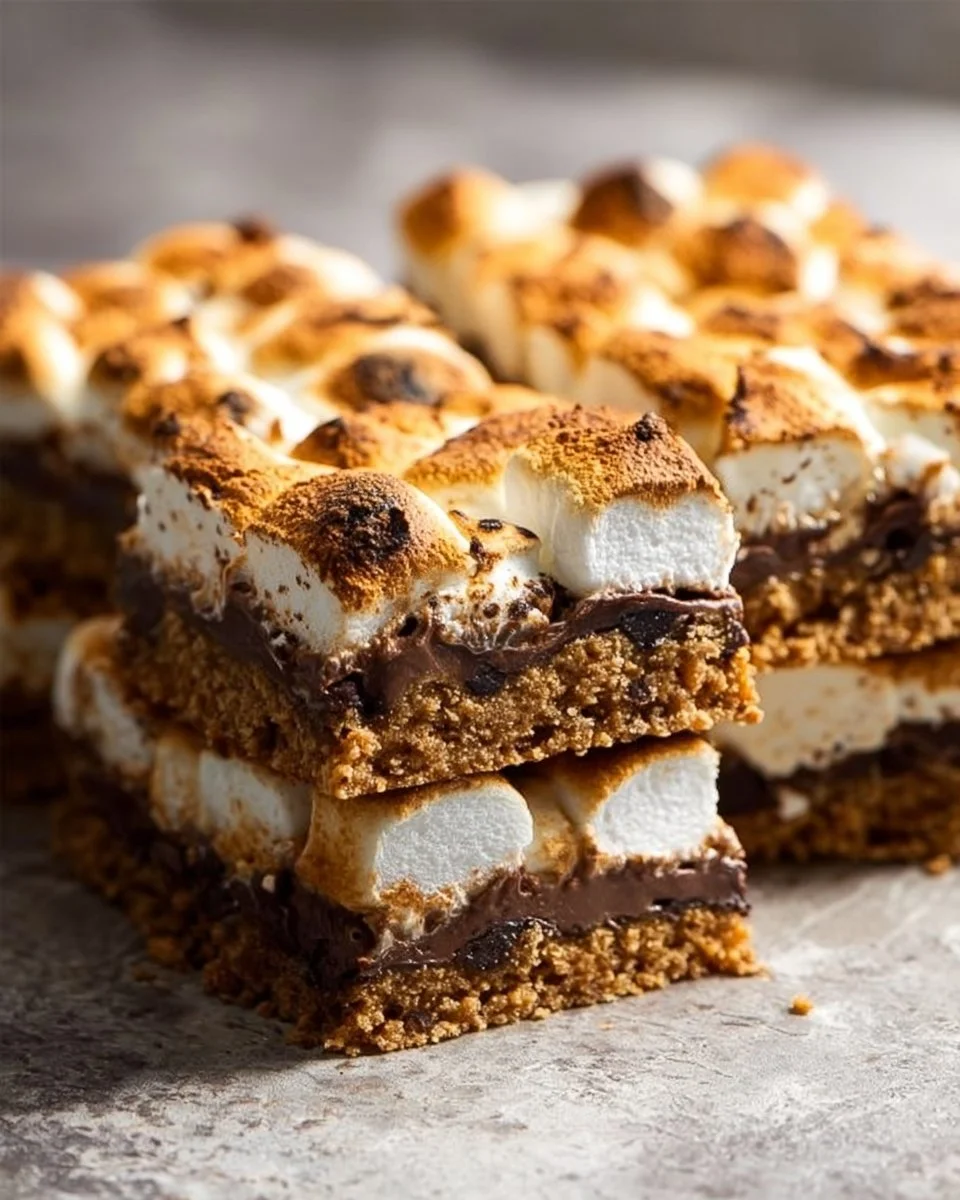
In bar form, these treats boast a wonderfully chewy texture with a crispy bottom courtesy of crushed graham crackers, followed by a rich layer of melted chocolate, and topped off with puffy marshmallows that turn delightfully golden brown when baked. Each bite offers a perfect harmony of textures—crunch, goo, and a touch of sweetness that is profoundly satisfying.
When should you make these? Honestly, any time is a good time for S’more Bars! They’re perfect for potlucks, parties, or just a cozy night in. Whenever you need that taste of nostalgia, these bars will undoubtedly hit the spot.
WHY YOU’LL LOVE THIS RECIPE
Nostalgic Comfort: This recipe brings back childhood memories with every bite, making it perfect for any age group. Whether it’s a family gathering or a cozy evening by yourself, they embody the comforting essence of home and childhood.
Easier than S’mores: Forget running outside in the cold to roast marshmallows. With these bars, you get the same delightful flavors without the hassle. Just pop them in the oven, and let the magic happen!
Cost-Effective and Customizable: Making S’more Bars at home is not only cheaper than those gourmet versions at bakeries, but it allows you to control the ingredients. Want extra chocolate? Go for it! Prefer dark chocolate instead of milk? You do you!
Quick to Prepare: This recipe comes together in about 30 minutes! With a baking time of just 10-15 minutes, you’ll have a sweet treat ready before you know it.
Perfect for Various Occasions: Birthdays, holidays, or just because—they suit every event. And the best part? They’ll disappear faster than you can say “marshmallow!”
INGREDIENTS SECTION
For these crave-worthy S’more Bars, here’s what you’ll need:
Graham Crackers: Consider using organic graham crackers for better flavor. You could also crush traditional honey grahams for a classic taste or go with chocolate grahams for a twist.
Butter: Use unsalted butter at room temperature for easier mixing. I always prefer brands like Kerrygold for that rich flavor.
Chocolate Chips: Semi-sweet is a classic choice, but feel free to mix in dark, milk, or even white chocolate chips! Ghirardelli or Nestlé Toll House are reliable brands with consistent quality.
Marshmallows: Look for mini marshmallows for an even distribution, or if you want a more rustic look, go for regular-sized marshmallows cut in half.
STEP-BY-STEP INSTRUCTIONS
Preheat the Oven: Set your oven to 350°F (175°C). This ensures a perfect baking temperature, allowing that marshmallow topping to get just golden.
Prepare the Baking Dish: Grease a 9×9-inch baking dish or line it with parchment paper for easy removal later.
Layer the Graham Crackers: Evenly layer whole graham crackers on the bottom of the dish. This will serve as the crunchy base of our bars.
Make the Graham Cracker Crust: In a bowl, melt 1/2 cup of butter (that should be about 1 stick), and mix with 1 cup of crushed graham crackers. Spread this buttery mixture evenly on top of your cracker layer. Press it down slightly with a spatula to ensure it holds together.
Chef’s Tip: Be sure the butter is fully melted and mixed to avoid dry spots in your crust.
Add Chocolate Chips: Sprinkle 1 cup of chocolate chips over the graham crust, making sure you cover it as evenly as possible.
Top with Marshmallows: Finally, add 2 cups of mini marshmallows on top of the chocolate layer, pressing them down slightly.
Bake: Place the dish in the preheated oven and bake for about 10-15 minutes. Keep an eye on the marshmallows—they should be perfectly golden and gooey!
Common Mistake to Avoid: Don’t overbake! You want that marshmallow topping to be golden, not browned.
Cool and Slice: Let your bars cool completely before cutting them into squares. This step ensures that they hold together nicely when you serve them.
EXPERT TIPS & TRICKS
Storage: Keep your S’more Bars in an airtight container for up to 5 days at room temperature. If you need to store them longer, consider refrigeration where they’ll last for up to a week.
Freezing: If you love your bars but want to make them last, freeze them! Just wrap them tightly in plastic wrap and then place them in an airtight container. They can last for up to 2 months in the freezer.
Make Ahead: You can prepare the crust and layer the chocolate and marshmallows in advance. Just cover and refrigerate until you’re ready to bake.
Troubleshooting: If your bars are too crumbly, it might be a sign of too much crust. Just ensure proper measurements next time!
SERVING SUGGESTIONS
These S’more Bars can stand alone as the star of the dessert table, but pairing them with vanilla ice cream or a dollop of whipped cream turns a good treat into a fantastic indulgence. For a fun presentation, stack them on a rustic wooden board, drizzled with chocolate sauce, and topped with fresh berries for color. They make a delightful addition to summer BBQs, movie nights, or just an afternoon sweet snack while curled up with a good book.
VARIATIONS & SUBSTITUTIONS
Feeling adventurous? Here are a few tasty variations you might want to try:
Nutty Addition: Add some chopped walnuts or almonds for a crunchy texture.
Peanut Butter Twist: Drizzle some creamy peanut butter over the chocolate layer before adding the marshmallows for a wonderful mix of flavors.
Seasonal Flair: In the fall, try adding in some cinnamon or using pumpkin spice chips for a seasonal twist. In winter, a hint of peppermint extract can create a festive flavor.
Gluten-Free Option: Swap out regular graham crackers for gluten-free versions available on the market.
NUTRITION & STORAGE INFO
- Prep Time: 10 minutes
- Cook Time: 10-15 minutes
- Total Time: 20-25 minutes
- Yield: Approximately 16 servings
- Estimated Calories: About 180 calories per serving.
- Storage Instructions: Keep at room temperature in an airtight container for up to 5 days; refrigerate for up to a week, or freeze for up to 2 months.
FAQ SECTION
Can I use different types of chocolate chips?
Absolutely! Use dark, milk, or even white chocolate chips based on your preference.Can I substitute the marshmallows?
Yes, you can use marshmallow cream for a different texture, or make a vegan version using gelatin alternatives.How do I cut the bars cleanly?
Use a sharp knife and lightly grease it or dip it in warm water between cuts for a cleaner slice.Can I add fruit to the bars?
Sure! Try adding thinly sliced strawberries or bananas for a unique twist.What can I do with leftover bars?
Use them in a trifle or crumble them over yogurt for a fun dessert!Are these bars suitable for children?
Yes, they are a great treat for kids, just be cautious with the sticky marshmallows.How long will the bars keep in the fridge?
They’ll last about a week when stored properly in an airtight container.Is this recipe easy for beginners?
Yes! It’s straightforward with minimal steps, perfect for novice bakers.How can I reheat leftover bars?
You can pop them in the microwave for a few seconds to warm them up and get that gooey texture back.Where can I find gluten-free graham crackers?
Most major grocery stores carry gluten-free variations in the baking aisle.
CONCLUSION
These Delightfully Chewy S’more Bars are the perfect indulgence, capturing a beloved flavor while offering ease and flexibility. They blend nostalgia and simplicity, ensuring that you can recreate those precious campfire memories right at home. I highly encourage you to try this recipe; it’s especially rewarding to see family, friends, or even your own kids enjoying them just as much as you did!
I would love to hear your thoughts! Have you tried them? What delectable tweaks did you add? And if you enjoyed this recipe, check out my other sweet creations on the blog! Let’s whip up more kitchen magic together!
Print
Delightfully Chewy S’more Bars
- Total Time: 25 minutes
- Yield: 16 servings 1x
- Diet: Vegetarian
Description
A nostalgic dessert that captures the classic flavors of s’mores in bar form, combining crunchy graham crackers, melty chocolate, and fluffy marshmallows.
Ingredients
- 10 whole graham crackers
- 1/2 cup unsalted butter, melted
- 1 cup crushed graham crackers
- 1 cup semi-sweet chocolate chips
- 2 cups mini marshmallows
Instructions
- Preheat your oven to 350°F (175°C).
- Grease a 9×9-inch baking dish or line with parchment paper.
- Evenly layer whole graham crackers on the bottom of the dish.
- In a bowl, mix melted butter with crushed graham crackers and spread evenly on top of the cracker layer, pressing down slightly.
- Sprinkle chocolate chips evenly over the graham crust.
- Add mini marshmallows on top of the chocolate layer, pressing them down slightly.
- Bake for about 10-15 minutes until marshmallows are golden and gooey.
- Allow bars to cool completely before cutting into squares.
Notes
Store in an airtight container for up to 5 days at room temperature, or refrigerate for up to a week. Can freeze for up to 2 months.
- Prep Time: 10 minutes
- Cook Time: 15 minutes
- Category: Dessert
- Method: Baking
- Cuisine: American
Nutrition
- Serving Size: 1 bar
- Calories: 180
- Sugar: 15g
- Sodium: 200mg
- Fat: 9g
- Saturated Fat: 5g
- Unsaturated Fat: 4g
- Trans Fat: 0g
- Carbohydrates: 23g
- Fiber: 1g
- Protein: 2g
- Cholesterol: 30mg
🥗 Free Custom Keto Meal Plan?
Do you want to lose weight while still enjoying delicious Asian & Thai Fusion meals? Take this quick quiz to get your personalized Keto plan based on your favorite foods!
- ✅ No more guessing what to eat
- ✅ Delicious & easy-to-make recipes
- ✅ Tailored to your body type
Get My Custom Plan Now! →
*Over 100,000+ people have transformed their lives with this quiz.