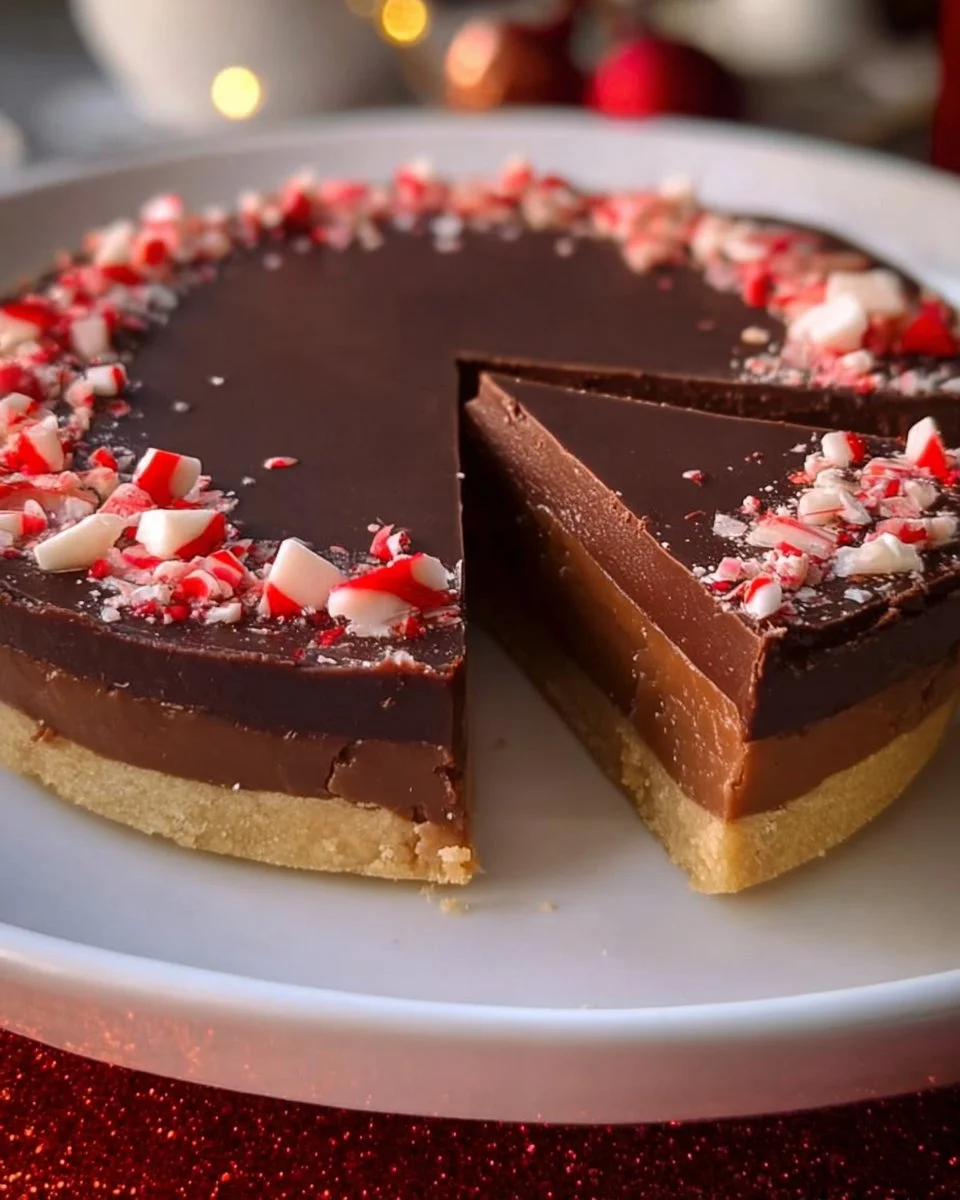
Ultimate No Bake Peppermint Tart: Perfect for the Holidays and Beyond!
There’s something magical that happens in my kitchen during the holiday season. The air fills with the aroma of peppermint and chocolate, whisking me back to my childhood. Every year, my family would gather around the table to indulge in my grandmother’s famous No Bake Peppermint Tart. It was an easy recipe that became a beloved tradition, and it was always the star of our festive spread. But as much as I cherished her version, I found myself wanting to add my own twist, making it a little lighter but just as indulgent.
This No Bake Peppermint Tart is not only a treat for your taste buds but a feast for the eyes, with its rich, velvety layers nestled in a crunchy almond crust. What makes this tart stand out from others is its sheer simplicity and the way it beautifully balances the refreshing notes of peppermint with deep, rich chocolate. No need to bustle around baking when you can whip this up with minimal fuss—and trust me, it tastes like you spent hours in the kitchen! By the end of this post, you’ll learn how to create this delightful dessert that not only holds fond memories but also offers a mouthwatering experience you can share with family and friends. Let’s dive in!
What are No Bake Peppermint Tarts?
Who doesn’t love a dessert that delivers on taste and is incredibly easy to make? Originating as a delightful summer treat, No Bake Peppermint Tarts have become a year-round favorite. These tarts consist of a rich, creamy filling made from luscious dark chocolate, aromatic peppermint, and smooth coconut cream, all nestled in a nutty, crunchy almond flour crust. The first bite reveals a delightful contrast between the creamy interior and the crumbly exterior, creating a culinary adventure with every slice.
They’re unique not just for their wonderful flavor but also for their versatility—perfect for everything from holiday gatherings to summer picnics! Make them for a special occasion or just because you deserve a treat; you can’t go wrong with this refreshing dessert on your table.
Why You’ll Love This Recipe
Effortless Elegance: This No Bake Peppermint Tart is remarkably simple to prepare—perfect for anyone, from kitchen novices to seasoned bakers. While many desserts require hours of baking, this one only needs a bit of mixing and chilling.
Homemade vs. Store-Bought: Store-bought desserts often falter in flavor. This tart, with its rich dark chocolate and fresh peppermint extract, guarantees fresher, better taste. Plus, there’s something beautifully satisfying about making your own desserts!
Budget-friendly: Unlike fancy bakery cakes, making this tart at home is very cost-effective. The ingredients are wholesome, and you get a dessert that can serve up to 12 for the price of one fancy slice from a bakery.
Customizable: Don’t have peppermint extract? Replace it with orange zest for a chocolate-orange delight or use different nuts in the crust to switch up the flavors according to your preferences.
MINIMAL Time Commitment: With a prep time of only 20 minutes and chill time of 2 hours, you can easily fit this dessert into your busy schedule. Set it in the fridge, decorate later, and you’re ready to impress guests!
Ingredients Section
For the Crust:
- 1 ½ cups almond flour: Ensure you get finely ground almond flour for a smooth crust, available at most grocery stores. Can substitute with crushed graham crackers if desired.
- ¼ cup coconut oil, melted: Look for cold-pressed organic coconut oil for the best flavor.
- ¼ cup maple syrup: Use pure maple syrup for a rich sweetness that elevates the crust.
- ¼ teaspoon salt: Balances the flavors perfectly.
For the Filling:
- 1 cup dark chocolate, melted: Opt for high-quality dark chocolate (70% cacao or higher), like Ghirardelli or Green & Black’s.
- ½ cup coconut cream: The thick part that settles at the top of a can of full-fat coconut milk works best, so refrigerate the can overnight.
- 1 teaspoon peppermint extract: Use a good-quality extract for the freshest flavor.
For Dusting:
- Cocoa powder: Use unsweetened cocoa powder for a refined finish.
Prep Notes:
- Make sure the coconut oil is melted but not hot when mixing to prevent curdling the filling.
- Allow ingredients like coconut cream to come to about room temperature for better mixing.
Step-by-Step Instructions
Prepare the Crust:
- In a large mixing bowl, combine 1 ½ cups almond flour, ¼ cup melted coconut oil, ¼ cup maple syrup, and ¼ teaspoon salt. Mix until a smooth dough forms—about 2-3 minutes should do it!
Chef’s Tip: Make sure all ingredients are well-incorporated; you want a sticky consistency resembling wet sand.
Form the Crust:
- Press the mixture firmly into the bottom of a tart pan evenly, creating a sturdy base. Make sure to build up the sides slightly—about 1 inch high has worked wonders for me!
Pro Technique: Use a flat-bottomed measuring cup to help flatten the mixture evenly.
Make the Filling:
- In a separate bowl, combine 1 cup melted dark chocolate, ½ cup coconut cream, and 1 teaspoon peppermint extract. Stir until completely smooth and glossy.
Visual Cue: The mixture should be thick yet pourable, with no visible lumps.
Assemble:
- Pour the luscious chocolate filling into the prepared crust. Spread it out evenly with a spatula to cover the base completely.
Chill:
- Refrigerate for at least 2 hours or until set. I usually make mine the day before to let those flavors meld beautifully.
Common Mistake: Not chilling long enough—this tart needs time to firm up!
Dust and Serve:
- Before serving, dust the top with cocoa powder. Voilà! Your No Bake Peppermint Tart is ready to impress.
Expert Tips & Tricks
Quality Over Quantity: Invest in high-quality dark chocolate and pure extracts for an unforgettable flavor experience.
Make Ahead: This tart can be made up to 3 days ahead; just keep it covered in the fridge.
Storage Recommendations: Keep any leftovers in the refrigerator for up to a week. It’s amazing what chilling does for the flavors!
Troubleshooting: If the filling isn’t setting, it might need more chill time; patience is a virtue with this tart.
Garnishing Delight: Top with fresh mint leaves or a sprinkle of crushed candy canes for an extra festive flair.
Serving Suggestions
Pair your No Bake Peppermint Tart with a dollop of whipped coconut cream, or serve alongside a steaming cup of hot cocoa for a truly decadent experience. For holiday gatherings, slice it into small squares and present them on a beautiful platter—this dessert deserves to shine! Perfect for Christmas, Thanksgiving, or any seasonal celebration, it brings joy to the table.
Variations & Substitutions
- Flavor Combinations: Switch out peppermint for orange zest for a rich chocolate-orange tart or add a hint of espresso for a mocha twist!
- Dietary Adaptations: Vegan? You’re already covered! Gluten-free? Almond flour high-five! For nut allergies, try sunflower seed flour.
- Seasonal Variations: Use crushed pumpkin spice cookies for the crust in autumn or top with fresh berries in the summer for a refreshing touch.
Nutrition & Storage Info
- Prep Time: 20 minutes
- Chill Time: 2 hours
- Total Time: 2 hours 20 minutes
- Yield: 12 servings
- Estimated Calories per Serving: 190 calories
- Storage Instructions: Store in an airtight container in the fridge for up to a week or freeze for up to 3 months. Thaw in the fridge before serving.
FAQ Section
Can I use any type of chocolate?
- Yes, you can substitute with milk chocolate or white chocolate; just note that the flavor profile will change.
What can I use instead of almond flour?
- You could use gluten-free flour blends or oat flour, but the texture will vary.
How do I prevent the filling from being too runny?
- Ensure the ingredients are well-mixed and the tart is adequately chilled to set.
Can I add more peppermint flavor?
- Absolutely! Just be cautious and add a little at a time to avoid overwhelming the other flavors.
Is this tart suitable for freezing?
- Yes, this tart freezes beautifully; just wrap it tightly with plastic wrap before placing it in an airtight container.
What’s the best way to serve it?
- For stunning presentation, slice with a warm knife and dust with cocoa powder just before serving.
Can this recipe be doubled or halved?
- Yes, you can easily scale the recipe up or down depending on your needs.
What if I don’t have coconut cream?
- You can use heavy cream or a thick dairy-free cream alternative if you prefer.
How long can I keep leftovers?
- Leftovers can last in the fridge for up to a week, but they rarely survive that long around here!
What other toppings do you recommend?
- Candied pecans, mini marshmallows, or crushed candy canes make for excellent toppings!
Conclusion
I hope your experience with this No Bake Peppermint Tart is as delightful and fulfilling as mine has been. It’s more than just a dessert; it’s a way to create sweet memories and share moments with loved ones. I genuinely encourage you to give it a try—you won’t be disappointed! Afterward, don’t forget to drop a comment with how it turned out for you. Check out my other festive recipes on the blog for more scrumptious delights. Happy baking!
Print
Ultimate No Bake Peppermint Tart
- Total Time: 140 minutes
- Yield: 12 servings 1x
- Diet: Vegan, Gluten-Free
Description
A delightful and rich No Bake Peppermint Tart with creamy chocolate filling and a crunchy almond crust, perfect for holiday gatherings and beyond.
Ingredients
- 1 ½ cups almond flour
- ¼ cup coconut oil, melted
- ¼ cup maple syrup
- ¼ teaspoon salt
- 1 cup dark chocolate, melted
- ½ cup coconut cream
- 1 teaspoon peppermint extract
- Cocoa powder (for dusting)
Instructions
- In a large mixing bowl, combine almond flour, melted coconut oil, maple syrup, and salt. Mix until a smooth dough forms (about 2-3 minutes).
- Press the mixture firmly into the bottom and sides of a tart pan to form the crust.
- In a separate bowl, combine melted dark chocolate, coconut cream, and peppermint extract. Stir until smooth.
- Pour the chocolate filling into the prepared crust and spread evenly.
- Refrigerate for at least 2 hours or until set.
- Before serving, dust with cocoa powder.
Notes
Make sure the coconut oil is melted but not hot when mixing to prevent curdling. This tart can be prepared up to 3 days ahead.
- Prep Time: 20 minutes
- Cook Time: 0 minutes
- Category: Dessert
- Method: No Bake
- Cuisine: American
Nutrition
- Serving Size: 1 serving
- Calories: 190
- Sugar: 8g
- Sodium: 50mg
- Fat: 15g
- Saturated Fat: 7g
- Unsaturated Fat: 8g
- Trans Fat: 0g
- Carbohydrates: 12g
- Fiber: 3g
- Protein: 3g
- Cholesterol: 0mg
🥗 Free Custom Keto Meal Plan?
Do you want to lose weight while still enjoying delicious Asian & Thai Fusion meals? Take this quick quiz to get your personalized Keto plan based on your favorite foods!
- ✅ No more guessing what to eat
- ✅ Delicious & easy-to-make recipes
- ✅ Tailored to your body type
Get My Custom Plan Now! →
*Over 100,000+ people have transformed their lives with this quiz.