Irresistible Peppermint Cake: A Festive Treat Full of Flavor and Memories
Introduction
There’s something truly magical about the aroma of freshly baked cakes wafting through my kitchen, especially during the holiday season. I vividly remember my grandmother standing at the counter, whisking away as she prepared her famous peppermint cake — a family tradition that always brought smiles and warmth to our gatherings. This Peppermint Cake isn’t just a dessert; it’s a lovely reminder of those cherished moments spent around the dining table, frosting-studded smiles, and laughter echoing through the room.
Now, don’t get me wrong — while I love indulging in a bakery’s peppermint cake, nothing compares to the homemade version you can whip up yourself! What makes my recipe stand out is the luscious combination of silky white chocolate and the unmistakable crunch of crushed candy canes, creating a harmonious blend of flavors that dance on your palate. This cake is light, fluffy, and perfectly festive; every slice radiates those memories that made it so special.
In today’s post, I’ll share with you how to create the perfect Peppermint Cake from scratch! Get ready to impress your loved ones and create new memories, as I guide you through each step to success in the kitchen.
What Are Peppermint Cakes?
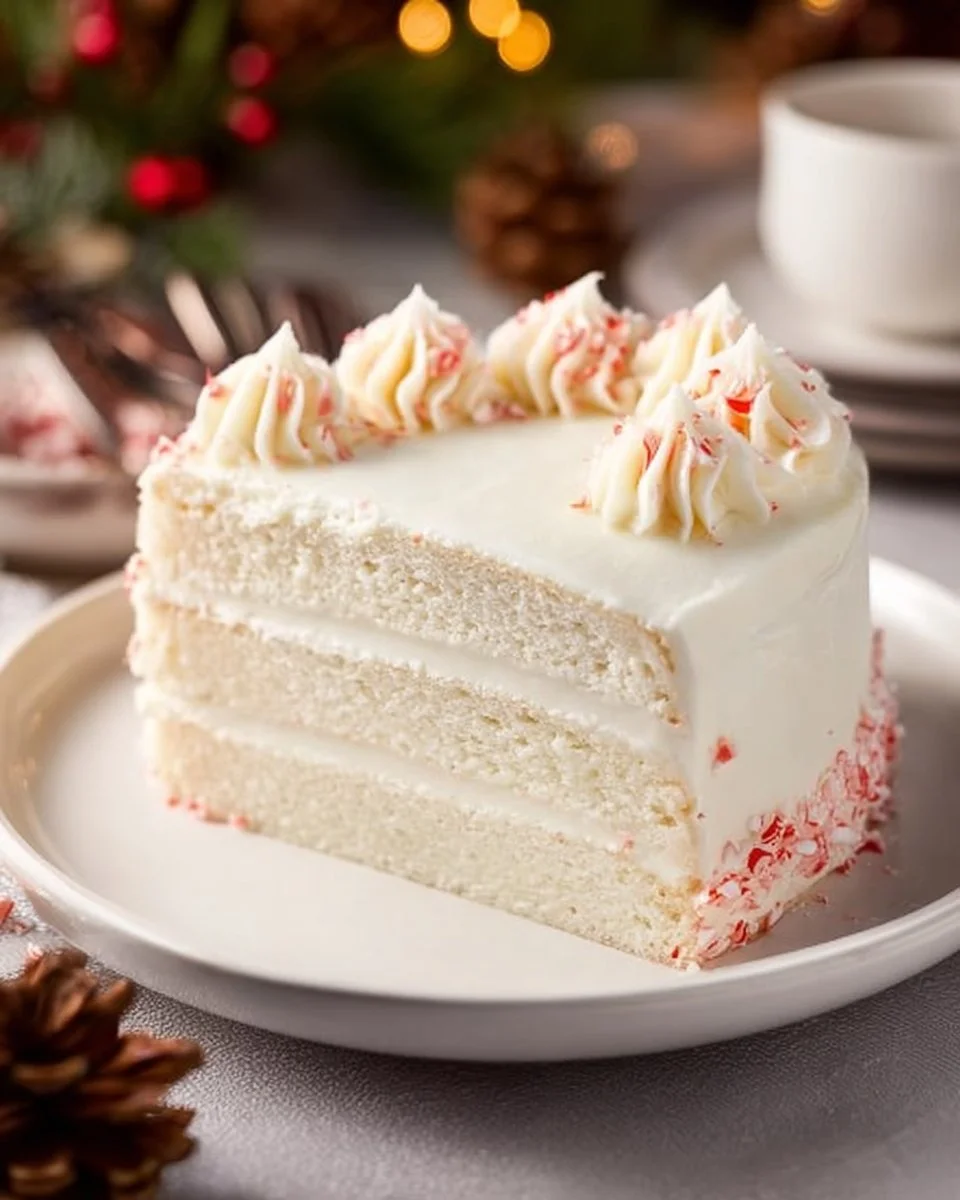
The Peppermint Cake has a delightful origin rooted deeply in holiday celebrations, where its refreshing taste and eye-catching colors make it a staple during festive gatherings. Typically layered with whipped frosting and topped with crushed candy canes, this cake is not just a feast for the eyes but also a delight for the taste buds.
The taste is a delicious harmony of sweet and minty, balanced with the creaminess of the white chocolate. The texture? Think soft, airy layers that melt in your mouth, complemented by the satisfying crunch of candy cane sprinkled on top. You’ll want to make this cake not just for special occasions but any time you crave a festive vibe — it’s perfect for holiday parties, birthdays, or even a casual Sunday surprise!
Why You’ll Love This Recipe
Homemade Goodness vs. Store-Bought: Let’s be real. Have you ever bitten into a store-bought cake and felt it was lacking? This Peppermint Cake bursts with freshness and flavor that you just can’t replicate with a boxed mix. Plus, the white chocolate and peppermint combo is irresistibly dreamy!
Budget-Friendly: Making a cake at home is not only a labor of love; it’s also kinder to your wallet. For a fraction of the cost of a bakery cake, you get to create something truly unique and delicious that will wow your guests.
Customization Galore: Love a hint of chocolate? Feel free to swap some of the white chocolate for dark, or toss in some mini chocolate chips for an extra sweet surprise. The opportunity to personalize this cake is endless!
Beginner-Friendly: You don’t have to be a baking expert to make this Peppermint Cake shine. With easy-to-follow steps and ingredients, you’ll feel like a pro in no time. Just keep reading, and I promise you’ll nail it on your first try!
Great for Make-Ahead: Planning a festive gathering? This cake is perfect for making ahead of time! Bake it a day early, store it in the fridge, and frost it just before serving. It will only get better as the flavors meld!
Ingredients Section
For this delightful Peppermint Cake, you will need the following ingredients, carefully organized by order of use to ensure a smooth baking experience:
Cake Ingredients:
- 2 cups all-purpose flour (For best results, sift before measuring)
- 1 ½ cups granulated sugar (Feel free to substitute with coconut sugar for a healthier option)
- ½ cup unsalted butter, softened (Let it sit at room temperature for easy creaming)
- 1 cup milk (Whole milk gives a richer flavor, but any type can work)
- 3 large eggs (Room temperature eggs create a fluffier cake)
- 1 tablespoon baking powder (Double-check the expiration date for the best rise)
- ½ teaspoon salt
- 1 teaspoon vanilla extract (Go for pure vanilla extract whenever possible)
- 1 cup white chocolate, melted (I recommend Ghirardelli or Bakers for quality)
Frosting Ingredients:
- 1 cup butter, softened (Again, use room temperature for easy mixing)
- 4 cups powdered sugar (For a fluffy texture, sift before adding)
- 2 tablespoons heavy cream (Extra richness!)
- 1 teaspoon peppermint extract (Be sure to use pure extract for an authentic flavor)
- Crushed candy canes (For the festive topping that brings a crunch!)
Step-by-Step Instructions
Now, let’s get baking! Follow these detailed steps to create your stunning Peppermint Cake:
Preheat the Oven: Preheat your oven to 350°F (175°C). Grease and flour two 9-inch round cake pans.
Cream the Butter and Sugar: In a large mixing bowl, cream the softened butter and granulated sugar together until light and fluffy — about 3 to 5 minutes. This will create air pockets for a tender cake.
Add the Eggs: Add the eggs one by one, making sure to beat well after each addition for a super smooth batter.
Mix in Vanilla: Stir in the vanilla extract and set aside.
Combine Dry Ingredients: In another bowl, whisk together the flour, baking powder, and salt. This ensures an even distribution of the leavening agent.
Combine Wet and Dry: Gradually add the dry mixture to the creamed mixture, alternating with the milk, starting and ending with the flour mixture. Mix until just combined to avoid overworking the batter.
Fold in Chocolate: Gently fold in the melted white chocolate, being careful not to deflate the batter.
Pour into Pans: Divide the batter evenly between the prepared cake pans and smooth out the tops.
Bake: Bake in the preheated oven for 25-30 minutes, or until a toothpick inserted in the center comes out clean. Keep an eye on it; ovens can vary!
Cool Completely: Allow the cakes to cool in the pans for 10 minutes before transferring them to a wire rack. Let them cool completely.
Make the Frosting: Beat the softened butter in a bowl until creamy. Gradually add the powdered sugar, mixing until well incorporated. Then mix in the heavy cream and peppermint extract until smooth.
Assemble the Cake: Place one layer of cake on your serving plate, spread frosting generously over the top, and place the second layer on top. Frost the top and sides of the cake.
Finish with Toppings: Sprinkle the top with crushed candy canes for that festive flair.
Slice and Serve: Slice it up and revel in the joy of serving your designated Peppermint Cake. Trust me; it deserves a celebration!
Chef’s Tip: To avoid crumbling when slicing, use a hot knife (run it under hot water and dry it off).
Expert Tips & Tricks
Storage Recommendations: Keep leftover cake covered at room temperature for up to 3 days or in the fridge for up to a week. You can also freeze it! Wrap each layer tightly in plastic wrap and store in an airtight container for up to 3 months.
Make-Ahead Instructions: You can bake the cake layers a day in advance. Just wrap them in plastic wrap and store in the fridge. Frost on the day you plan to serve.
Troubleshooting: If your cake domes in the center, try lowering the oven temperature by 25°F (10°C) and baking a bit longer. This allows for even cooking.
Check for Doneness: Besides the toothpick test, if the edges of the cake have pulled away from the pan slightly, you know it’s done!
Frosting Smoothness: If your frosting seems too thick, add a teaspoon of milk or heavy cream at a time until you reach your desired consistency.
Serving Suggestions
This Peppermint Cake is a star on its own, but why not enhance the experience? Serve it with a side of whipped cream or a scoop of vanilla ice cream for a decadent balance. For presentation, consider dusting the plate with powdered sugar and a couple of extra crushed candy canes, or add a sprig of fresh mint on top for that professional touch! It’s perfect for holiday celebrations, birthday parties, or anytime you want to spread cheer.
Variations & Substitutions
Flavor Combinations: If peppermint isn’t to your liking, try other extracts like orange or almond! A little raspberry jam between the layers adds a lovely twist, too!
Dietary Adaptations: For a gluten-free version, swap out all-purpose flour with a gluten-free blend. You can also easily make this vegan by replacing eggs with flax eggs, using almond milk, and a vegan butter substitute.
Seasonal Twists: Incorporate seasonal fruit like strawberries in the spring or cinnamon in the fall for an equally delicious Peppermint Cake variant.
Nutrition & Storage Info
- Prep Time: 20 minutes
- Cook Time: 30 minutes
- Total Time: 1 hour (plus cooling time)
- Yield: 12 servings
- Estimated Calories: Approximately 350 calories per slice (varies based on size and frosting).
FAQ Section
Can I use a different frosting?
Absolutely! Cream cheese frosting works beautifully with peppermint flavors, or try a chocolate ganache.What can I use instead of milk?
If you’re dairy-free, oat or almond milk are great substitutes.How do I make this cake without white chocolate?
You can omit it and double up on the cocoa powder for a rich chocolate peppermint cake or stick with the vanilla flavor for a classic take.Why is my cake dense?
Dense cakes can often result from over-mixing or too much flour. Make sure to measure accurately.Can I use whole eggs instead of large?
It’s better to stick to large eggs for the best results. Smaller ones may not provide enough moisture.Can I make it in advance?
Definitely! You can bake the cake a few days ahead and simply frost it on the event day.How should I store leftover cake?
Keep it covered at room temperature or place it in the fridge for longer preservation.What if I don’t have peppermint extract?
You can substitute with vanilla extract or even use crushed peppermint candies for flavor.Can I double the recipe?
Yes! Just keep in mind to adjust baking times as necessary for larger cake pans or multiple layers.Is this recipe adaptable for cupcakes?
Of course! The batter works wonderfully for cupcakes if you want to create individual treats; just reduce the baking time to 15-18 minutes.
Conclusion
This Peppermint Cake has become a staple in my holiday baking adventures — it’s not just about the flavors, but about the memory-making alongside family and friends. I invite you to bring this delightful recipe into your kitchen and share it with those you love. I can’t wait to hear how it turns out for you! Feel free to leave comments or feedback, and don’t forget to explore the other festive treats available on my blog. Happy baking and enjoy every sweet bite of your Peppermint Cake!
I hope you find joy and comfort in this recipe, just as I have. Here’s to heartfelt baking experiences and delicious memories!
Print
Irresistible Peppermint Cake
- Total Time: 60 minutes
- Yield: 12 servings 1x
- Diet: Vegetarian
Description
A delightful homemade peppermint cake infused with white chocolate and topped with crushed candy canes, perfect for holiday celebrations.
Ingredients
- 2 cups all-purpose flour
- 1 ½ cups granulated sugar
- ½ cup unsalted butter, softened
- 1 cup milk
- 3 large eggs
- 1 tablespoon baking powder
- ½ teaspoon salt
- 1 teaspoon vanilla extract
- 1 cup white chocolate, melted
- 1 cup butter, softened (for frosting)
- 4 cups powdered sugar
- 2 tablespoons heavy cream
- 1 teaspoon peppermint extract
- Crushed candy canes (for topping)
Instructions
- Preheat your oven to 350°F (175°C). Grease and flour two 9-inch round cake pans.
- In a large mixing bowl, cream the softened butter and granulated sugar together until light and fluffy — about 3 to 5 minutes.
- Add the eggs one by one, beating well after each addition.
- Stir in the vanilla extract and set aside.
- In another bowl, whisk together the flour, baking powder, and salt.
- Gradually add the dry mixture to the creamed mixture, alternating with the milk, starting and ending with the flour mixture.
- Gently fold in the melted white chocolate.
- Divide the batter evenly between the prepared cake pans and smooth out the tops.
- Bake for 25-30 minutes, or until a toothpick inserted comes out clean.
- Allow the cakes to cool in the pans for 10 minutes before transferring to a wire rack to cool completely.
- For the frosting, beat the softened butter until creamy. Gradually add the powdered sugar, then mix in the heavy cream and peppermint extract until smooth.
- Assemble the cake by placing one layer on a serving plate, spreading frosting on top, and adding the second layer. Frost the top and sides.
- Sprinkle crushed candy canes on top for decoration.
- Slice and serve.
Notes
Store leftover cake covered at room temperature for up to 3 days or in the fridge for up to a week. Can be made ahead of time and frosted just before serving.
- Prep Time: 20 minutes
- Cook Time: 30 minutes
- Category: Dessert
- Method: Baking
- Cuisine: American
Nutrition
- Serving Size: 1 slice
- Calories: 350
- Sugar: 30g
- Sodium: 400mg
- Fat: 18g
- Saturated Fat: 10g
- Unsaturated Fat: 8g
- Trans Fat: 0g
- Carbohydrates: 45g
- Fiber: 1g
- Protein: 3g
- Cholesterol: 70mg
🥗 Free Custom Keto Meal Plan?
Do you want to lose weight while still enjoying delicious Asian & Thai Fusion meals? Take this quick quiz to get your personalized Keto plan based on your favorite foods!
- ✅ No more guessing what to eat
- ✅ Delicious & easy-to-make recipes
- ✅ Tailored to your body type
Get My Custom Plan Now! →
*Over 100,000+ people have transformed their lives with this quiz.