Table of Contents
As the leaves begin to change and the air turns crisp, I’m always reminded of my childhood Halloween adventures—trick-or-treating alongside friends, all wrapped up in costumes and fueled by excitement. It’s that time of year when creativity flows freely, especially in the kitchen. This Halloween, I’m thrilled to share one of my family’s favorite treats—Mummy Veggie Wraps!
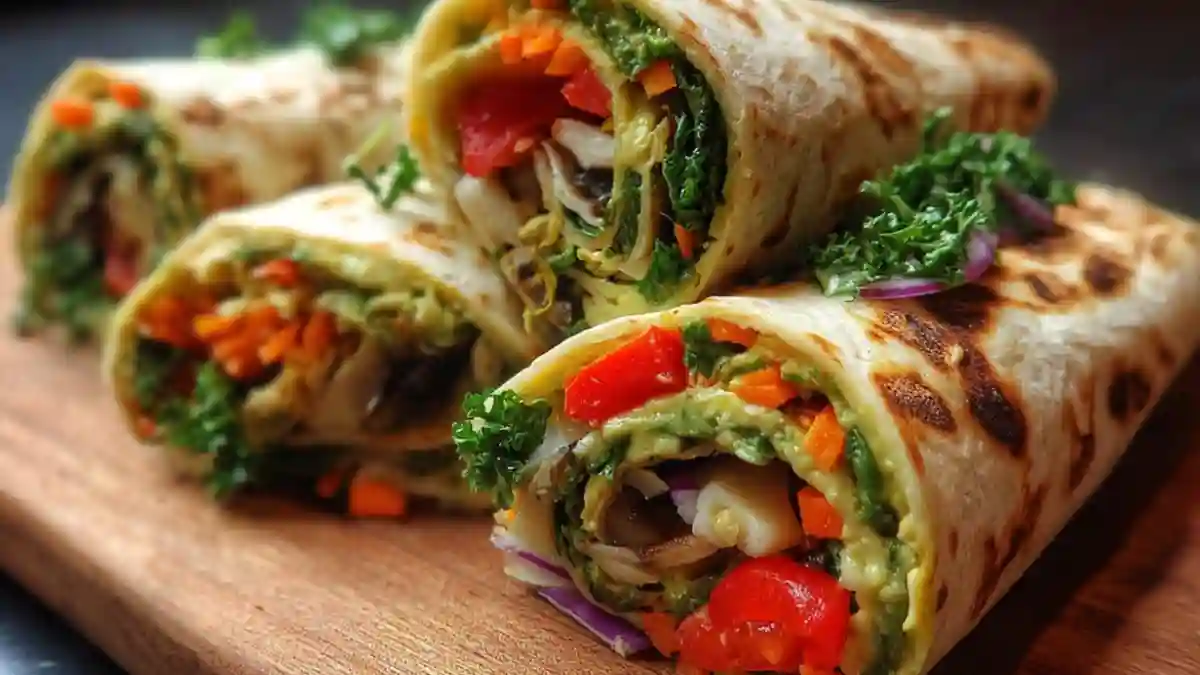
Picture this: a colorful array of fresh veggies wrapped in a savory cream cheese blanket, cleverly decorated to resemble spooky mummies. These wraps aren’t just a feast for the eyes; they’re a delightful and healthy snack that even the pickiest of eaters can enjoy. Unlike the standard Halloween sweets that leave you feeling sluggish, Mummy Veggie Wraps offer a burst of flavor and nutrition that keeps everyone energized for all the fun.
What makes these wraps better than the store-bought options? It’s all about the fresh ingredients, customizable flavors, and that special touch of love from your own kitchen. This recipe will not only tickle your taste buds but also ignite nostalgia and warmth as you prepare it with your little ghouls and goblins. Stick around, and I promise you’ll learn how to create these delightful wraps that will charm both kids and adults alike.
What Are Mummy Veggie Wraps?
Mummy Veggie Wraps emerged from my quest to provide a healthy, fun snack for Halloween gatherings. This playful twist on the classic veggie wrap is inspired by those chilly autumn nights filled with spooky tales and laughter. Each bite combines a variety of textures and flavors—from the crunchiness of julienned cucumbers to the sweetness of bell peppers and the creamy richness of a cheese spread.
These wraps are unique because they embrace the spirit of Halloween while still prioritizing health. Instead of sugary treats, this recipe allows you to indulge in colorful veggies that add vibrant nutrition to your festive celebrations. You can whip them up for a Halloween-themed party, as an after-school snack, or even as a healthy lunch option, allowing you to enjoy the season without compromising your family’s wellness.
Why You’ll Love This Recipe
- Kid-Friendly & Fun: As a parent, I know how challenging it can be to get kids to eat their veggies. But with these Mummy Veggie Wraps, they’re not just eating vegetables; they’re eating fun! The creative presentation transforms the mundane into the magical, making meal time an adventure.
- Customizable: One of the best aspects of this recipe is its flexibility. You can mix and match vegetables based on your family’s preferences or what you have on hand. Add some spicy jalapeños for a kick, or swap out the spinach for a peppery arugula. You create the flavor!
- Budget-Friendly: When you compare these homemade wraps to the store-bought options, you’ll be pleasantly surprised. Not only are they packed with more nutrition, but you’ll also save money in the long run. Impress your guests without breaking the bank!
- Quick and Simple: You can whip up these wraps in about 30 minutes. They’re perfect for those busy days when you want to impress without spending hours in the kitchen. Plus, they can be made ahead of time and tossed in the fridge for a convenient and delicious snack!
- Great for Any Occasion: While they’re perfect for Halloween, these Mummy Veggie Wraps don’t have to stop there! They’re ideal for picnics, birthday parties, or even a fun lunch during the school week. Their versatility makes them a staple in our household.

Ingredients
- 4-6 large flour tortillas (10-inch)
- Note: Whole wheat or spinach tortillas are excellent alternatives for added nutrition.
- 8 ounces cream cheese, softened
- Substitution: Try using herbed cream cheese or Greek yogurt for a tangy twist.
- 1 cup shredded carrots, finely shredded
- Tip: Choose organic carrots for a fresher taste.
- 1 cup julienned bell peppers (mixed colors)
- Quality Note: Always select the freshest bell peppers for the best flavor.
- 1 cup julienned cucumber, seeds removed
- Prep Note: Salting your cucumbers for a few minutes helps eliminate excess moisture.
- 1 cup baby spinach, fresh and tightly packed
- Substitution: Feel free to use kale or mixed greens if preferred.
- 1/4 cup black olives, pitted
- Consider: Green olives can add a different flavor profile!
- 1/2 teaspoon garlic powder (optional)
- 1/4 teaspoon onion powder (optional)
- Pinch of salt and black pepper (optional)
Prep Tips: Before you dive into the recipe, let your cream cheese come to room temperature, making it easier to mix.
Step-by-Step Instructions
- Prepare the Cream Cheese Spread: In a mixing bowl, blend the softened cream cheese with garlic powder, onion powder, salt, and pepper until smooth and creamy. Aim for a texture that’s easy to spread—your wraps will thank you!
- Chef’s Tip: If you want a zesty flavor, consider mixing in some fresh herbs like dill or chives!
- Wash and Dry the Veggies: Rinse each veggie under cool water and dry thoroughly. Shred the carrots and julienne the bell peppers and cucumber, ensuring all pieces are uniform for easy rolling.
- Assemble the Wraps: Lay a tortilla flat on a clean surface. Spread an even layer of the cream cheese mixture across the entire surface, leaving about a 1-inch border around the edges.
- Layer the Goodness: On the lower third of the tortilla, place a line of shredded carrots, bell peppers, cucumber, and fresh spinach. Get creative with your placements—make it colorful!
- Roll It Up: Carefully roll the tortilla tightly from the bottom, sealing with the cream cheese edge. Wrap the finished roll in plastic wrap to keep it tucked in nice and tight.
- Chill for Perfection: Refrigerate your wraps for at least 30 minutes. This sets the cream cheese and makes slicing easier.
- Slice and Serve: Once chilled, slice the wraps into pinwheels. For the mummy effect, cut some strips from the edges to create bandages.
- Get Creative: Decorate each wrap by crisscrossing the bandage strips and placing olive slices as eyes.
- Enjoy!: Serve your spooky Mummy Veggie Wraps at your next gathering and watch them disappear!
Expert Tips & Tricks
- Storing Leftovers: If you have any wraps leftover, keep them wrapped in plastic in the fridge for up to 2 days. They’re just as delicious the next day!
- Make-Ahead Instructions: You can prepare the wraps up to a day in advance. Just ensure they are tightly wrapped to avoid drying out.
- Troubleshooting: If your wraps split while rolling, try softening the tortillas further in the microwave for 10-15 seconds, making them more pliable.
- Presentation: For serving, consider adding festive toothpicks with fun Halloween-themed flags. This adds to the fun and makes them easy to grab!
- Flavor Enhancements: Want some spice? Try mixing sriracha or hot sauce into the cream cheese spread for a fiery twist!
Serving Suggestions
These Mummy Veggie Wraps shine on their own, but pairing them with some sides can elevate your presentation. Serve alongside a vibrant fruit platter or spooky Halloween-themed snacks like pumpkin hummus and crispy pita chips. For drinks, a fun, colorful punch can bring the whole meal together!
Variations & Substitutions
- Different Flavor Combinations: Experiment with flavors like roasted red peppers for added sweetness, or swap cucumbers for sliced avocado for a creamy boost.
- Dietary Restrictions: Want to go gluten-free? Substitute the flour tortillas with any gluten-free wraps available. For a plant-based option, use vegan cream cheese and adjust veggies accordingly.
- Seasonal Variations: In the autumn months, consider adding roasted sweet potatoes or seasonal squash for a delightful twist!
Nutrition & Storage Info
- Prep Time: 30 minutes
- Total Time: 1 hour (includes chilling)
- Yield: Approximately 12 pinwheels
- Estimated Calories: 120 calories per serving
- Storage Instructions: Keep in the fridge, well-wrapped, for up to 2 days.
- Freezing: These wraps do not freeze well because of the cream cheese.

FAQ Section
- Can I make these wraps without cream cheese?
- Yes! You can use goat cheese, hummus, or avocado spread as a substitute!
- How can I prevent the wraps from becoming soggy?
- Make sure to dry your veggies properly and not overstuff the wraps. Layering them correctly also helps!
- Can I use other vegetables?
- Absolutely! Any crunchy veggies you enjoy can work perfectly. Think radishes, zucchini, or even bean sprouts!
- How do I make them spicier?
- Add jalapeños, hot sauce, or cayenne pepper to the cream cheese mixture to kick up the heat!
- What if my kids don’t like some of the veggies?
- Get creative! Let them choose their veggies for a fun food crafting session.
- Can these wraps be served at room temperature?
- Yes, they are enjoyable straight from the fridge or at room temperature!
- How do I store them for the best texture?
- Wrap tightly in plastic wrap and refrigerate. To maintain texture, place a paper towel inside the wrap to absorb excess moisture.
- Is there a way to make them more filling?
- You can add grains such as quinoa or brown rice for added substance.
- Can I make these wraps with whole wheat tortillas?
- Yes, whole wheat tortillas work fantastically and add a nutty flavor!
- What’s the best way to garnish these?
- Use fresh herbs like parsley or cilantro, or sprinkle them with a little paprika for an eye-catching color!
Conclusion
Mummy Veggie Wraps are more than just a Halloween treat; they are a delightful way to bring joy, creativity, and health to your table. This recipe is an exciting adventure for the whole family, packed with fun and flavor! I encourage you to give these a try—you’re bound to love them as much as we do. I’d love to hear your thoughts, so feel free to share any tweaks you make or feedback in the comments below. And don’t forget to check out other festive recipes on my blog for more delicious inspiration! Happy Halloween, and happy munching! 🎃
Halloween Sprinkle Donuts Recipe
Print
Mummy Veggie Wraps
- Total Time: 15 minutes
- Yield: 8–10 mummy wraps (approx. 32 pinwheels) 1x
- Diet: Vegan
Description
Mummy Veggie Wraps are a fun, healthy, and spooky Halloween lunch or snack. Colorful vegetable sticks are wrapped in strips of tortilla to look like mummy bandages, with olive or pepper eyes peeking through. They are perfect for kids’ parties and are easily customizable with your favorite dips.
Ingredients
- 4–6 large flour tortillas (10-inch)
- 8 ounces cream cheese, softened
- 1 cup shredded carrots, finely shredded
- 1 cup julienned bell peppers (mixed colors)
- 1 cup julienned cucumber, seeds removed
- 1 cup baby spinach, fresh and tightly packed
- 1/4 cup black olives, pitted
- 1/2 teaspoon garlic powder (optional)
- 1/4 teaspoon onion powder (optional)
- Pinch of salt and black pepper (optional)
Instructions
- Lay a tortilla flat on a clean surface. Spread a thin, even layer of hummus or cream cheese over the entire surface, leaving a 1-inch border.
- Arrange a small handful of assorted vegetable sticks horizontally across the lower third of the tortilla.
- Carefully roll the tortilla up tightly, starting from the bottom edge with the vegetables, ensuring the filling is enclosed.
- Using a sharp knife, slice the rolled wrap into 1-inch thick pinwheels.
- For the mummy effect, take thin strips of another tortilla (about 1/4-inch wide) and loosely wrap them around each pinwheel, leaving a small gap for the ‘eyes’.
- Secure the end of the tortilla strip with a small dab of hummus if needed.
- Press two small black olive pieces or pepper slices into the gap to create the mummy’s eyes.
- Serve immediately or refrigerate until ready to serve.
Notes
- Use a pizza cutter to easily slice the tortillas into thin, even strips for the bandages.
- To prevent tortillas from cracking, slightly warm them in the microwave for 10-15 seconds before spreading and rolling.
- These are best assembled the day they are served to prevent the tortillas from getting soggy.
- Get creative with the fillings! Use your child’s favorite veggies or add thin slices of turkey or cheese for a non-vegetarian version.
- Prep Time: 15 minutes
- Cook Time: 0 minutes
- Category: Snack, Appetizer
- Method: No-Cook
- Cuisine: American
Nutrition
- Serving Size: 4 pinwheels
- Calories: 180
- Sugar: 2g
- Sodium: 320mg
- Fat: 8g
- Saturated Fat: 1g
- Unsaturated Fat: 5g
- Trans Fat: 0g
- Carbohydrates: 22g
- Fiber: 4g
- Protein: 5g
- Cholesterol: 0mg
Ask the Community
🥗 Free Custom Keto Meal Plan?
Do you want to lose weight while still enjoying delicious Asian & Thai Fusion meals? Take this quick quiz to get your personalized Keto plan based on your favorite foods!
- ✅ No more guessing what to eat
- ✅ Delicious & easy-to-make recipes
- ✅ Tailored to your body type
Get My Custom Plan Now! →
*Over 100,000+ people have transformed their lives with this quiz.