Table of Contents
Table of Contents
I’ll never forget the first time I made Mummy Brownies for Halloween—kitchen chaos, laughter, and a little too much icing decorating my face! Since that delightful night, they’ve become a cherished family tradition, and every year we huddle together, whisk in one hand and chocolate in the other, as we whip up this spooky yet scrumptious dessert. The combination of chewy, fudgy brownies and creepy candy eyes brings joy and laughter to our Halloween festivities, creating memories that last a lifetime.
What sets my Mummy Brownies apart from others is not just their adorable, eerie appearance but also the rich, decadent taste that rivals any store-bought dessert. There’s something deeply comforting about biting into a chocolatey treat that oozes warmth and family love. This recipe is easier than you might think, and with just a handful of ingredients, you can create a showstopper dessert that will impress everyone, from the neighborhood kids to your Halloween party guests.
In the upcoming sections, I’ll guide you step by step through the process of making these unforgettable Mummy Brownies, weaving together the deliciousness, creativity, and little secrets that make this treat so extra special. You’ll learn tips on ingredient quality, foolproof baking techniques, and how to customize the spooky designs to make them uniquely yours!
What Are Mummy Brownies?
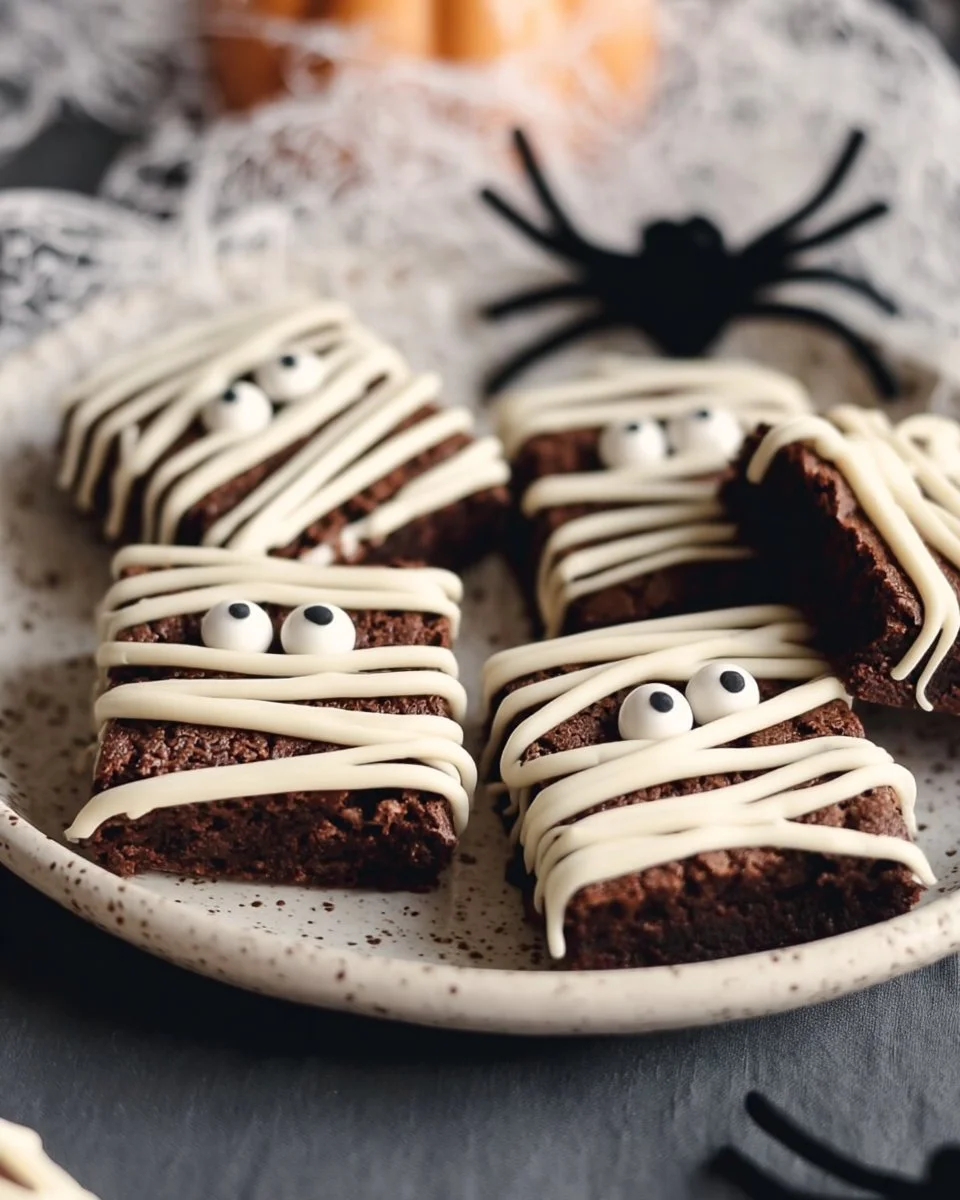
Mummy Brownies are a fun and festive twist on traditional brownies that aesthetically celebrate Halloween. Originating from the idea of dressing treats in a spooky and fun fashion, Mummy Brownies are essentially fudgy brownies drizzled with melted white chocolate, giving them the appearance of cute mummies wrapped in gauzy bandages. Add to that adorable candy eyes peeking through, and you have a treat that’s both delicious and delightful.
You can expect a rich, chocolate flavor complemented by the creamy sweetness of white chocolate. The texture? Oh my goodness—these brownies are so fudgy that you’ll be tempted to eat them straight from the pan! They’re perfect for Halloween parties, classroom treats, or just an evening spent snuggled up on the couch watching classic monster movies. So why wait? Let’s dive into the delightful world of Mummy Brownies!
Why You’ll Love This Recipe
Decadent Taste: These Mummy Brownies are rich and fudgy, with the perfect balance of sweetness from the semisweet and white chocolate, making each bite irresistible.
Cost-Effective: Why spend money on pricey bakery treats when you can whip these up at home for a fraction of the cost? This recipe costs less than $10, yielding plenty of spooky brownies for your haunted gatherings.
Easy to Customize: Feel free to get creative! If white chocolate isn’t your thing, try using colored candy melts or even bright frosting for that extra Halloween flair. Add different types of candy for the eyes to mix it up!
Kid-Friendly Fun: Involve the little ones in the decorating process for an enjoyable family activity. Everyone loves to drizzle the “bandages” and place on the eyeballs—trust me; it turns into a competition to see who can get the most creative!
Quick Preparations: With a total cook and prep time of about an hour, these brown treats come together quickly, allowing you ample time for other festive projects—like binge-watching your favorite Halloween movies!
If you’ve ever bought store-bought brownies, you know there’s just no comparison to homemade freshness and love. Plus, let’s be honest: nothing beats the heavenly aroma wafting from your own kitchen.
Ingredients
Here’s what you’ll need to create your Mummy Brownies:
- 1/2 Cup Butter (1 stick, unsalted; it’s best to use high-quality butter like Kerry Gold)
- 1/4 Cup Chocolate Chips (Semisweet; I love using Ghirardelli for a rich flavor)
- 2 teaspoons Vanilla Extract (opt for pure vanilla for the best results)
- 2 large eggs (room temperature works best; Eggland’s Best is a solid choice)
- 3/4 Cup Flour (94g; all-purpose flour works beautifully)
- 1/2 Cup Granulated Sugar (100g)
- 1/2 Cup Brown Sugar (100g; light or dark depending on your taste)
- 1/3 Cup Dutch Process Cocoa (33g; I recommend using Hershey’s Special Dark for a richer flavor)
- 1/4 teaspoon Salt
- 32 Candy Eyes (these can be found at craft stores or online for a fun finishing touch)
- 1 cup White Chocolate Chips (or Candy Wafers; make sure to use high-quality brands like Merckens)
Prep Notes
- Make sure your butter is room temperature to ensure a smooth batter.
- If you’re gluten-free, you can substitute the flour with a gluten-free blend.
Step-by-Step Instructions
Let’s get started on these delightful Mummy Brownies! This recipe is user-friendly and perfect for bakers of all experience levels.
Melt Butter and Chocolate: In a large mixing bowl, combine the butter and semisweet chocolate chips. Microwave in 30-second intervals, stirring in between until melted and smooth. Aim for a glossy mix without lumps—this should take about 1-1.5 minutes total.
Chef’s Tip: Be careful not to overheat; burning chocolate is a heartbreak!
Mix the Dry Ingredients: In a separate bowl, whisk together the flour, brown sugar, granulated sugar, Dutch cocoa, and salt until combined and fluffy.
Combine Wet and Dry: Once the butter and chocolate mixture has cooled slightly, mix in the eggs and vanilla extract until fully incorporated. Gradually stir the dry mixture into the wet mixture until well combined.
Bake the Brownies: Grease a 9×9-inch baking pan or line it with parchment paper. Pour the brownie batter into the prepared pan, spreading it evenly. Bake at 350°F (175°C) for 30-35 minutes, or until a toothpick inserted into the center comes out clean or with a few moist crumbs.
Visual Cue: The edges should look set and the top slightly cracked.
Cool and Prepare for Decorating: Allow the brownies to cool in the pan for 5 minutes before carefully lifting them out using the parchment paper. Let them cool completely on a wire rack for at least 30 minutes before slicing.
Decorate: In a small bowl, melt the white chocolate chips in the microwave in 30-second intervals, stirring well between each interval until it’s smooth. Transfer the melted white chocolate to a zip-lock bag, snip a tiny corner, and drizzle starting at the top of the brownie, weaving back and forth to create a mummy look. Place two candy eyes on each brownie before the chocolate sets.
Chef’s Tip: The best effect comes from drizzling back and forth and securing the eye candies beneath the drizzle without squishing!
Cool Once More: Allow the drizzled brownies to set for 10-15 minutes before transferring to a container or serving platter.
Expert Tips & Tricks
Storage: Store leftovers in an airtight container. They will keep at room temperature for about 3 days or in the fridge for up to a week.
Freezing: You can freeze these brownies for up to 3 months! Just wrap them tightly in plastic wrap and foil.
Make Ahead: You can prep the brownie batter in advance and refrigerate it for up to 24 hours before baking—save time on a busy day!
Don’t Overmix: Once you combine the wet and dry ingredients, mix just until you don’t see any flour—overmixing can give you dense brownies.
Finishing Touches: Try adding sprinkles or colored sugar atop the drizzled chocolate for an extra pop of color!
Troubleshooting: If your brownies crack on top, you can cover them with the white chocolate drizzle for a seamless finish.
Serving Suggestions
These Mummy Brownies are wonderfully festive on their own, but here are a few simple serving suggestions to elevate your Halloween dessert table:
- Pair with Ice Cream: Vanilla or pumpkin-flavored ice cream is the perfect accompaniment to warm brownies.
- Display Creatively: Serve them on a spooky platter with fake spiders and bats for an extra thrill!
- Occasional Treat: Perfect for Halloween parties, school gatherings, or just a cozy night spent with family.
Variations & Substitutions
- Flavor Swaps: Try adding peppermint extract instead of vanilla and sprinkling crushed candy canes for a peppermint brownie twist this holiday season.
- Nutty Version: Fold in chopped nuts like walnuts or pecans if you want a little crunch.
- Dietary Needs: You can easily make these brownies dairy-free by using coconut oil instead of butter and dairy-free chocolate chips.
Nutrition & Storage Info
- Prep Time: 15 minutes
- Cook Time: 30-35 minutes
- Total Time: Approximately 1 hour
- Yield: 16 brownies
- Calories: About 150 calories per brownie (varies with specific brands used)
- Storage: Keep in an airtight container at room temp for 3 days or refrigerate for up to 1 week. Brownies can also be frozen for up to 3 months.
FAQ Section
What’s the best way to cut brownies cleanly?
Use a sharp knife, dip it in hot water, then wipe it dry before cutting for clean edges!Can I add other mix-ins?
Absolutely! Chopped nuts, chocolate chunks, marshmallows, or candy pieces all work great.Do I have to use Dutch-process cocoa?
You can use regular cocoa powder. Just remember that the flavor and color may vary.What if I don’t have a 9×9-inch pan?
You can use an 8×8-inch pan for thicker brownies, just add a few extra minutes to the baking time.Can I use any type of chocolate for the drizzle?
Yes, you can use colored candy melts or dark chocolate for a different appearance!How do I know if my brownies are done?
A toothpick inserted in the center should come out clean or with a few moist crumbs attached.Is there a vegan option for this recipe?
Yes, you can substitute eggs with flax eggs and use plant-based butter and vegan chocolate.What makes these brownies so fudgy?
The balance of sugars and the proper mix of fat to flour gives that soft, rich texture.Can I make the batter ahead of time?
Yes! Refrigerate the batter for up to 24 hours before baking.Can I add food coloring to the chocolate drizzle?
Yes! For festive fun, add gel food coloring to your white chocolate before drizzling.
Conclusion
In summary, Mummy Brownies are not just any Halloween treat; they’re a heartwarming reminder of the joy of baking with family. They capture the essence of spooky fun while delivering moist and fudgy goodness that no one can resist! I encourage you to try this enchanting recipe, channel your inner baker, and brighten your Halloween celebration.
To share your experiences or any fun variations you make, leave a comment below! And if you’re looking for more festive recipes, check out my blog for other delightful treats like Pumpkin Spice Cookies and Mummy Pizzas. Happy baking!
Print
Spooktacular Mummy Brownies
- Total Time: 50 minutes
- Yield: 16 brownies 1x
- Diet: Vegetarian
Description
A fun and festive twist on traditional brownies, adorned with white chocolate drizzles and candy eyes for a Halloween treat that’s rich, fudgy, and utterly delightful.
Ingredients
- 1/2 Cup Butter (unsalted)
- 1/4 Cup Semisweet Chocolate Chips
- 2 teaspoons Vanilla Extract
- 2 large eggs
- 3/4 Cup All-Purpose Flour
- 1/2 Cup Granulated Sugar
- 1/2 Cup Brown Sugar
- 1/3 Cup Dutch Process Cocoa
- 1/4 teaspoon Salt
- 32 Candy Eyes
- 1 Cup White Chocolate Chips
Instructions
- Melt Butter and Chocolate: In a large mixing bowl, combine the butter and semisweet chocolate chips. Microwave in 30-second intervals until melted and smooth.
- Mix the Dry Ingredients: In a separate bowl, whisk together the flour, brown sugar, granulated sugar, Dutch cocoa, and salt.
- Combine Wet and Dry: Mix in the eggs and vanilla extract with the melted butter and chocolate. Gradually stir in the dry mixture until well combined.
- Bake the Brownies: Grease a 9×9-inch baking pan, pour in the batter, and bake at 350°F (175°C) for 30-35 minutes.
- Cool and Prepare for Decorating: Let the brownies cool in the pan for 5 minutes, then cool completely on a wire rack for at least 30 minutes.
- Decorate: Melt white chocolate chips, drizzle over the brownies, and place two candy eyes on each brownie.
- Cool Once More: Allow the drizzled brownies to set for 10-15 minutes before serving.
Notes
Store leftovers in an airtight container for up to 3 days at room temperature or refrigerate for up to a week. These brownies can be frozen for up to 3 months!
- Prep Time: 15 minutes
- Cook Time: 35 minutes
- Category: Dessert
- Method: Baking
- Cuisine: American
Nutrition
- Serving Size: 1 brownie
- Calories: 150
- Sugar: 12g
- Sodium: 85mg
- Fat: 8g
- Saturated Fat: 4g
- Unsaturated Fat: 4g
- Trans Fat: 0g
- Carbohydrates: 20g
- Fiber: 1g
- Protein: 2g
- Cholesterol: 30mg
Ask the Community
🥗 Free Custom Keto Meal Plan?
Do you want to lose weight while still enjoying delicious Asian & Thai Fusion meals? Take this quick quiz to get your personalized Keto plan based on your favorite foods!
- ✅ No more guessing what to eat
- ✅ Delicious & easy-to-make recipes
- ✅ Tailored to your body type
Get My Custom Plan Now! →
*Over 100,000+ people have transformed their lives with this quiz.