Delicious and Easy French Toast: A Classic Breakfast Favorite This classic French toast recipe is the perfect way to start your day, offering a delicious combination of crispy, golden edges
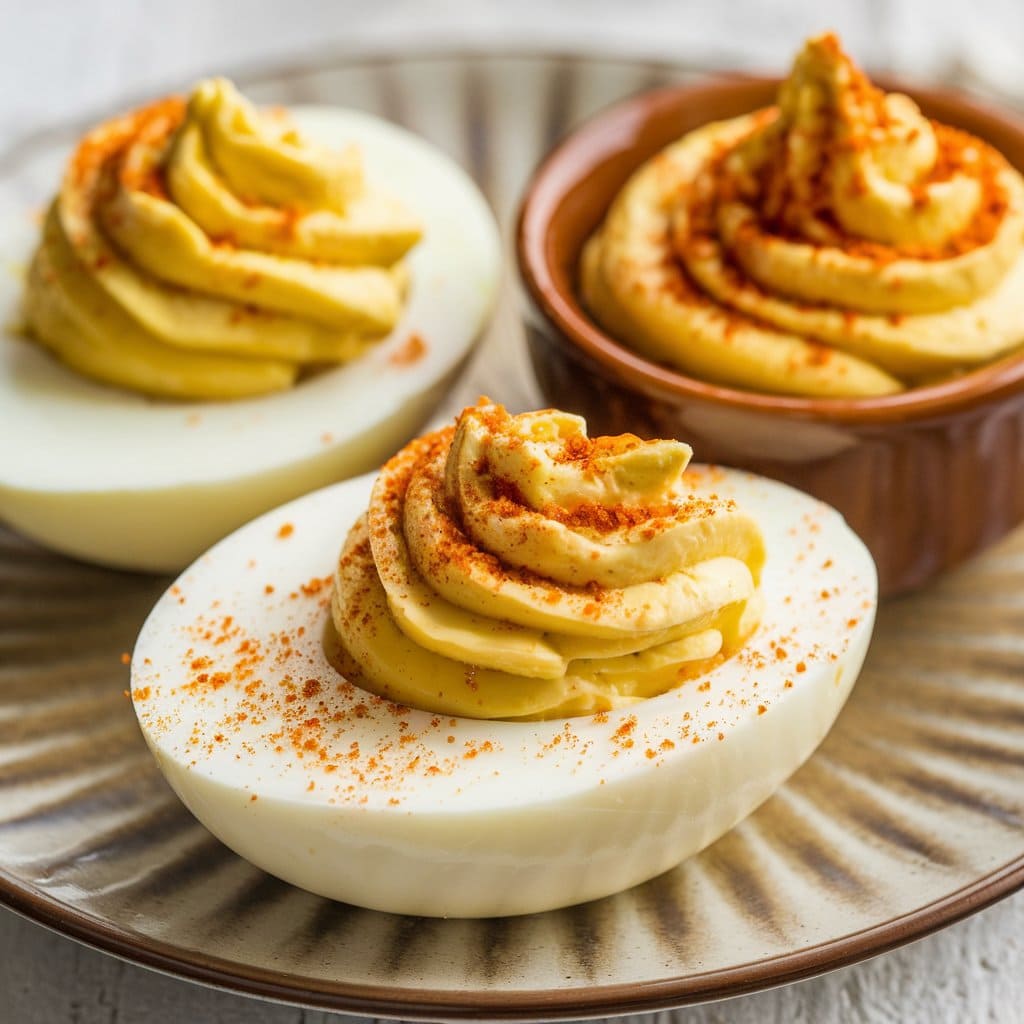
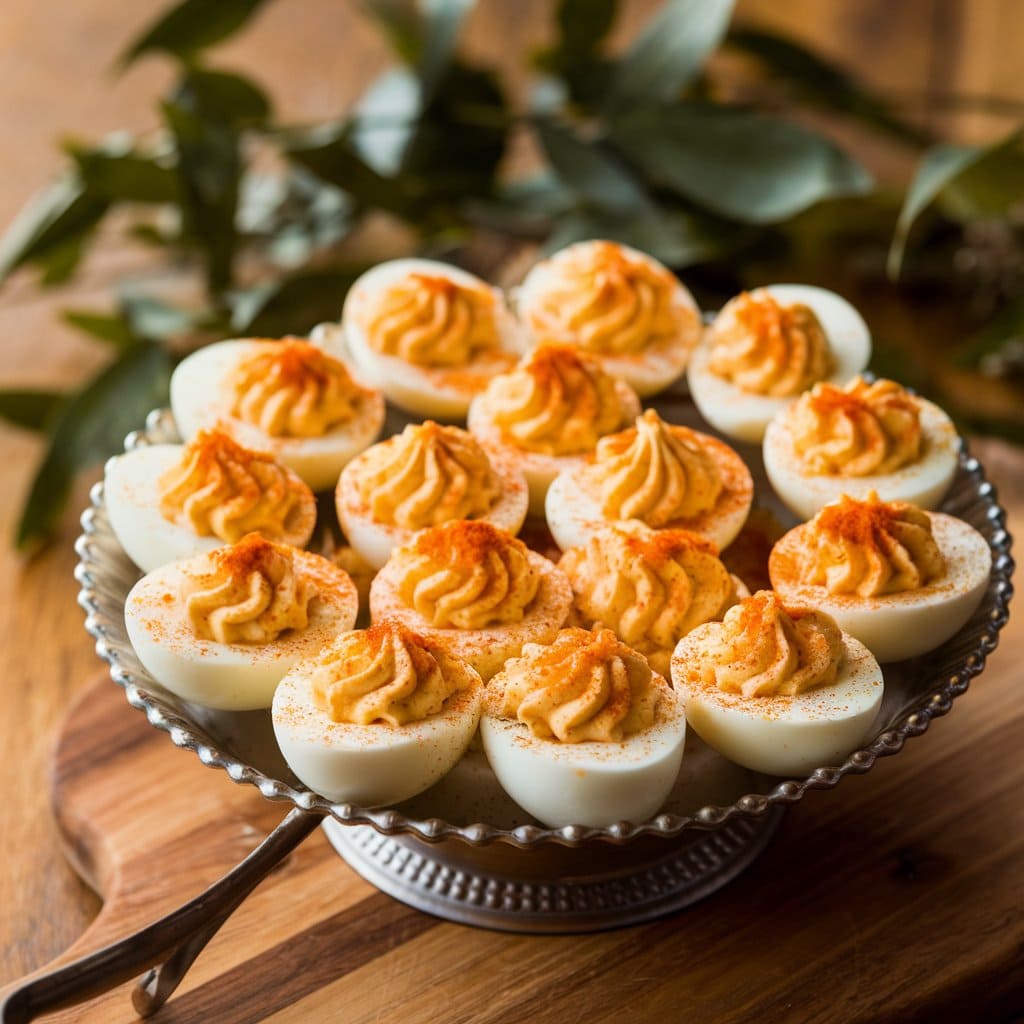
Deviled eggs are a timeless appetizer that never goes out of style. Whether hosting a party, preparing a holiday spread, or craving a delicious snack, this deviled eggs recipe is your go-to guide. In this article, we’ll walk you through everything you need to know to make the classic deviled eggs creamy, flavorful, and irresistible. Plus, we’ll share tips, variations, and answers to all your burning questions. Let’s get cracking!
Remember it later
Like this recipe! Pin it to your favorite board NOW!
A timeless and easy-to-make appetizer, these classic deviled eggs are creamy, tangy, and perfect for any occasion. Made with simple ingredients like eggs, mayonnaise, and mustard, they’re a crowd-pleasing favorite.
Optional: Fresh chives, hot sauce, or bacon bits for variation
Instructions
Boil the Eggs: Place eggs in a pot, cover with cold water, and bring to a boil. Once boiling, cover and remove from heat. Let sit for 10-12 minutes, then transfer to an ice bath to cool.Peel the Eggs: Gently crack and peel the eggs under cool running water.Prepare the Filling: Slice eggs in half lengthwise, remove yolks, and mash them in a bowl. Add mayonnaise, mustard, salt, and pepper, then mix until smooth.Fill the Egg Whites: Spoon or pipe the yolk mixture back into the egg white halves.Garnish: Sprinkle with paprika and optional toppings like chives or bacon bits.Serve: Chill until ready to serve.
Notes
For easier peeling, use eggs that are 7-10 days old.
Add a splash of vinegar or hot sauce for extra flavor.
Store leftovers in an airtight container in the fridge for up to 2 days.
Deviled eggs are a crowd-pleaser, whether at a family gathering, a potluck, or a fancy dinner party. They’re bite-sized, easy to serve, and always disappear fast!
Simple and Affordable Ingredients
With just a handful of pantry staples, such as eggs, mayonnaise, and mustard, this easy-deviled egg recipe is budget-friendly and requires no fancy equipment.
Endlessly Customizable
Deviled eggs can be spicy, tangy, or keto-friendly, so they can be tailored to suit your taste buds or dietary preferences. They’re the ultimate versatile dish!
Essential Ingredients for the Recipe
Ingredients:
6 large eggs
3 tablespoons mayonnaise
1 teaspoon Dijon mustard (or yellow mustard)
Salt and pepper to taste
Paprika for garnish
Optional: Fresh chives, hot sauce, or bacon bits for variation
Eggs
Eggs are the star of the show. Use fresh, large eggs for the best results. If you’re concerned about peeling, older eggs (about 7-10 days old) tend to peel more easily.
Mayonnaise
Mayonnaise adds creaminess to the filling. Use your favorite brand, or try a homemade version for an extra touch of flavor.
Mustard
Dijon or yellow mustard works perfectly. Mustard adds a tangy kick that balances the richness of the mayo.
Paprika
A sprinkle of paprika adds a smoky flavor and gives your deviled eggs that classic finishing touch.
Ingredient Preparation
Boiling the Eggs
Cover your eggs in a single layer in a pot with cold water. Bring the water to a boil, cover the pot, and remove it from the heat. Let the eggs sit for 10-12 minutes before transferring them to an ice bath to cool.
Peeling the Eggs
Gently tap the eggs on a hard surface and roll them to crack the shell. Peel under cool running water to make the process easier.
Cutting and Scooping
Slice the eggs in half lengthwise and carefully remove the yolks. Place the yolks in a bowl and set the whites aside.
Step-by-Step Cooking Instructions
Step 1 – Preparing the Filling
Mash the egg yolks with a fork until they’re crumbly. Add mayonnaise, mustard, salt, and pepper, then mix until smooth and creamy.
Step 2 – Filling the Egg Whites
Spoon the yolk mixture back into the egg white halves. For a fancier presentation, use a piping bag or zip-top bag with the corner snipped off.
Step 3 – Adding the Finishing Touches
Sprinkle each deviled egg with paprika for a pop of color and flavor. For extra flair, add fresh herbs like chives or dill.
Tips for an Even Tastier Version
Add Extra Ingredients
Mix in finely chopped pickles, bacon bits, or hot sauce for a unique twist.
Enhance the Flavor
A splash of vinegar or a pinch of garlic powder can elevate the flavor profile of your deviled eggs.
Adjust for Preferences
For a healthier version, use Greek yogurt instead of mayonnaise. For a spicy kick, add a pinch of cayenne pepper.
Recipe Variations and Adaptations
Vegetarian Option
Deviled eggs are naturally vegetarian, but you can add more veggies like diced bell peppers or avocado for extra texture.
Keto-Friendly Option
This recipe is already low-carb, making it perfect for keto diets. Just ensure your mayonnaise and mustard are sugar-free.
Seasonal Variations
Add a touch of pumpkin spice in the fall for a unique twist. Fresh herbs like basil or cilantro can brighten the flavor in the summer.
Serving Suggestions
Pair with a Salad
Serve your deviled eggs with a light green salad or a tangy coleslaw for a refreshing contrast.
Hearty Sides
Pair them with roasted vegetables or a charcuterie board for a more substantial meal.
Drink Recommendations
A crisp white wine, iced tea, or a citrusy mocktail perfectly complements the creamy richness of deviled eggs.
Deviled Eggs Recipe
Storage and Reheating Tips
Storing Leftovers
Deviled eggs can be stored in an airtight container in the fridge for up to 2 days. They should be chilled until ready to serve.
Reheating Tips
Deviled eggs are best served cold, so reheating them is unnecessary.
Portioning for Meal Prep
If you’re making the filling and egg whites beforehand, prepare them separately. Assemble just before serving to keep them fresh.
Nutritional Information and Benefits
Nutrition Information:
Serving Size: 1 deviled egg half
Cholesterol: 95mg
Calories: 70
Sugar: 0.2g
Sodium: 70mg
Fat: 6g
Saturated Fat: 1.5g
Unsaturated Fat: 4g
Trans Fat: 0g
Carbohydrates: 0.5g
Fiber: 0g
Protein: 3g
Health Benefits
Eggs are a great source of protein and essential nutrients like vitamin B12 and selenium.
Recommended Portions
Serving 2-3 deviled egg halves is perfect as appetizers.
Common Mistakes to Avoid
Overcooking the Eggs
Overcooked eggs can lead to a rubbery texture and a greenish yolk. Follow the boiling instructions carefully.
Overfilling the Egg Whites
Be careful not to overfill the egg whites, as the filling can spill out and make them messy.
Skipping the Ice Bath
The ice bath is crucial for easy peeling and preventing overcooking. Don’t skip this step!
Inspiring Conclusion
Deviled eggs are more than just a recipe—they’re a tradition. Whether you stick to the classic deviled eggs or experiment with your variations, this dish will impress. So, grab your eggs, get creative, and enjoy the process of making these delicious bites. Don’t forget to share your creations with friends and family!
FAQ (Frequently Asked Questions)
Can I make deviled eggs ahead of time?
Yes! Prepare the filling and egg whites separately and assemble them just before serving.
What can I use instead of mayonnaise?
Greek yogurt or avocado make great substitutes for mayonnaise.
How do I prevent my deviled eggs from sliding on the plate?
Use a small piece of lettuce or a sprinkle of salt on the plate to keep them in place.
Can I freeze deviled eggs?
It’s not recommended, as the texture of the eggs will change.
How long do deviled eggs last in the fridge?
They can last up to 2 days when stored properly.
What’s the best way to pipe the filling?
Use a piping or zip-top bag with the corner snipped off for a neat presentation.
Can I add cheese to the filling?
Absolutely! Grated cheddar or cream cheese can add a delicious twist.
How do I make spicy deviled eggs?
Add a dash of hot sauce or cayenne pepper to the filling.
Are deviled eggs keto-friendly?
They’re naturally low in carbs and perfect for a keto diet.
What’s the secret to perfectly boiled eggs?
Start with cold water, boil, then let them sit off the heat for 10-12 minutes before cooling in an ice bath.
Deliciously Crispy and Fluffy Waffles for a Perfect Breakfast Discover the ultimate recipe for classic waffles that are crispy on the outside and fluffy on the inside. Perfect for a
Fluffy, Golden Pancakes That Warm Your Heart Start your morning with these delicious, good old-fashioned pancakes that are light, fluffy, and incredibly easy to make. Whether it’s for a family
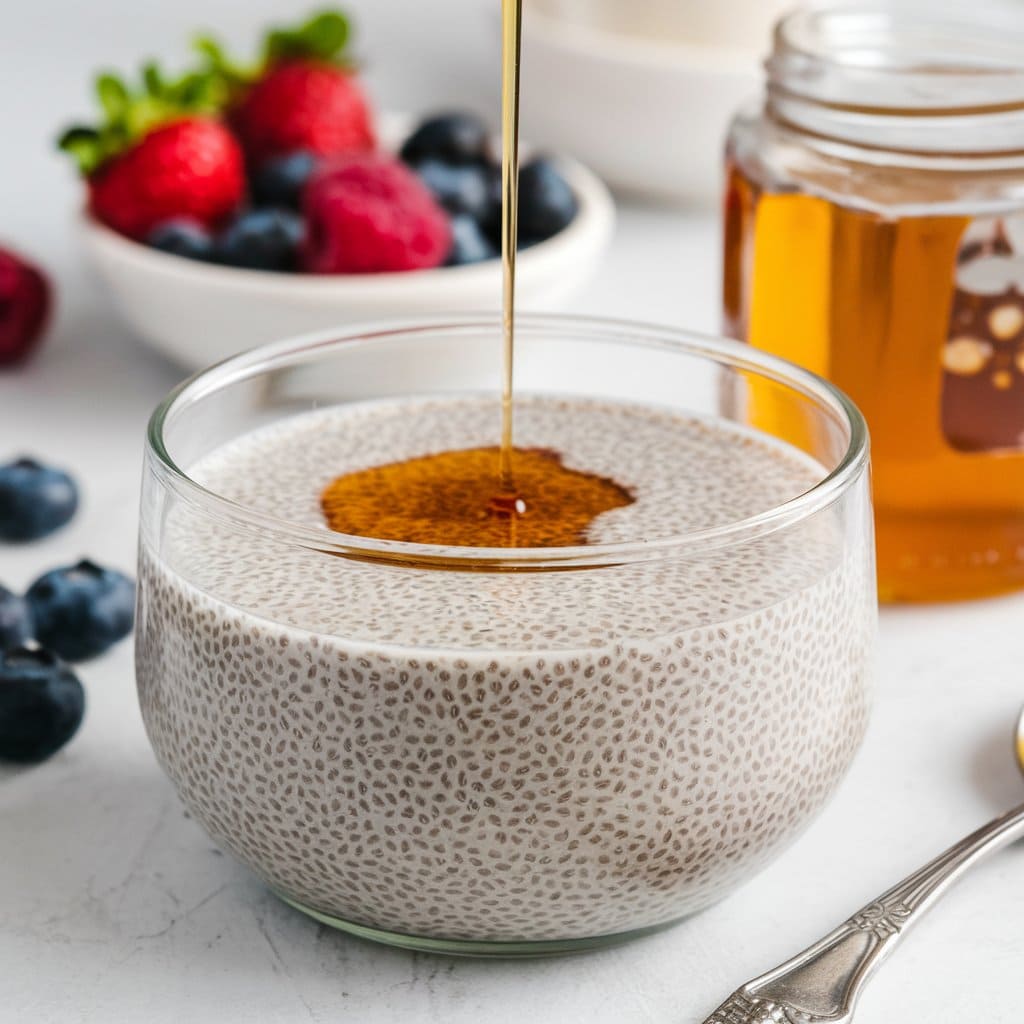
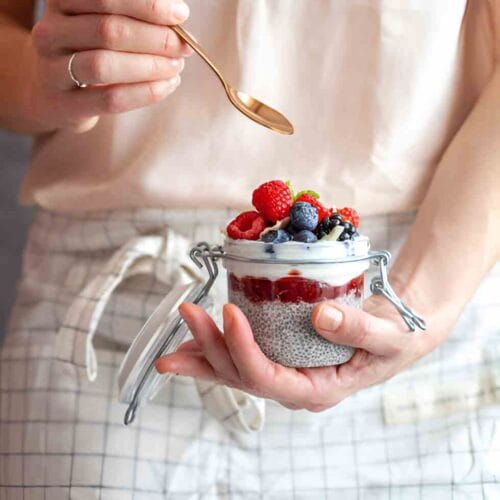
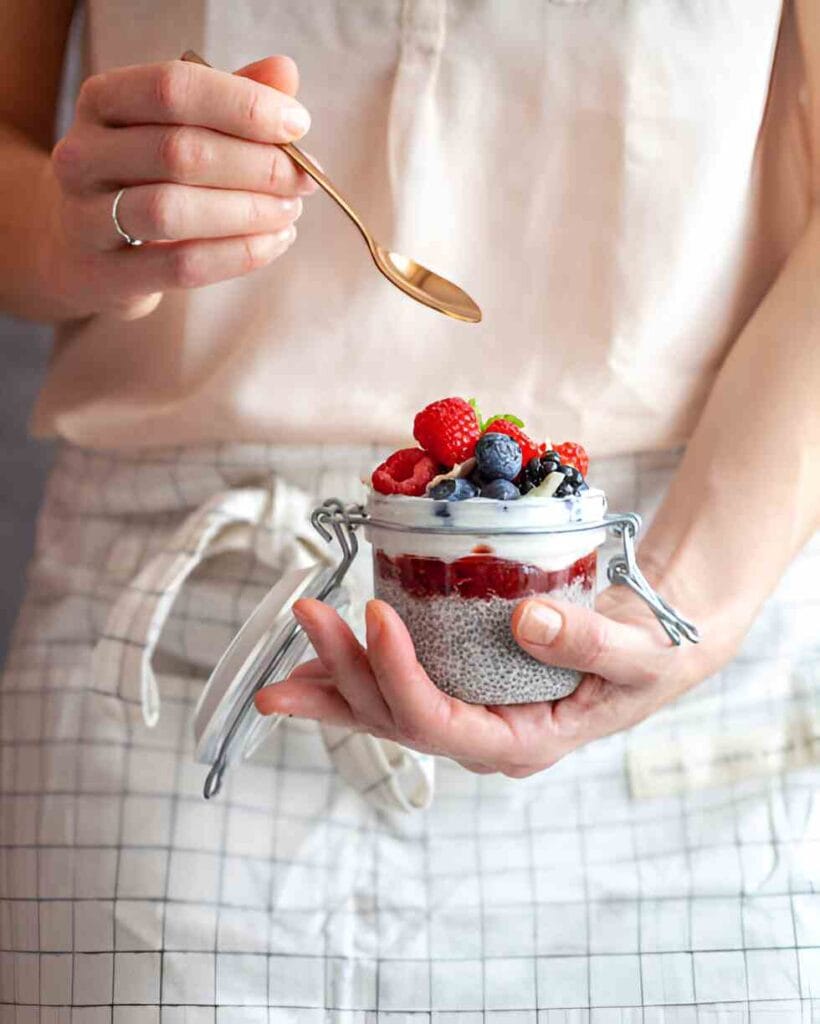
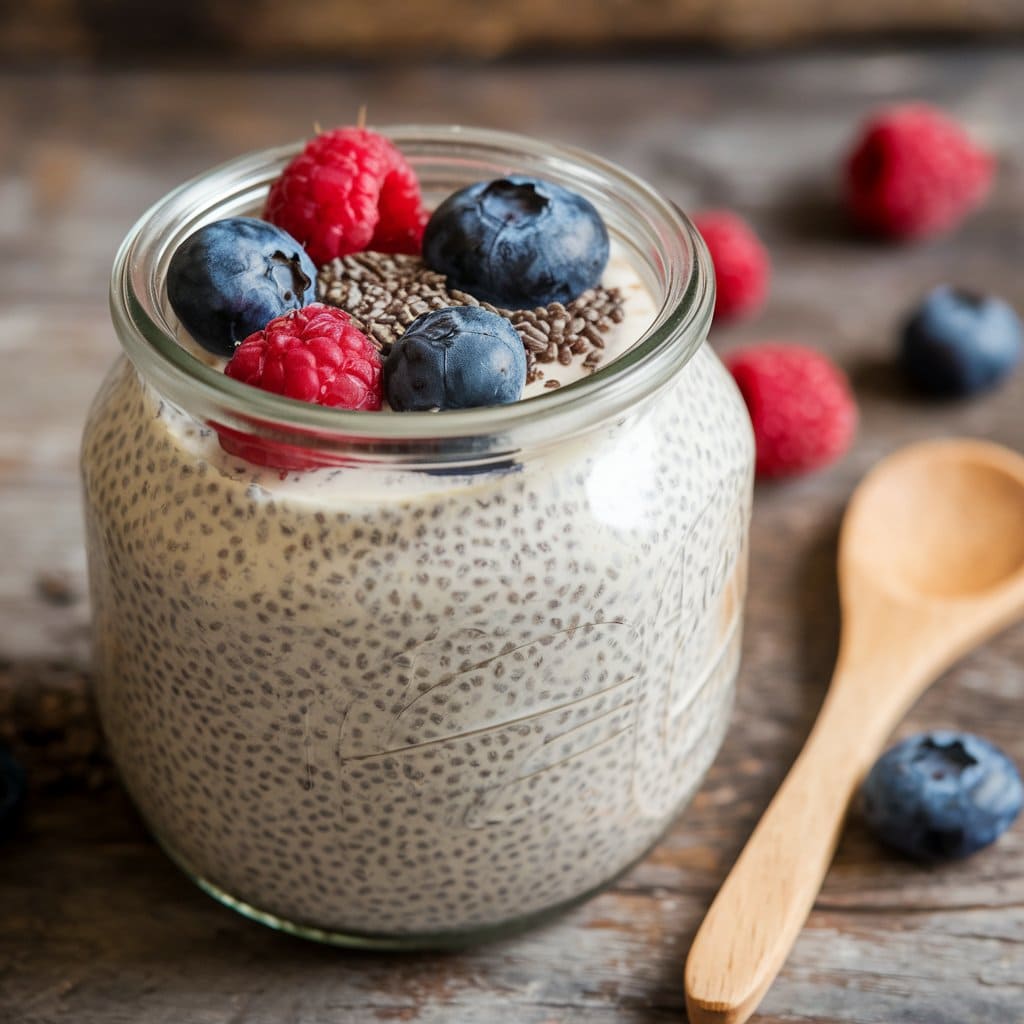
Welcome to your go-to guide on making a delicious Chia Seed Pudding Recipe that’s incredibly tasty and nutritious. Whether you’re a busy parent, a health enthusiast, or someone looking for a quick yet satisfying snack, this guide on How to Make Chia seed pudding covers every detail, from essential ingredients to creative variations. In the following 3000 words, we’ll explore why this Chia seed pudding is a favorite for many, list all the ingredients and steps needed, and offer helpful tips and tricks to ensure your pudding turns out perfect every time. So grab your favorite bowl, and let’s create an Easy chia seed pudding that will become a staple in your kitchen!
Chia Seed Pudding Recipe
Chia Seed Pudding Recipe
A healthy, easy-to-make chia seed pudding that’s perfect for breakfast, snacks, or dessert. Customize with your favorite toppings like fresh fruit, nuts, or honey!
1cupmilk (dairy or plant-based like almond, coconut, or oat milk)
2tbspsweetener (honey, maple syrup, or sugar)
½tspvanilla extract (optional)
Toppings: fresh fruit, nuts, granola, coconut flakes, etc.
Instructions
In a bowl or jar, combine chia seeds, milk, sweetener, and vanilla extract.Stir well to ensure the chia seeds are evenly distributed.Let the mixture sit for 5 minutes, then stir again to prevent clumping.Cover and refrigerate for at least 2 hours or overnight, until the mixture thickens into a pudding-like consistency.Before serving, stir well and add your favorite toppings.
Every great recipe has a story, and this Chia Seed Pudding Recipe is no different. Below, we explore why this healthy treat is perfect for nearly everyone.
.Family-Friendly and Delicious
Imagine a dessert that brings the entire family together without spending hours in the kitchen. This Chia seed pudding is ideal for busy mornings or a quick dessert after dinner. Its naturally sweet, nutty flavor makes it a hit with kids and adults alike. The texture is delightfully creamy yet slightly crunchy due to the tiny chia seeds, making it a nutritious and fun snack. Plus, it requires minimal prep time, so you can whip it up on those busy weekday mornings or prepare it the night before for a healthy grab-and-go breakfast.
. Nutritional Benefits and Simple Ingredients
One of the best parts of this recipe is that it uses whole, natural ingredients that are as beneficial for your body as they are for your taste buds. This Healthy chia pudding is loaded with omega-3 fatty acids, fiber, and protein from the chia seeds. By blending in your favorite type of milk—dairy or a plant-based alternative—you’re also getting a dose of calcium and vitamin D. With no artificial flavors or preservatives, every spoonful delivers pure, wholesome nutrition. The simplicity of the ingredients makes it accessible for anyone who wants to enjoy a healthy yet indulgent treat.
. Flexibility and Budget-Friendly Creativity
The beauty of this Easy chia seed pudding is its flexibility. You can quickly adapt it to suit your dietary needs, budget, or desired flavors. Whether vegan, gluten-free, or just looking to experiment with seasonal fruits and spices, this pudding can be customized in countless ways. It’s a budget-friendly recipe that requires only a few pantry staples, yet it leaves plenty of room for creative additions like cocoa powder, vanilla extract, or even a drizzle of honey. With this adaptable recipe, you can tailor your chia pudding to be as straightforward or decadent.
Essential Ingredients for the Recipe
A standout Chia Seed Pudding Recipe relies on key ingredients that work together to create its signature texture and flavor. Let’s break down each essential component, including alternatives and variations to suit different dietary needs and preferences.
Toppings: fresh fruit, nuts, granola, coconut flakes, etc.
. Chia Seeds – The Star Ingredient
Chia seeds are the foundation of this pudding. Rich in omega-3 fatty acids, antioxidants, and fiber, these tiny seeds swell when mixed with liquid, forming a gel-like consistency that is both satisfying and filling. When purchasing chia seeds, opt for organic varieties, as they tend to be fresher and chemical-free. If you’re looking for a change, you can sometimes substitute with flaxseeds, though the texture and nutritional profile will differ slightly.
. Milk or Milk Alternative – The Creamy Base
The liquid used in a Chia seed pudding hydrates the chia seeds and adds creaminess and flavor. You can use dairy milk, almond milk, coconut milk, or any other plant-based milk. Each type of milk brings unique taste and nutritional benefits—dairy for protein and calcium, almond for low calories, or coconut for a hint of tropical flavor. Consider using full-fat coconut or cashew milk for a more decadent pudding.
. Natural Sweeteners and Flavor Enhancers
While the chia seeds and milk provide a neutral canvas, a natural sweetener is needed to enhance the flavor. Honey, maple syrup, or agave nectar are popular choices that add just the right amount of sweetness without overwhelming the pudding’s natural taste. Additionally, a splash of vanilla extract or a sprinkle of cinnamon can elevate the flavor profile, making the pudding even more irresistible.
Ingredient Preparation
Proper preparation of your ingredients is the key to success when creating this Chia Seed Pudding Recipe. Here’s a step-by-step breakdown to ensure your pudding always comes out perfectly.
Measure and Mix the Chia Seeds
Begin by measuring the chia seeds accurately using a standard measuring spoon. This precision is essential since the chia seeds will absorb liquid and expand significantly. Place the seeds in a large mixing bowl or directly into your serving container. For the best results, stir the seeds gently to ensure they are evenly distributed.
Incorporate the Milk and Sweetener
Next, pour in your chosen milk or milk alternative. Slowly add your natural sweetener—honey, maple syrup, or agave nectar—and flavor enhancers like vanilla extract. Stir thoroughly to combine all ingredients. A whisk or fork works perfectly here to break up any potential clumps of chia seeds. This step ensures that every seed is coated with liquid, which is critical for the proper texture.
Let It Set and Develop Flavor
Once everything is mixed, cover your container and refrigerate the mixture for at least 4 hours or overnight. This resting period is when the magic happens. The chia seeds absorb the liquid, swell, and transform into a smooth, pudding-like consistency. For an even creamier texture, stir the mixture once or twice during the initial hour of refrigeration to redistribute the seeds evenly.
Step-by-Step Cooking Instructions
While there’s no traditional “cooking” for this no-bake dessert, following these steps will guide you through preparing your Chia seed pudding.
Initial Preparation: Gathering Your Tools
Before you begin, ensure you have all the necessary tools. This includes a mixing bowl or jar, a whisk or fork, a measuring cup, and a refrigerator for setting the pudding. Prepping your workstation with these essentials will make the process smooth and efficient.
Ingredient Assembly: Layering Your Flavors
After combining the chia seeds, milk, and sweetener in your bowl or jar, consider adding any extra ingredients you might enjoy—layer in diced mango, strawberries, or blueberries for added freshness and texture. Alternatively, you can create a layered effect by letting the base pudding set and then topping it with granola or nut butter. This step builds flavor and enhances the visual appeal of your Healthy chia pudding.
Final Setting and Finishing Touches
Cover the container tightly once your ingredients are assembled, and place it in the refrigerator. Allow the mixture to rest undisturbed for at least 4 hours, ideally overnight. When you’re ready to serve, gently stir the pudding to ensure a uniform texture. Garnish with fresh fruit, nuts, or a dusting of cocoa powder for that extra pop of flavor and presentation flair. This final touch makes your Easy chia seed pudding a treat for your taste buds and a feast for your eyes.
Chia Seed Pudding Recipe
Tips for an Even Tastier Version
Here are some creative ideas and expert techniques for boosting the flavor and nutritional profile of your chia seed pudding recipe.
Adding Extra Ingredients
Enhance your pudding by incorporating extra ingredients that provide bursts of flavor and texture.
Fruits: Fresh berries, diced kiwi, or mango chunks add natural sweetness and boost the vitamin content.
Nuts and Seeds: Almond slices, chopped walnuts, or even a sprinkle of hemp seeds can introduce a delightful crunch and additional protein.
Superfoods: Consider adding a spoonful of acai puree or a dash of spirulina powder for an antioxidant boost. These ingredients make your pudding a dessert and a powerhouse of nutrition.
Techniques to Enhance Flavor
Sometimes, minor tweaks in preparation can lead to a noticeable improvement in taste.
Infuse Your Milk: Gently warm your milk with a cinnamon stick or a few strips of lemon zest before mixing with the chia seeds. Allow the milk to cool completely; this process extracts subtle flavors that elevate your pudding.
Sweetener Switch: Experiment with different natural sweeteners. Maple syrup adds a rich, caramel-like taste, while agave nectar is perfect for those who prefer a milder sweetness.
Vanilla and Spices: Don’t underestimate the power of spices. A splash of vanilla extract, a pinch of nutmeg, or even a hint of cardamom can make your Chia seed pudding more aromatic and inviting.
Adjustments for Preferences
Not everyone’s taste or dietary needs are the same. Here are some adjustments you can consider:
For a Thinner Consistency: Increase the liquid if you prefer a more drinkable pudding consistency, which is perfect for a smoothie bowl.
For a Thicker Texture: Use less liquid or add a dollop of Greek yogurt to give your pudding a more prosperous, creamier texture.
Dietary Substitutions: If you have specific dietary restrictions—such as vegan or keto—choose a suitable milk alternative and low-carb sweetener to maintain flavor and nutritional integrity.
Recipe Variations and Adaptations
One of the greatest strengths of this Chia Seed Pudding Recipe is its versatility. Several variations and adaptations are available to cater to different lifestyles, tastes, and dietary needs.
Vegetarian Option
This recipe is inherently vegetarian; however, adding plant-based protein can enrich it further. For example, stir in a spoonful of almond butter or blend in some silken tofu. These additions will boost the protein content and provide a creamier texture without compromising the natural goodness of the chia seeds.
Gluten-Free or Low-Carb Option
Chia seeds are naturally gluten-free, making this recipe an excellent choice for those with gluten sensitivities. For a low-carb twist, avoid adding high-sugar fruits or granola. Instead, opt for a few raspberries or blackberries, which are lower in sugar, and consider using a sugar substitute like stevia or erythritol if necessary.
Other Adaptations
The beauty of this pudding lies in its adaptability. Here are some more ideas:
Seasonal Variations: Add a dash of pumpkin puree and pumpkin spice in the fall for a comforting twist. Try mixing in tropical fruits such as pineapple or mango in the summer for a refreshing vibe.
Flavor Variations: Experiment with cocoa powder for a chocolate version or blend in a handful of matcha powder for a green tea twist. The base recipe welcomes any creative addition that suits your mood or the occasion.
Serving Suggestions
Serving your Healthy chia pudding creatively can elevate the experience even further. Here are some ideas for presenting and pairing your pudding for a complete meal or snack.
Salad or Soup Ideas
While chia pudding is typically enjoyed as a standalone dessert or breakfast, it can also complement a light starter.
Savory Chia Salad: To create a unique, refreshing salad, try topping your pudding with finely chopped cucumbers, tomatoes, and a drizzle of olive oil.
Cold Soup Base: For an adventurous twist, blend your chia pudding with lemon juice and herbs to form a cold, savory, healthy, and satisfying soup.
Hearty Sides
Pair your Easy chia seed pudding with hearty sides to create a balanced meal.
Homemade Bread or Toast: For added texture and sustenance, serve with a slice of whole-grain toast or freshly baked sourdough.
Roasted Vegetables: A side of roasted sweet potatoes or a medley of seasonal vegetables can provide a savory counterpoint to the sweetness of your pudding.
Drink Recommendations
A well-chosen drink can elevate your pudding experience:
Morning Boost: Enjoy your pudding with freshly brewed coffee or tea for a balanced breakfast.
Refreshing Beverage: Pair it with a refreshing glass of iced green tea or a nutrient-packed smoothie to energize you throughout the day.
Evening Treat: For a relaxing dessert, consider a light dessert wine or a naturally flavored mocktail that complements the delicate flavors of your pudding.
Chia Seed Pudding Recipe
Storage and Reheating Tips
Proper storage and reheating are crucial to maintaining the delicious texture and flavor of your Chia Seed Pudding Recipe. Here’s how to keep it fresh and tasty for longer.
How to Store Leftovers
Store your pudding in an airtight container if you’ve made a larger batch than needed. Please place it in the refrigerator for up to 5 days. This method allows the pudding to continue thickening slightly while maintaining its freshness. For more extended storage, you can freeze individual portions; however, freezing may alter the texture slightly.
Reheating Techniques
Although chia pudding is typically cold, you may prefer it slightly warmed occasionally. To gently reheat, transfer a serving to a microwave-safe bowl and warm on low power for 10-15 seconds. Be careful not to overheat, as excessive warmth can cause the pudding to separate.
Portioning Tips
For those who enjoy meal prepping, portion your pudding into small jars or bowls immediately after it has been set. This makes it easy to grab a healthy breakfast or snack. When dividing your pudding, stir well so every portion has a consistent mix of seeds and liquid.
Nutritional Information and Benefits
Understanding the nutritional profile of your Chia Seed Pudding Recipe can help you appreciate its value as a healthful addition to your diet. Let’s break down the benefits and nutritional information.
These values can vary slightly depending on the type of milk and sweetener used. The high fiber and protein content help to keep you full longer, while the healthy fats contribute to overall heart health.
Ingredient Benefits
Chia Seeds: Packed with omega-3 fatty acids, antioxidants, and a high fiber content, chia seeds support heart health and digestive wellness.
Milk and milk Alternatives Provide calcium, vitamin D, and essential proteins. Plant-based alternatives also offer additional vitamins, such as vitamin E.
Natural Sweeteners: These add flavor without relying on refined sugars, and when used in moderation, they help maintain a balanced glycemic index.
Recommended Portions
One cup of chia pudding is ideal for breakfast, a snack, or a light dessert. Adjust portions based on your daily caloric and nutritional needs. For those looking to reduce calorie intake, consider using a lower-calorie milk alternative and reducing the amount of sweetener.
Common Mistakes to Avoid
Even the most straightforward recipes can sometimes go awry. Here are some common pitfalls when making Chia seed pudding and expert advice on how to avoid them.
Issue 1 – Insufficient Mixing
One frequent mistake is not stirring the chia seeds thoroughly into the liquid. This can lead to clumping and an uneven texture.
Solution: Mix well with a whisk or fork; stir the mixture after the first 30 minutes of refrigeration.
Issue 2 – Not Allowing Enough Setting Time
Patience is key when making chia pudding. Rushing the process may result in a runny or underdeveloped texture.
Solution: Allow the pudding to set for at least 4 hours, or even better, overnight, to ensure the chia seeds fully absorb the liquid.
Issue 3 – Overloading on Sweeteners or Flavors
While it might be tempting to add many sweeteners or additional flavorings, too much can overpower the delicate taste of the chia seeds.
Solution: Start with a modest sweetener and gradually increase it to your taste, remembering that the pudding’s flavors will meld as it sits.
Inspiring Conclusion
The journey to creating the perfect Chia Seed Pudding Recipe is as delightful as the result. This recipe is unique because it’s simple yet versatile, healthy yet indulgent, and, most importantly, customizable to suit any palate or lifestyle. Whether you’re a busy professional needing a nutritious breakfast, a parent seeking a kid-friendly snack, or someone who loves to experiment in the kitchen, this Chia seed pudding is a fantastic option that can be made with minimal effort and maximum flavor.
We encourage you to experiment with different toppings, flavor infusions, and presentation styles. Share your creative twists on this recipe with family and friends, and join the growing community of people who have embraced this nutritious, delicious dessert. Remember, food is not just about sustenance—it’s about creating memories, exploring new flavors, and having fun in the kitchen.
FAQ (Frequently Asked Questions)
Here are ten common questions and answers about this Chia Seed Pudding Recipe to help you master the art of making Healthy chia pudding:
1. Can I prepare this recipe in advance?
Absolutely! This recipe benefits from being prepared the night before. The chia seeds need time to absorb the liquid, so mixing everything beforehand ensures a thick, pudding-like texture by morning.
2. What are the best substitutes for dairy milk?
You can use almond, coconut, cashew, or oat milk. Each offers a unique flavor profile and nutritional benefits while keeping the pudding vegan and dairy-free.
3. Can I adjust the sweetness of my pudding?
Yes, you can adjust the amount of natural sweetener to suit your taste. Start with a small amount and gradually increase it. You may also use sugar alternatives like stevia or erythritol if you’re looking to lower the calorie count.
4. Is it possible to add extra flavors or toppings?
Definitely! Top your pudding with fresh fruits, nuts, granola, or even a sprinkle of cocoa powder. You can also stir in spices like cinnamon or nutmeg during preparation for added warmth and depth of flavor.
5. What consistency should my chia pudding have?
A well-made pudding should have a thick, creamy consistency with a slight crunch from the chia seeds. If it’s too runny, let it sit a bit longer in the refrigerator. If it’s too thick, stir in more milk until you achieve your desired texture.
6. Can I make a savory version of this pudding?
You can experiment with savory flavors by omitting the sweetener and adding herbs, a pinch of salt, or even a swirl of pesto. Savory chia pudding is an innovative twist that pairs well with fresh vegetables and whole-grain crackers.
7. What’s the ideal serving size for this pudding?
One cup per serving is a standard portion size, but feel free to adjust based on your nutritional needs. Half a cup may be sufficient for a light snack, while a full cup can serve as a nutritious breakfast.
8. How long can I store leftover pudding in the refrigerator?
You can store your Chia seed pudding in an airtight container in the refrigerator for up to five days. The pudding will thicken slightly over time, so you may need to stir more milk before serving.
9. Can I make this recipe without any sweetener?
You can skip the sweetener altogether if you prefer a less sweet, more natural taste. Alternatively, you can use mashed fruit like bananas or blended dates to provide natural sweetness while adding extra nutrients.
10. What are some standard troubleshooting tips?
If your pudding becomes clumpy after the first half-hour of setting, stir it well. Add more liquid before refrigerating for a thinner consistency. If you find it too bland, experiment with different extracts or spices to enhance the flavor.
In recent years, interest in Cottage Cheese Homemade options has grown exponentially. People are craving fresh, wholesome alternatives to store-bought varieties, and crafting your Homemade cottage cheese is a rewarding