Irresistibly Delicious Homemade Twix Bars: Your New Favorite Treat!
Introduction
Picture this: a rainy afternoon, the sweet smell of chocolate wafting through the kitchen, and the sound of laughter as my family gathers around the table. These are the moments that turn into sweet memories, and this is exactly how Homemade Twix Bars came to life for me. Growing up, I was always the one reaching for a Twix from the candy bowl, a guilty pleasure that brought a little brightness to my day. However, I often found store-bought versions lacking—which is what fueled my passion for creating a healthier, homemade alternative.
These delightful bars are not only delicious but also packed with wholesome ingredients that you can feel good about. What sets my version apart? It’s simple: rich layers of nutty crust, soft caramel, and velvety chocolate, all crafted from ingredients you can trust. They are the epitome of comfort food, tailored to evoke those sweet family memories while also satisfying your cravings. So today, I promise to take you through my process of making these Homemade Twix Bars—from the first steps in the kitchen to the final scrumptious bite!
What Are Homemade Twix Bars?
Homemade Twix Bars are a delectable twist on the classic candy bar, combining a crispy crust, creamy caramel, and luscious chocolate in every bite. Originating as a well-loved confectionery, Twix embodies a combination of textures and flavors that make it irresistible. My homemade version takes this beloved treat to a new level with all-natural ingredients and a pinch of love.
You’ll taste the nutty crunch of almond butter in the base, paired with the soft, gooey caramel made from Medjool dates, which transforms into a sticky, sweet layer reminiscent of the original. Topped off with rich dark chocolate, every piece melts in your mouth. They’re perfect for any occasion—be it a cozy night in or a weekend gathering with friends. You’ll find that making these bars elevates your snack game and warms the heart, making them an instant favorite at your next gathering!
Why You’ll Love This Recipe
Healthier Alternative: Unlike traditional store-bought Twix bars filled with artificial ingredients and refined sugars, my Homemade Twix Bars use whole-food ingredients like almond butter and dates. You can enjoy your sweet tooth guilt-free!
Cost-Effective: Making your own treats at home is often less expensive than buying them pre-packaged. This recipe makes about eight bars, so it’s perfect for meal prep or for sharing with friends and family.
Customizable to Your Taste: Love coconut? You can sprinkle shredded coconut on top! Want a nutty flavor boost? Toss in some chopped nuts into the crust. The options are endless, making it easy to tailor the bars to your preferences.
Easy to Make: Even if you’re new to baking, this recipe is super simple! With minimal prep and just a few ingredients, you’ll feel like a pro in no time. Plus, if I can do it, so can you!
Great for Any Occasion: Whether it’s a lunchbox treat for the kids, a pick-me-up after a workout, or a decadent dessert to impress guests, these bars fit the bill. They’re perfect for holiday gatherings or as a sweet snack anytime you need a little indulgence.
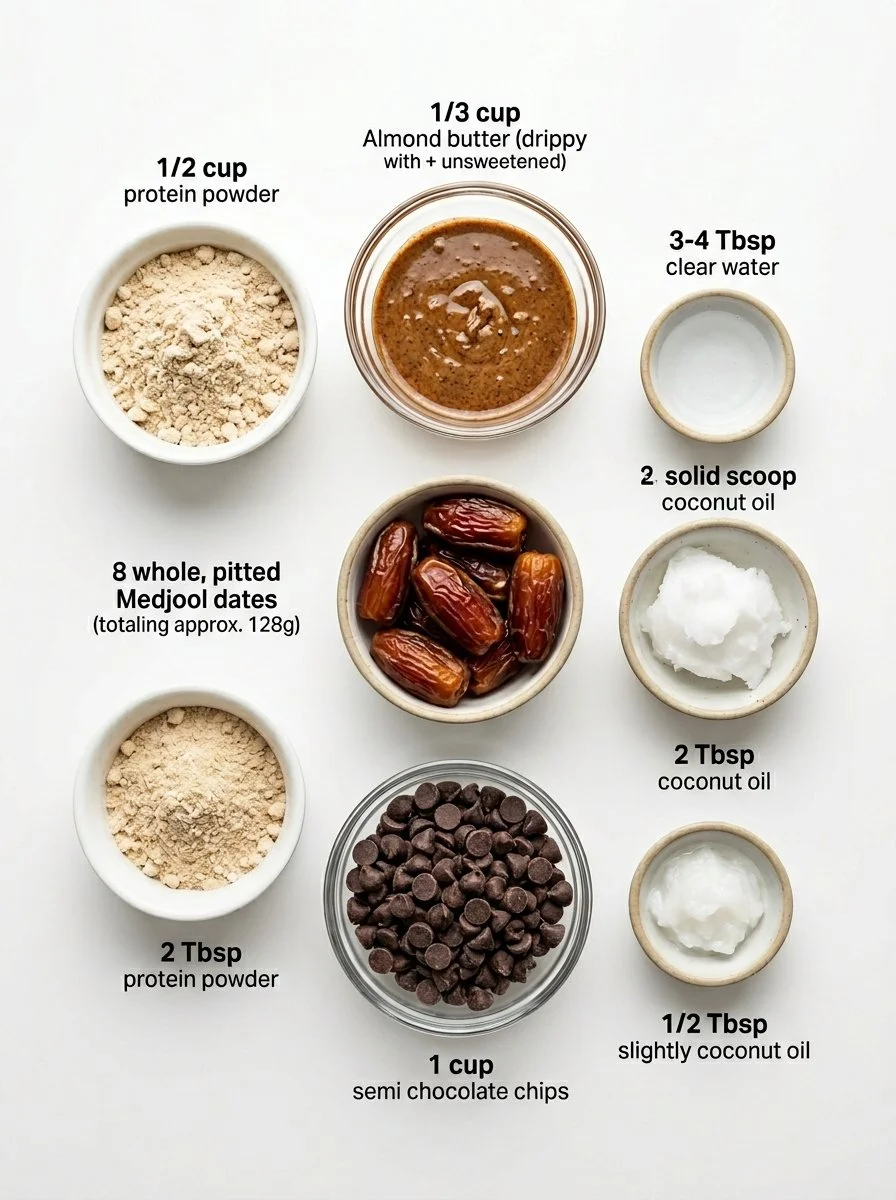
Ingredients
- 1/2 cup protein powder (vanilla or chocolate)
- 1/3 cup almond butter (choose drippy and unsweetened for best results)
- 3-4 Tbsp water (more if needed)
- 8 pitted Medjool dates (approximately 128g)
- 2 Tbsp coconut oil
- 2 Tbsp additional protein powder
- 1 cup dark chocolate chips (look for 70% cocoa or higher for richness)
- 1/2 Tbsp coconut oil (for the chocolate coating)
Notes on Ingredients:
- Quality Matters: Always opt for high-quality ingredients, especially for the chocolate and nut butter. It makes a world of difference in taste!
- Substitutions: If you’re vegan or nut-free, you can use sunflower seed butter instead of almond butter.
- Prep Notes: Make sure your almond butter is at room temperature for easier mixing.
Step-By-Step Instructions
Prep the Pan: Line an 8″ x 4″ loaf pan with parchment paper, allowing some overhang for easy removal of the bars later.
Make the Crust: In a medium-sized mixing bowl, combine the protein powder, almond butter, and water. Gradually add the water one tablespoon at a time until you reach a smooth, pliable consistency.
- Chef’s Tip: The crust should hold together but not be too wet. You’re looking for a soft dough-like texture.
Press into the Pan: Firmly press the crust mixture evenly into the bottom of the lined loaf pan. Visual cue: It should feel dense but not crumbling.
Prepare the Caramel: Soak the pitted dates in hot water for about 5 minutes to soften. Drain and then blend the soaked dates with coconut oil in a food processor until they reach a smooth, sticky consistency.
- Common Mistake to Avoid: Ensure the dates are adequately softened; if they’re too dry, the caramel won’t blend smoothly!
Add Protein Powder: Add the additional protein powder to the date mixture and pulse until fully incorporated. Scoop the caramel mixture onto the crust and spread it into an even layer.
Freeze: Place the pan in the freezer for about 2 hours, allowing everything to firm up nicely.
Cut and Dip: Once firm, cut the bars into 8 equal pieces and place them back in the freezer. Melt together the chocolate chips and coconut oil in a microwave or double boiler until smooth.
- Chef’s Tip: Stir every 30 seconds to prevent overheating!
Coat the Bars: Dip each bar into the melted chocolate, fully coating them. Place the chocolate-covered bars on a parchment-lined baking sheet. If desired, drizzle any leftover chocolate over the bars and sprinkle a pinch of sea salt on top.
Final Chill: Return the bars to the fridge or freezer for about 30 minutes to set before serving.
Store: Store your bars in a sealed container in the fridge for up to two weeks, or in the freezer for up to two months.

Expert Tips & Troubleshooting
Storage Recommendations: Keep your Homemade Twix Bars in an airtight container to maintain their freshness. You can also wrap them individually for easy grab-and-go snacks!
Make-Ahead Instructions: These bars are perfect for meal prep! Make a batch on Sunday for delicious snacks or desserts all week long.
Troubleshooting Common Problems:
- Too Crumbly Crust: If the crust crumbles when pressing, try adding a teaspoon of water or more almond butter to help it hold together.
- Caramel Too Sticky: If it seems too sticky, blend in a little extra protein powder to achieve the desired consistency.
Serving Suggestions
These Homemade Twix Bars are delightful on their own, but if you want to elevate your treat game even further, serve them alongside a scoop of vanilla ice cream or a dollop of coconut whipped cream. Presentation matters, so consider placing them in cute paper liners for a beautiful display! They are fantastic for parties, movie nights, or even as an energy boost during a busy day.
Variations & Substitutions
Flavor Combinations: Add a pinch of cinnamon or a splash of vanilla extract to the crust for an extra flavor boost. Think about mixing in your favorite nuts or chocolate chips into the caramel layer for added crunch!
Dietary Restrictions: To make these bars gluten-free, make sure your protein powder is certified gluten-free. For a vegan option, ensure your chocolate chips are dairy-free.
Seasonal Variations: During the holidays, try adding crushed peppermint to the chocolate coating for a festive twist! In autumn, a pinch of pumpkin spice in the caramel can create a cozy flavor fit for fall.
Nutrition & Storage Info
- Prep Time: 20 minutes
- Cook Time: 0 minutes (just chilling time!)
- Total Time: 2 hours 20 minutes
- Yield: 8 bars
- Estimated Calories per Serving: Approximately 170 calories
- Storage Instructions: Keep at room temperature for short-term use, but it’s best to store leftovers in the fridge or freezer for optimal freshness. They last up to two weeks in the refrigerator and two months in the freezer.
FAQ Section
Can I use a different nut butter?
Absolutely! Feel free to use any nut or seed butter that you love, such as peanut butter or sun butter.What if I don’t have protein powder?
If you’re out of protein powder, you can substitute it with cocoa powder or even ground oats, but the texture will change slightly.Are these bars gluten-free?
Yes, as long as you use gluten-free protein powder, these bars are naturally gluten-free!How do I prevent the chocolate from melting?
Keep your bars refrigerated to maintain the chocolate coating. If serving outdoors or in warm conditions, serve immediately after coating.Can I make them peanut butter flavored?
Yes! Replace almond butter with peanut butter and consider adding a little more to enhance the flavor.What’s the best way to cut these bars?
Use a sharp knife that’s been warmed slightly under hot water for a clean cut.How do I know when they’re set?
The chocolate should harden, and the bars will feel firm to the touch. If they’re sticky, give them a little more time in the fridge or freezer.Can I add additional sweeteners?
If you find the bars aren’t sweet enough, you can add a dash of maple syrup or honey to the date mixture—just keep in mind that this may affect the texture.Are these suitable for kids?
Yes! They’re a great snack for kids since they are filled with wholesome ingredients and have less sugar than traditional candy.Can I freeze them?
Yes! These bars freeze wonderfully. Make sure to store them in an airtight container or separate them with parchment paper to avoid sticking.
Conclusion
These Homemade Twix Bars are more than just a delicious treat; they’re a way to create fond memories with your loved ones while indulging in a healthier version of a classic favorite. I can’t wait for you to try making them yourself! Don’t forget to share your experiences with me in the comments below, and let me know how they turn out! For more amazing dessert recipes, check out my blog for all things sweet and delightful. Happy baking!
Print
Irresistibly Delicious Homemade Twix Bars
- Total Time: 140 minutes
- Yield: 8 bars 1x
- Diet: Vegan, Gluten-Free
Description
A healthier twist on the classic Twix bar, featuring layers of nutty crust, soft caramel, and rich dark chocolate.
Ingredients
- 1/2 cup protein powder (vanilla or chocolate)
- 1/3 cup almond butter (unsweetened)
- 3–4 Tbsp water (more if needed)
- 8 pitted Medjool dates (approximately 128g)
- 2 Tbsp coconut oil
- 2 Tbsp additional protein powder
- 1 cup dark chocolate chips (70% cocoa or higher)
- 1/2 Tbsp coconut oil (for coating)
Instructions
- Prep the pan: Line an 8″ x 4″ loaf pan with parchment paper.
- Make the crust: In a bowl, combine protein powder, almond butter, and water.
- Press the mixture into the bottom of the loaf pan.
- Prepare the caramel: Soak pitted dates in hot water for 5 minutes, then blend with coconut oil.
- Add additional protein powder to the blended date mixture and mix well.
- Scoop the caramel onto the crust and spread evenly.
- Freeze for about 2 hours to set.
- Cut into 8 pieces and return to the freezer.
- Melt the chocolate chips with coconut oil until smooth.
- Coat each bar in the melted chocolate and place on a baking sheet.
- Chill again for 30 minutes to set before serving.
Notes
Store in a sealed container in the fridge for up to two weeks, or freeze for up to two months.
- Prep Time: 20 minutes
- Cook Time: 0 minutes
- Category: Dessert
- Method: No-Bake
- Cuisine: American
Nutrition
- Serving Size: 1 bar
- Calories: 170
- Sugar: 10g
- Sodium: 30mg
- Fat: 9g
- Saturated Fat: 5g
- Unsaturated Fat: 4g
- Trans Fat: 0g
- Carbohydrates: 21g
- Fiber: 3g
- Protein: 6g
- Cholesterol: 0mg
🥗 Free Custom Keto Meal Plan?
Do you want to lose weight while still enjoying delicious Asian & Thai Fusion meals? Take this quick quiz to get your personalized Keto plan based on your favorite foods!
- ✅ No more guessing what to eat
- ✅ Delicious & easy-to-make recipes
- ✅ Tailored to your body type
Get My Custom Plan Now! →
*Over 100,000+ people have transformed their lives with this quiz.