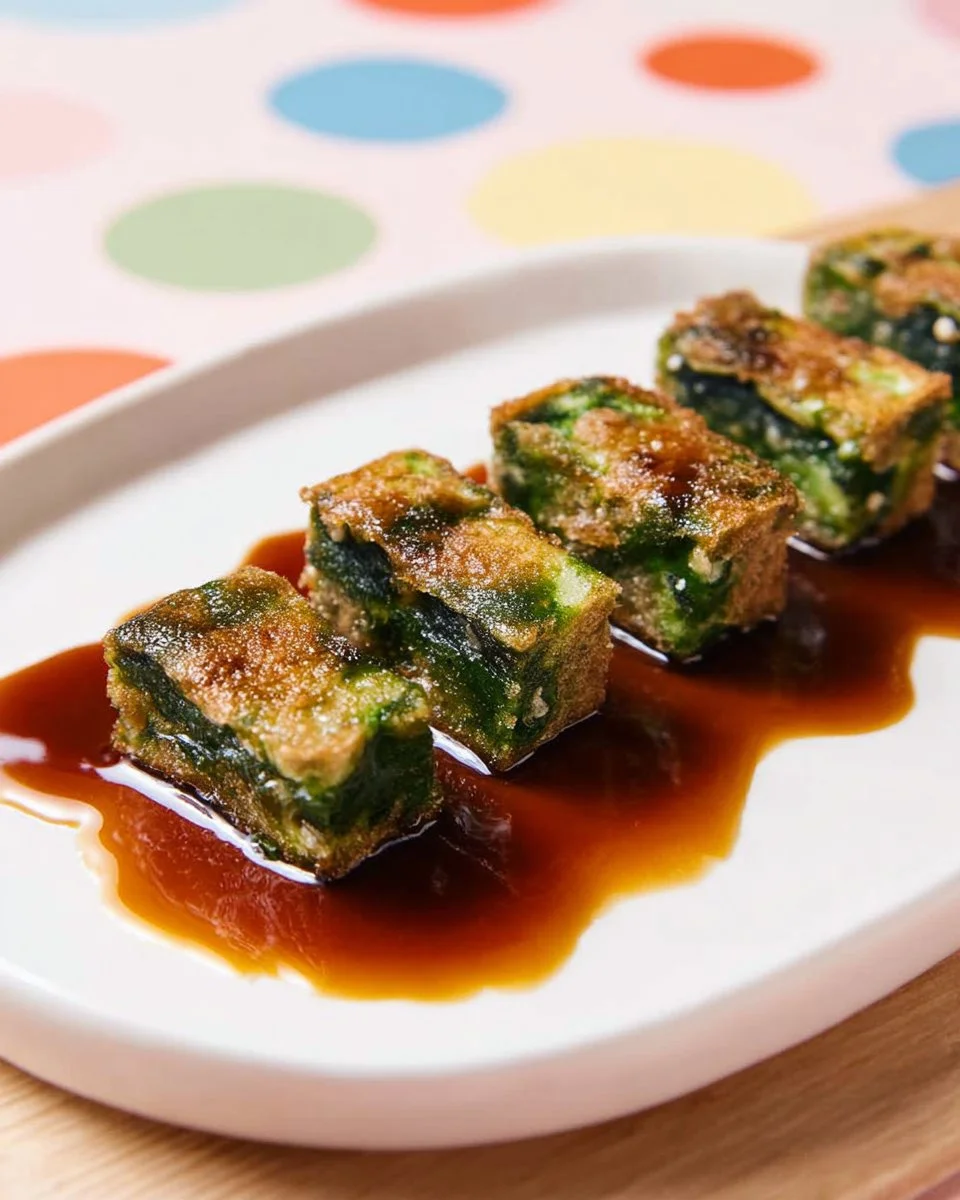
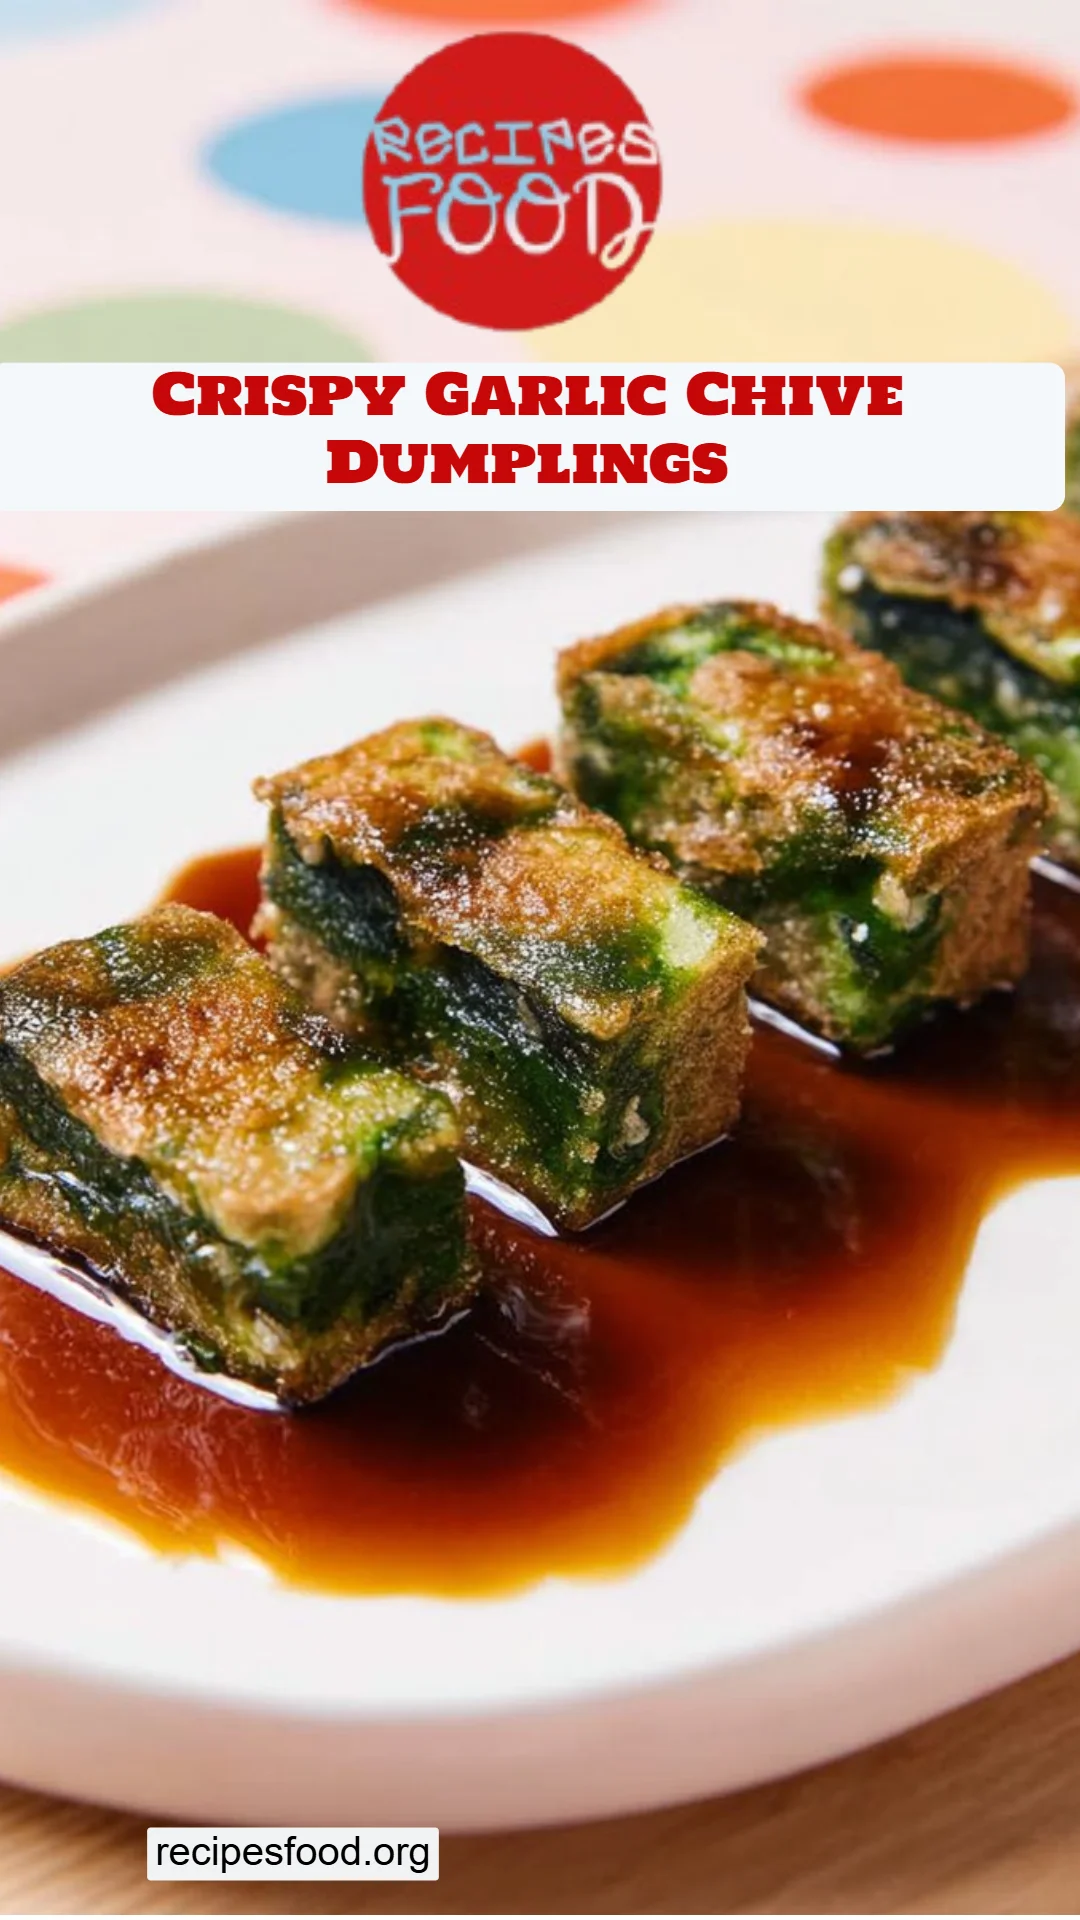
Crispy Garlic Chive Dumplings: A Perfect Blend of Crunch and Flavor
Have you ever had one of those nostalgic culinary experiences? For me, it’s the crunchy, aromatic bite of Crispy Garlic Chive Dumplings, pulling me back to my childhood kitchen, where the air was thick with laughter and the scent of garlic. My grandma would whip up steaming dumplings with the freshest chives from our garden, and each bite was a comforting hug. What makes these dumplings truly special is their addictive crunch paired with the herbaceous flavor of garlic chives, which elevates them beyond your average dim sum treat.
Unlike other dumplings that can often be heavy or bland, my Crispy Garlic Chive Dumplings are light yet satisfying, with a golden-brown crust that adds an irresistible texture. They are a fusion of simplicity and comfort, using ingredients that you might already have on hand. In this recipe, I promise to share not just the steps but also all the little secrets I’ve learned along the way that will help you recreate these delightful dumplings in your own kitchen. Grab your apron, and let’s embark on this delicious journey together!
What Are Crispy Garlic Chive Dumplings?
Crispy Garlic Chive Dumplings are a delectable treat rooted in Asian cuisine. Originating from various regions where chives are abundant, these dumplings combine the mild yet fragrant taste of garlic chives and a crispy batter that’s simply divine. You’ll find yourself enchanted by the way the dumplings puff up beautifully when steamed, and their mouthwatering crunch when pan-fried gives them a satisfying bite.
These dumplings stand out due to the unique blend of flavors in the filling—sweet, savory, and slightly peppery from the chives. The clever use of rice flour and tapioca starch creates a delightfully chewy texture, while the pan-frying technique offers a golden crust that contrasts perfectly with the soft interior. Whether you’re serving them at a family gathering, as a snack, or just because you crave something tasty, these Crispy Garlic Chive Dumplings are the perfect choice.
Why You’ll Love This Recipe
Unbeatable Flavor: The fresh garlic chives bring an incredible herbal aroma and flavor that beats any store-bought dumplings. When you take a bite, you’ll experience a burst of taste that’ll make your taste buds dance!
Cost-Effective: Making dumplings at home is budget-friendly compared to ordering them from restaurants. With simple, inexpensive ingredients, you can whip up a large batch that feeds a crowd without breaking the bank.
Customizable: Not only can you adjust the filling to suit your taste, but you can also play around with additional spices or switch out vegetables based on what’s in season. If you’re feeling adventurous, throw in some mushrooms or pork for an exciting twist!
Easy to Follow: Even if you’re new to cooking, this recipe is straightforward. With step-by-step instructions and helpful tips throughout, you’ll feel like a pro in no time—no fancy culinary skills necessary!
Perfect for Meal Prep: These dumplings are versatile and freeze well, making them a fantastic option for meal prep. You can make a big batch, freeze them, and simply fry or steam them whenever you need a quick and delicious meal.
Ingredients
Filling:
- 230 g garlic chives (fresh is best, but you can use frozen if needed)
- 2 tsp sugar
- ½ Tbsp soy sauce
- ½ tsp salt
- ¼ tsp baking soda (optional, for a fluffier filling)
- 2 tsp neutral oil (like vegetable or canola)
- 1 clove garlic, finely grated or minced
- ¼ tsp white pepper
Batter:
- 100 g rice flour
- 100 g tapioca starch
- 1 cup water
Dipping Sauce:
- 1 Tbsp sugar
- 1 Tbsp water
- 1 Tbsp vinegar (preferably rice vinegar)
- 1 ½ Tbsp sweet soy sauce (kecap manis)
- 1 Tbsp soy sauce
- 2-3 tsp sambal oelek or minced Thai chilies (adjust for spice level)
Notes on Ingredients:
Garlic Chives: Fresh garlic chives are essential for an authentic flavor. However, if you can’t find them, substitute with regular chives and add a bit more garlic for depth.
Tapioca Starch: For the greatest chewiness, use high-quality tapioca starch. Brands like Bob’s Red Mill are great options.
Sweet Soy Sauce (Kecap Manis): This thick sweet sauce can usually be found in Asian grocery stores; it adds a unique sweetness to the dipping sauce.
Prep Notes:
- Ensure your ingredients are at room temperature, especially the garlic chives, to help release their full flavor.
Step-by-Step Instructions
Prepare the Filling: Start by cutting about 1.5 inches off the bottom of the garlic chives. Wash them thoroughly to remove any dirt, then dry them with a paper towel. Chop the chives into small pieces and place them in a mixing bowl. Add salt, sugar, soy sauce, baking soda (if using), neutral oil, white pepper, and grated garlic. Mix well and let the filling sit for at least 20 minutes to let those flavors mingle.
Make the Dipping Sauce: While the filling is resting, whip up your dipping sauce. In a small bowl, combine the vinegar, water, and sugar, stirring until the sugar has dissolved. Then add the sweet soy sauce, regular soy sauce, and sambal oelek. Mix thoroughly and set aside.
Prepare the Batter: In a pot, mix water, rice flour, and tapioca starch. Stir the mixture until there are no lumps. Place the pot over low heat, stirring constantly until the mixture is thick and smooth. Remove from heat and fold in the garlic chive mixture, ensuring it’s evenly distributed.
Prepare to Steam: Grease a 7-inch round cake pan and line it with parchment paper. Carefully pour in the batter, smoothing out the top with a spatula.
Steam the Dumplings: Preheat your steamer and place the cake pan inside. Steam the dumplings for about 15-20 minutes, or until they are fully cooked. You’ll know they’re ready when a toothpick inserted in the center comes out clean.
Cool and Cut: Allow the steamed dumplings to cool completely in the pan, then carefully remove them and cut them into bite-sized pieces.
Fry to Perfection: In a non-stick pan, heat a little oil over medium-high heat. Fry the dumplings until they are golden brown and crispy on all sides, usually around 4-5 minutes. Drain any excess oil and serve them hot alongside your dipping sauce.
Chef’s Tips:
- Keep an eye on the dumplings while frying to avoid burning.
- Don’t overload the pan; fry in batches if necessary to achieve that perfect crunch.
Common Mistakes to Avoid:
- Don’t skip the resting time for the filling—it’s essential for flavor.
- Make sure the batter is smooth; lumps can lead to an uneven texture.
Expert Tips & Tricks
Storage: These dumplings can be stored in an airtight container in the refrigerator for up to 3 days or frozen for up to a month. Just ensure they’re completely cooled before storing.
Make-Ahead Instructions: You can prepare the filling and batter a day in advance and keep them in the fridge. Just steam and fry them when you’re ready to serve!
Troubleshooting: If your batter is too thick, add a little more water until you reach a pourable consistency. If it’s too thin, whisk in a small amount of additional rice flour.
Flavor Variations: Experiment with different fillings! Try adding grated carrots for sweetness or minced pork for a heartier version.
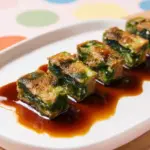
Presentation: Serve these dumplings on a beautiful platter drizzled with extra dipping sauce and a sprinkle of sesame seeds for flair.
Serving Suggestions
Crispy Garlic Chive Dumplings pair wonderfully with a variety of side dishes. Serve them alongside a fresh, crunchy salad for a complete meal or with some warm stir-fried vegetables to balance out the savory flavors. They are perfect for casual gatherings, Chinese New Year celebrations, or just as a cozy snack on movie night.
For an extra touch, consider garnishing your presentation with sesame seeds or chopped cilantro, which can add color and additional flavor.
Variations & Substitutions
Flavor Combinations: For a spicy kick, add minced ginger or a dash of chili oil to your filling mix. You could also try adding finely chopped mushrooms for an earthy note.
Dietary Adaptations: If you’re looking for a gluten-free version, double-check that your rice flour and tapioca starch are certified gluten-free.
Seasonal Variations: In the spring, consider incorporating asparagus or peas into the filling for a refreshing twist. Autumn calls for adding roasted pumpkin to make a hearty, seasonal dumpling.
Nutrition & Storage Info
- Prep Time: 30 minutes
- Cook Time: 30 minutes
- Total Time: 1 hour
- Yield: Approximately 4 servings
- Estimated Calories: 300 calories per serving
Storage Instructions:
- Store cooked dumplings in an airtight container in the fridge for up to 3 days or freeze for up to 1 month.
- Reheat by steaming or frying until heated through.
FAQ Section
Can I use frozen garlic chives?
Yes, frozen garlic chives work in a pinch! Just make sure to thaw and drain excess moisture.Can I air-fry these dumplings?
Absolutely! Place the dumplings in a preheated air fryer at 375°F (190°C) and cook for about 8-10 minutes until crispy.What if my filling is too watery?
If you find that your filling is too watery, add a small amount of rice flour to help absorb the liquid.Can I make these vegan?
Yes! This recipe is naturally vegan, but double-check the soy sauces you use as some brands may contain fish sauce.Is it hard to make dumplings from scratch?
Not at all! This recipe is simple and accessible, even for beginners. You’ll be impressing your friends in no time!Can I use regular flour instead of rice flour?
Though it may change the texture, all-purpose flour can be a substitute. However, the dumpling won’t be as chewy.What can I serve with these dumplings?
These dumplings pair well with a variety of sides, like a light salad, stir-fried veggies, or even some steamed rice.Can I prepare the filling ahead of time?
Yes! You can prepare the filling the night before and store it in the fridge.What’s the best way to reheat these dumplings?
For the best results, steam or pan-fry them to bring back that crispy texture.Are these dumplings gluten-free?
Yes, as long as you use certified gluten-free rice flour and tapioca starch!
Conclusion
Crispy Garlic Chive Dumplings are so much more than a meal; they are a slice of my childhood, filled with warmth and nostalgia. By following this recipe, you’re not just cooking; you’re creating flavors that tell a story. I’m excited for you to try them—your taste buds will thank you!
Don’t forget to come back and share your thoughts in the comments. I’d love to hear how your dumplings turned out! For more tantalizing recipes, check out my posts on homemade dim sum and quick stir-fries. Happy cooking!

Crispy Garlic Chive Dumplings
- Total Time: 60 minutes
- Yield: 4 servings 1x
- Diet: Vegan
Description
A nostalgic recipe for Crispy Garlic Chive Dumplings that blend addictive crunch and the herbaceous flavor of garlic chives, perfect for any occasion.
Ingredients
- 230 g garlic chives
- 2 tsp sugar
- ½ Tbsp soy sauce
- ½ tsp salt
- ¼ tsp baking soda (optional)
- 2 tsp neutral oil
- 1 clove garlic, finely grated or minced
- ¼ tsp white pepper
- 100 g rice flour
- 100 g tapioca starch
- 1 cup water
- 1 Tbsp sugar (for dipping sauce)
- 1 Tbsp water (for dipping sauce)
- 1 Tbsp vinegar (preferably rice vinegar)
- 1 ½ Tbsp sweet soy sauce (kecap manis)
- 1 Tbsp soy sauce (for dipping sauce)
- 2–3 tsp sambal oelek or minced Thai chilies (for dipping sauce)
Instructions
- Prepare the filling: Cut the garlic chives and mix with salt, sugar, soy sauce, baking soda, neutral oil, white pepper, and garlic. Let it rest for 20 minutes.
- Make the dipping sauce: Combine vinegar, water, and sugar until dissolved, then mix in soy sauces and sambal oelek.
- Prepare the batter: Mix water, rice flour, and tapioca starch in a pot. Cook until smooth and thick, then fold in the garlic chive mixture.
- Prepare to steam: Grease a round cake pan, pour in the batter, and smooth the top.
- Steam the dumplings: Steam for 15-20 minutes until set.
- Cool and cut: Let cool, remove from pan, and cut into pieces.
- Fry to perfection: Heat oil in a pan, fry dumplings until golden brown.
Notes
For authentic flavor, use fresh garlic chives. Store in an airtight container for up to 3 days or freeze for a month.
- Prep Time: 30 minutes
- Cook Time: 30 minutes
- Category: Main Course
- Method: Steaming and Frying
- Cuisine: Asian
Nutrition
- Serving Size: 1 serving
- Calories: 300
- Sugar: 7g
- Sodium: 700mg
- Fat: 4g
- Saturated Fat: 0.5g
- Unsaturated Fat: 3g
- Trans Fat: 0g
- Carbohydrates: 56g
- Fiber: 4g
- Protein: 8g
- Cholesterol: 0mg
🥗 Free Custom Keto Meal Plan?
Do you want to lose weight while still enjoying delicious Asian & Thai Fusion meals? Take this quick quiz to get your personalized Keto plan based on your favorite foods!
- ✅ No more guessing what to eat
- ✅ Delicious & easy-to-make recipes
- ✅ Tailored to your body type
Get My Custom Plan Now! →
*Over 100,000+ people have transformed their lives with this quiz.