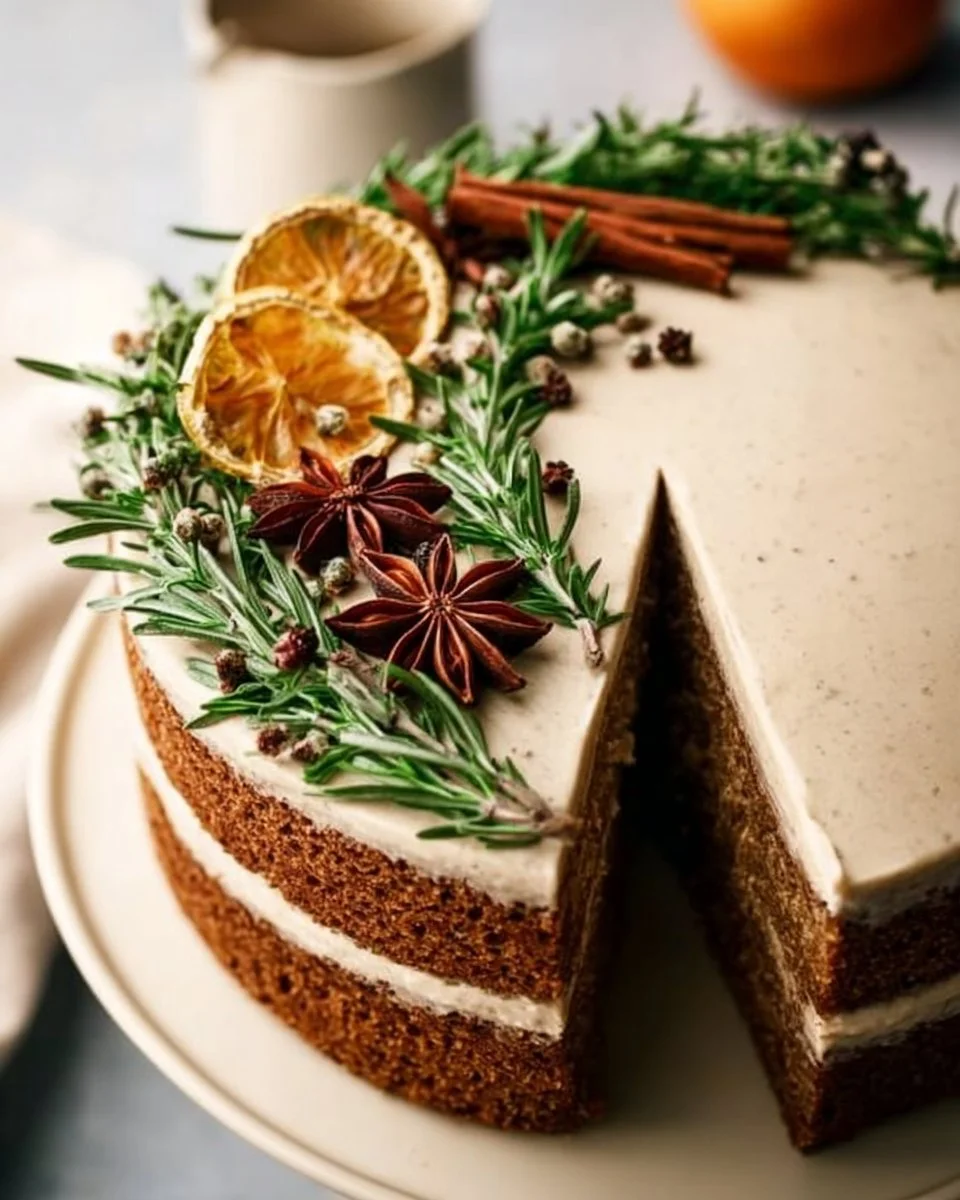
Delightful Gingerbread Layer Cake: A Festive Twist on a Timeless Classic
Ah, the smell of gingerbread baking in the oven; it takes me straight back to my childhood, when my grandmother would whip up her famous Gingerbread Layer Cake every holiday season. The aroma would fill the house, wrapping us in warmth and sweet nostalgia. Each slice, dense with the bold flavors of ginger, cinnamon, and cloves, was a delightful memory on a plate. The combination of layers, rich cream cheese frosting, and those seasonal spices elevated our gatherings into a feast for both the eyes and taste buds. What makes this recipe special is its balance of spices and moisture, ensuring your cake remains fluffy yet full of flavor.
While many recipes out there aim for the same sugary heights, this one stands out because it gushes with love and family memories, not just flavor. With each layer perfectly balanced and lovingly frosted, this Gingerbread Layer Cake isn’t just a dessert—it’s a celebration of festive togetherness. In this post, I promise to share not only a step-by-step guide to replicate this beloved cake but also tips and stories to make the experience feel just as familiar and cosy as my grandmother’s kitchen.
What Are Gingerbread Layer Cakes?
The origins of gingerbread can be traced back to ancient civilizations in Greece and China, but the moist, rich Gingerbread Layer Cake we know and love today really took shape in the Western world. Delightfully spiced and often enjoyed during the holidays, it’s a show-stopper that is perfect for festive occasions—think Thanksgiving, Christmas, or even birthdays in the chillier months.
When you cut into a slice, you’ll discover layers that are decadent yet light, and a taste that is complex thanks to the combination of warm spices and deep, dark molasses. The soft, moist crumb pairs beautifully with the tangy, creamy frosting, making each mouthful a cozy experience.
For those wintery nights or festive gatherings, this cake is a reminder that it’s the little moments—sipping hot cocoa by the fire, sharing stories with loved ones—that transform simple gatherings into lifelong memories.
Why You’ll Love This Recipe
Ridiculously Flavorful: Unlike the store-bought versions, this Gingerbread Layer Cake is brimming with spices that dance on your palate. The homemade depth of flavor is unmatched.
Cost-Effective: Let’s face it, holiday baking can be pricey. This recipe uses basic pantry ingredients which means you can whip it up without breaking the bank! Plus, it serves a crowd—perfect for family gatherings.
Customizable: Want to switch out the molasses for honey or add a kick of orange zest? Go for it! This recipe is flexible, allowing you to make it your own based on your taste preferences or dietary needs.
Frosting That Stuns: The cream cheese frosting is velvety and sweet, a delightful companion to the spiced layers. It’s an easy frosting that anyone can master—after all, who doesn’t love frosting?
A Sharing Experience: Not only is it fun to bake, but it’s even more rewarding to share! Whether gifting to neighbors or showcasing it at a holiday party, it’s sure to spark joy and conversation.
Pairing all these elements makes this cake worth every minute spent in the kitchen. Giving you an avenue to explore baking while staying efficient and cost-effective? Now that’s what I call a win-win.
Ingredients
To create this Gingerbread Layer Cake, gather the following ingredients, ensuring they are of good quality for the best results:
For the Cake:
2 1/2 cups all-purpose flour: For the perfect structure. Make sure to sift the flour for lightness if desired.
1 teaspoon baking soda: This helps the cake rise, ensuring it’s fluffy.
1 teaspoon baking powder: Works in tandem with baking soda for a lighter cake.
1 teaspoon ground ginger: The star of our spice medley, adding warmth and depth.
1 teaspoon ground cinnamon: A necessity for that classic gingerbread flavor.
1/2 teaspoon ground cloves: Provides an earthy richness to the cake.
1/2 teaspoon salt: Enhances all flavors; don’t skip it!
1 cup unsalted butter, softened: Use room temperature butter for easier creaming.
1 1/2 cups granulated sugar: For sweetness and structure—don’t substitute this for brown sugar.
3 large eggs: Adds moisture and provides stability to the layers.
1 cup molasses: The secret ingredient for rich flavor and moisture. Make sure you’re using unsulfured molasses.
1 cup buttermilk: Tenderizes the cake while adding a subtle tang.
1 teaspoon vanilla extract: Enhances sweetness—a must-have for any cake.
For the Frosting:
8 oz cream cheese, softened: For a rich and creamy frosting.
1/2 cup powdered sugar: For sweetness without grittiness; sifted for a smooth texture.
1 teaspoon vanilla extract: A flavor enhancer for the frosting.
1 teaspoon ground cinnamon: Just a hint to tie in the spice profile!
Chef’s Tip: Always use ingredients at room temperature to ensure a smoother batter and consistency!
Step-by-Step Instructions
Preheat your oven: Begin by preheating your oven to 350°F (175°C). Grease and flour three 8-inch round cake pans. Ensuring a good layer of flour will prevent sticking—trust me, you’ll thank yourself later!
Mix Dry Ingredients: In a bowl, whisk together your flour, baking soda, baking powder, ginger, cinnamon, cloves, and salt. This helps evenly distribute the leavening agents and spices.
Cream Butter and Sugar: In a large mixing bowl, cream together the softened butter and sugar using an electric mixer on medium speed until light and fluffy—about 3-5 minutes. Be patient; this step adds air to your cake!
Add Eggs: Add the eggs one at a time, mixing well after each addition. You want them fully incorporated for a uniform texture.
Combine Wet Ingredients: Stir in the molasses, buttermilk, and vanilla extract until everything is well combined. The mixture will look a bit thick and somewhat lumpy—that’s just fine!
Merge Dry and Wet Ingredients: Gradually add the dry ingredients to the wet ingredients, mixing on low speed just until combined. Overmixing will lead to a dense cake!
Divide and Bake: Divide the batter evenly between your prepared cake pans. Bake for 25-30 minutes or until a toothpick inserted into the center comes out clean. Keep an eye out for golden edges!
Cool the Cakes: Allow the cakes to cool in the pans for 10 minutes. This will make it easier to remove them without collapsing. Then, transfer to a wire rack to cool completely.
Prepare the Frosting: While the layers cool, beat the cream cheese until smooth. Gradually add the powdered sugar, vanilla, and ground cinnamon, mixing until well combined and fluffy—about 3 minutes.
Layer and Frost: Once the cakes have cooled, place one layer on a cake stand. Spread a generous layer of frosting between each layer before adding the next. Frost the top and sides of the cake as desired.
Serve and Enjoy! Your Gingerbread Layer Cake is ready! Slice, serve, and be prepared for compliments!
Common Mistake to Avoid: Don’t open the oven door while baking until the time is nearly up; it can lead to sinking layers!
Expert Tips & Tricks
Storage: Store the iced cake in an airtight container at room temperature for a day or two, or refrigerate to extend its life for up to a week.
Make-Ahead Instructions: Spice cakes like ours actually improve with time! Make your layers a day in advance, wrap them tightly without frosting, and leave in the fridge overnight.
Troubleshooting: If the cake seems too dense, it’s likely over-mixed. Additionally, if your cake domes on the top, it may have been baked too long or at too high of a heat; check your oven’s accuracy regularly.
Frosting Piping: If you want a fancy finish, use a piping bag with a star tip to create decorative swirls on top and garnishes—pretty makes it taste even better!
Leftover Frosting?: Don’t throw it away! Use it as a topping for cupcakes, spread on pancakes, or mix into oatmeal for a sweet kick!
Serving Suggestions
Pair this delightful Gingerbread Layer Cake with a warm beverage like spiced chai or a classic hot chocolate for a cozy dessert experience! If you want to dress it up a bit for your holiday table, consider adding festive fruits like fresh cranberries as a garnish or serving it with a dollop of whipped cream.
This cake isn’t just perfect for Christmas; it fits any winter celebration, from New Year’s gatherings to cold-weather birthdays. Take a moment to place it on a cake stand, sprinkle a little cinnamon on top, and add a sparkling candle or two for extra flair.
Variations & Substitutions
Feel free to make this versatile Gingerbread Layer Cake your own:
- Flavor Combinations: Add orange zest or lemon extract for a bright citrusy twist!
- Dietary Restrictions: Substitute buttermilk with a dairy-free milk like almond or oat milk mixed with lemon juice for a vegan-friendly version!
- Seasonal Variations: For an autumn twist, a sprinkle of nutmeg or pumpkin spice can give it a fresh seasonal vibe.
Nutrition & Storage Info
- Prep Time: 20 minutes
- Cook Time: 30 minutes
- Total Time: 50 minutes (plus cooling time)
- Yield: 12 servings
- Estimated Calories per Serving: 450 calories
Storage Instructions:
- At room temperature: 1-2 days.
- In the fridge: up to 1 week.
- In the freezer: up to 3 months (freeze un-frosted layers wrapped tightly).
FAQ Section
Can I use whole wheat flour instead of all-purpose flour?
- Yes, but the texture might be denser. Consider mixing half-and-half for a better balance.
What can I substitute for molasses?
- You can use dark brown sugar mixed with water or replace it with honey or agave syrup, keeping in mind it will alter the flavor slightly.
How can I make this gluten-free?
- Substitute with a 1:1 gluten-free flour blend and ensure your baking powder is gluten-free.
Why does my cake sink in the middle?
- This could be due to opening the oven door too early or under-baking. Ensure a clean toothpick test!
Can I skip the frosting?
- Absolutely! A simple dusting of powdered sugar can be a beautiful alternative.
How do I make this cake more festive?
- Try adding a layer of cranberry jam between the layers or topping with candied pecans!
Is this cake suitable for freezing?
- Yes! Freeze the un-frosted layers, wrap tightly, and frost once thawed.
I’m not a fan of cream cheese. What can I use?
- Try a buttercream frosting—just add more powdered sugar for sweetness and cover it with vanilla bean for flavors.
Can I double this recipe?
- Yes! Just ensure you have the right pans or bake in batches.
What’s the best way to slice the cake?
- Use a sharp serrated knife and clean it between slices for neat portions.
Conclusion
This Gingerbread Layer Cake isn’t just a recipe; it’s a journey back to rich family traditions, warm memories, and the joy of baking for those we love. I encourage you to give it a try—after all, your loved ones deserve a cake that’s as special as the moments you share together.
I’d love to hear how your cake turns out—feel free to leave a comment or feedback, and don’t forget to check out my other festive recipes on the blog. Let’s make these memories together, one delicious cake at a time!
Print
Delightful Gingerbread Layer Cake
- Total Time: 50 minutes
- Yield: 12 servings 1x
- Diet: Vegetarian
Description
A festive twist on a timeless classic, this Gingerbread Layer Cake is rich with spices and layered with cream cheese frosting, perfect for holiday gatherings.
Ingredients
- 2 1/2 cups all-purpose flour
- 1 teaspoon baking soda
- 1 teaspoon baking powder
- 1 teaspoon ground ginger
- 1 teaspoon ground cinnamon
- 1/2 teaspoon ground cloves
- 1/2 teaspoon salt
- 1 cup unsalted butter, softened
- 1 1/2 cups granulated sugar
- 3 large eggs
- 1 cup molasses
- 1 cup buttermilk
- 1 teaspoon vanilla extract
- 8 oz cream cheese, softened
- 1/2 cup powdered sugar
- 1 teaspoon vanilla extract
- 1 teaspoon ground cinnamon
Instructions
- Preheat your oven to 350°F (175°C) and grease and flour three 8-inch round cake pans.
- In a bowl, whisk together the flour, baking soda, baking powder, ginger, cinnamon, cloves, and salt.
- Cream together the softened butter and sugar using an electric mixer until light and fluffy, about 3-5 minutes.
- Add the eggs one at a time, mixing well after each addition.
- Stir in the molasses, buttermilk, and vanilla extract until well combined.
- Gradually add the dry ingredients to the wet ingredients, mixing just until combined.
- Divide the batter evenly between the prepared cake pans and bake for 25-30 minutes or until a toothpick comes out clean.
- Allow the cakes to cool in the pans for 10 minutes before transferring to a wire rack to cool completely.
- Beat the cream cheese until smooth, then add the powdered sugar, vanilla, and ground cinnamon, mixing until fluffy.
- Once the cakes are cool, layer them with frosting in between and frost the top and sides as desired.
- Slice, serve, and enjoy!
Notes
Store the cake in an airtight container at room temperature for 1-2 days, or refrigerate it for up to a week.
- Prep Time: 20 minutes
- Cook Time: 30 minutes
- Category: Dessert
- Method: Baking
- Cuisine: American
Nutrition
- Serving Size: 1 slice
- Calories: 450
- Sugar: 40g
- Sodium: 350mg
- Fat: 22g
- Saturated Fat: 12g
- Unsaturated Fat: 8g
- Trans Fat: 0g
- Carbohydrates: 60g
- Fiber: 2g
- Protein: 4g
- Cholesterol: 60mg
🥗 Free Custom Keto Meal Plan?
Do you want to lose weight while still enjoying delicious Asian & Thai Fusion meals? Take this quick quiz to get your personalized Keto plan based on your favorite foods!
- ✅ No more guessing what to eat
- ✅ Delicious & easy-to-make recipes
- ✅ Tailored to your body type
Get My Custom Plan Now! →
*Over 100,000+ people have transformed their lives with this quiz.