Irresistible Peppermint Bark Cookies: The Ultimate Holiday Treat!
As the holiday season rolls around, I can’t help but reminisce about cozy evenings spent in the kitchen, surrounded by the warm, chocolatey aroma of baked goodies. One standout memory is the time my family gathered to make Peppermint Bark Cookies, a scrumptious twist on traditional peppermint bark. These delightful morsels combine rich dark chocolate, creamy white chocolate, and the festive crunch of crushed candy canes. They’re not just cookies; they’re a celebration of flavors that charm everyone who tries them!
What makes my recipe special is its heartfelt blend of beloved holiday ingredients and the cocoa-rich taste that dances on your palate. Unlike store-bought cookies, which often lack the freshness and home-cooked love, these Peppermint Bark Cookies are custom-made to suit your taste — you can experiment with chocolate types, sweeteners, or even add some seasonal spices.
As we embark on this culinary adventure together, I promise you’ll learn the secrets to creating these delightful cookies in your own kitchen. Get ready for a baking experience filled with warmth, nostalgia, and a sprinkle of holiday magic!
What Are Peppermint Bark Cookies?
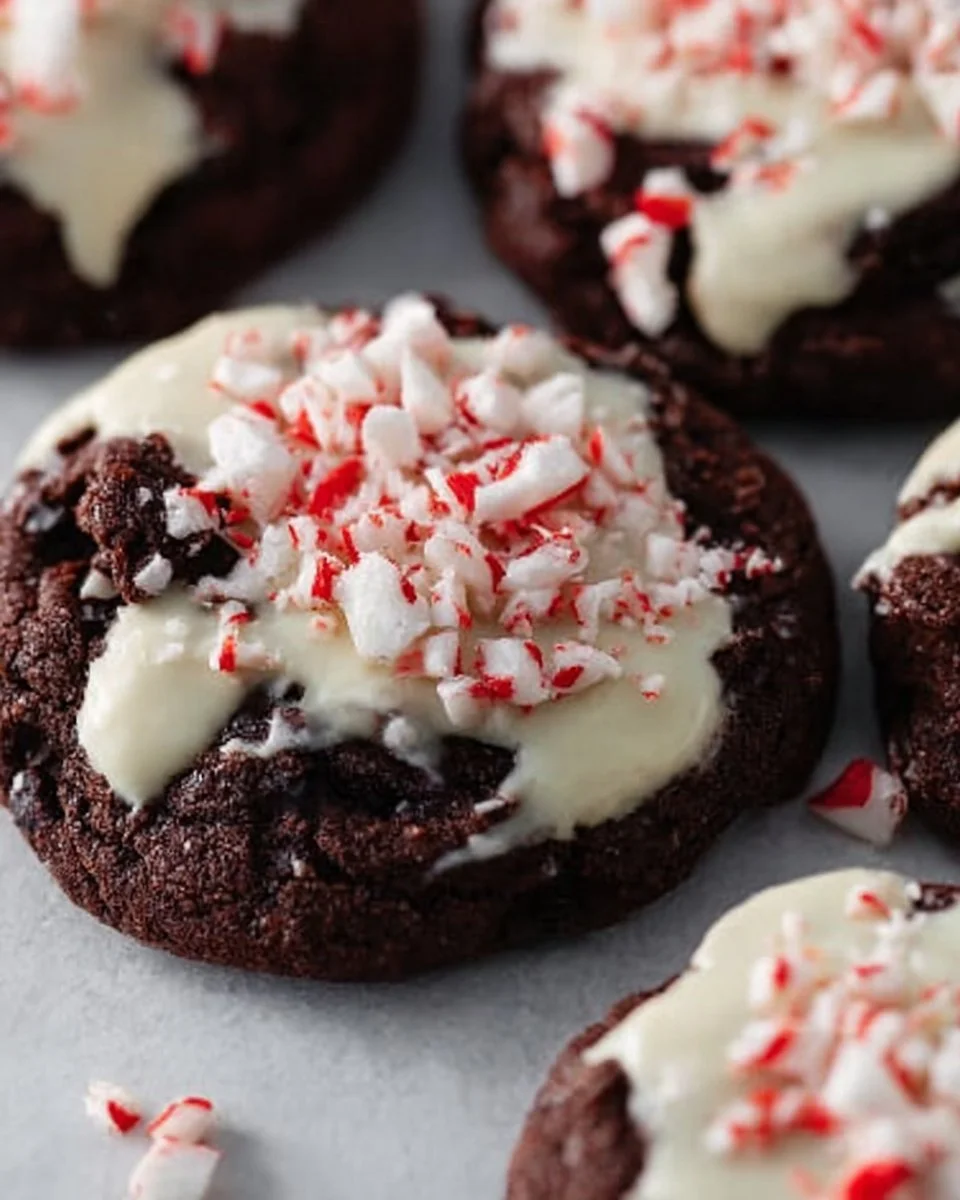
Peppermint Bark Cookies are a joyful fusion of two classic holiday favorites: cookies and peppermint bark! Originating from the popular winter confectionery, peppermint bark consists of layers of dark and white chocolate sprinkled with crushed peppermint. My version elevates this beloved dessert into soft, chewy cookies, perfect for sharing or enjoying with a cozy cup of cocoa.
With their rich, chocolatey taste complemented by bursts of peppermint crunch, these cookies strike an exceptional balance between indulgence and festive cheer. Imagine biting into a freshly baked cookie, its soft texture melting in your mouth, only to be enhanced by the cool, refreshing taste of mint. These cookies are perfect for holiday parties, cozy gatherings, or simply enjoying at home while watching your favorite holiday movies.
Why You’ll Love This Recipe
Fresh and Flavorful: In contrast to store-bought cookies that can be overly sweet and lacking in quality ingredients, these homemade Peppermint Bark Cookies are packed with layers of rich flavors and textures. You control the sweetness and can customize each cookie to your heart’s content.
Cost-Effective Goodness: Juggling holiday budgets can be tough, but baking at home is a delicious and economical alternative to expensive specialty cookies found in stores or bakeries. The ingredients for Peppermint Bark Cookies are also often readily available in your pantry!
Creative Customization: Maybe you prefer dark chocolate over milk chocolate, or you want to amp up the peppermint flavor with mint extract — feel free to tweak the recipe to fit your ideal cookie vision! You can even swap in gluten-free flour if you’re looking to adapt for dietary needs.
Easy to Make: Despite their gourmet appearance, these cookies are beginner-friendly and don’t require any extensive baking skills. With just a bit of patience and some basic equipment, you’ll be whipping up batches in no time.
Time Investment: You can make these delicious Peppermint Bark Cookies in about an hour or so, including prep time and baking. They’re perfect for last-minute holiday baking or potluck contributions.
Ingredients
To create the perfect Peppermint Bark Cookies, gather the following ingredients:
- 400 grams dark chocolate (chopped or chips; I recommend quality brands like Ghirardelli or Callebaut for rich flavor)
- 170 grams flour (all-purpose; use a gluten-free substitute if needed)
- 170 grams cocoa powder (my go-to is Dutch-processed for a deeper chocolate flavor)
- 226 grams unsalted butter (room temperature; makes mixing easier and ensures a fluffier texture)
- 226 grams light brown sugar (this adds moisture and a lovely caramel note)
- 205 grams granulated sugar (for sweetness)
- 2 tsp kosher salt (to enhance chocolate flavors)
- 1 tsp baking soda (for a nice rise)
- ½ tsp baking powder (for lightness)
- 1 tbsp vanilla extract (always use pure for more depth)
- 1 egg (at room temperature, helps incorporate into the batter)
- 285 grams white chocolate (for dipping; I love using Ghirardelli again here)
- 1 tbsp coconut oil (to help the white chocolate melt smoothly)
- 1 candy cane (crushed; for that essential peppermint crunch)
Preparation Notes: Ensure your butter is at room temperature for the best mixing outcome. When buying chocolate, opt for high-quality brands, as it greatly contributes to the overall taste.
Step-by-Step Instructions
Preheat the oven: Preheat your oven to 350°F (180°C) and line your baking sheets with parchment paper for easy cleanup.
Prepare the chocolate mixture: Take a handful of the chopped dark chocolate and set it aside. In a medium-sized bowl, toss the remaining chopped chocolate with the flour and cocoa powder until well mixed. This helps the chocolate distribute evenly throughout the cookies.
Mix the batter: In the bowl of a stand mixer, combine the unsalted butter, light brown sugar, granulated sugar, kosher salt, baking soda, baking powder, and vanilla extract. Mix on low speed for about 1 minute, then increase to medium and beat until the mixture is fluffy and creamy, roughly 5 minutes. While the mixer is running, add the egg; continue mixing until smooth.
Add dry ingredients: Reduce the mixer speed to low and gradually add the flour/chocolate mixture. Mix until just incorporated; avoid overmixing.
Shape the cookies: Scoop out portions of dough (about 2 tablespoons each) and flatten them into discs, leaving at least 2 inches between each cookie on the prepared baking sheets. Press the reserved chopped chocolate into the tops of each cookie and sprinkle lightly with a pinch of kosher salt.
Bake: Place in the oven and bake for 13-15 minutes. When done, the edges should look set, and the centers will still appear slightly soft. Allow the cookies to cool completely on the baking sheets.
Prepare white chocolate dip: While the cookies cool, melt the white chocolate with the coconut oil in a microwavable bowl, melting in 20-second bursts and stirring in between until smooth and melted.
Decorate: Dip the cooled cookies into the melted white chocolate, allowing any excess to drip off. After dipping, immediately sprinkle crushed candy canes over the top for a festive touch.
Let them set: Place the decorated cookies on parchment paper and let them sit until the white chocolate hardens.
Chef’s Tips:
- Make sure not to overcrowd the baking sheets; this can lead to uneven baking.
- Keep an eye on the cookies while they bake, as ovens may vary. They are done when the edges look firm but the centers may still feel slightly soft.
- For added flavor, try mixing in some peppermint extract into the dough!
Expert Tips & Tricks
Storage: These cookies can be stored in an airtight container at room temperature for up to one week. For longer storage, place them in the fridge for up to two weeks or freeze for up to three months!
Make-Ahead Instructions: The cookie dough can be prepared in advance and stored in the refrigerator for up to 3 days. When ready to bake, scoop and flatten directly from the fridge.
Troubleshooting: If you find your dough is too crumbly, it’s possible that there’s not enough moisture. A splash of milk or extra melted butter can help bind it. Conversely, if the dough is too sticky, add a little more flour, one tablespoon at a time.
Piping Extra Holiday Joy: Thinking of adding a little flair? Drizzle some melted dark chocolate over the finished cookies for enhanced decoration and flavor.
Epic Fail? Not with These Tips!: If your cookies spread out too much, you may have mixed the dough a bit too long. Next time, mix until just combined.
Serving Suggestions
These Peppermint Bark Cookies pair beautifully with a warm cup of hot cocoa or a festive spiced chai. Consider presenting them on a holiday-themed platter, perhaps garnished with some additional candy canes or seasonal greenery for an elegant touch. They’re perfect for holiday gatherings, cookie exchanges, or as delightful gifts for neighbors and friends.
Variations & Substitutions
- Flavor Combos: Try substituting the peppermint with orange zest for a festive chocolate-orange cookie or incorporating nuts like toasted pecans for extra crunch.
- Dietary Adaptations: You can easily use vegan butter and dairy-free chocolate options to make these cookies vegan. Gluten-free alternatives like almond flour can also be used.
- Seasonal Twists: Add seasonal spices like cinnamon or nutmeg for an autumn twist, or switch it up with chopped dried cherries for a holiday flavor explosion.
Nutrition & Storage Info
- Prep time: 20 minutes
- Cook time: 15 minutes
- Total time: 35 minutes
- Yield: Approximately 24 cookies
- Estimated calories per serving: 150 calories (per cookie)
Storage Instructions: Store at room temperature in an airtight container for up to a week, in the fridge for up to two weeks, or freeze for up to three months.
FAQ Section
Can I freeze these cookies?
Yes, these cookies freeze beautifully! Just ensure they are completely cooled before wrapping them tightly in plastic wrap or storing them in a freezer-safe container.What can I use instead of dark chocolate?
You can substitute dark chocolate with semi-sweet or even milk chocolate, but keep in mind they will be sweeter in flavor.Why don’t my cookies spread?
If your cookies aren’t spreading, it could be due to over-measuring the flour. Use a kitchen scale for precision.Can I omit the crushed candy canes?
Absolutely! While they add a nice festive touch, you can skip them or substitute with nuts, sprinkles, or leave the cookies plain.My white chocolate is seizing! What happened?
White chocolate can seize if it gets too hot or encounters moisture. Melting slowly in short bursts helps prevent this.Can I make these cookies ahead of time?
Definitely! You can prepare the dough in advance and refrigerate it for a few days or even freeze it.What’s the best way to crush candy canes?
You can place them in a plastic bag and use a rolling pin or a mallet for smashing. If you have a food processor, that works just as well!Can I make these without cocoa powder?
While cocoa powder is essential for that deep chocolate flavor, you could potentially make a vanilla-based cookie instead.How can I make these gluten-free?
Substitute the all-purpose flour with a gluten-free blend that measures 1-to-1.What can I pair these cookies with?
They’re delightful with hot cocoa, coffee, or even a glass of milk.
Conclusion
These Peppermint Bark Cookies aren’t just a treat; they’re a delicious symbol of the holiday spirit and a nod to fond family memories. With every bite, you’ll experience a rich flavor profile that’s not only heavenly but also effortlessly achievable. I encourage you to try making them and infuse your kitchen with warmth and love this season. Don’t forget to share your thoughts or variations with me in the comments; I love hearing from you! For more delicious festive ideas, check out my other cozy recipes on the blog. Happy baking!
Print
Irresistible Peppermint Bark Cookies
- Total Time: 35 minutes
- Yield: 24 cookies 1x
- Diet: Vegetarian
Description
A scrumptious twist on traditional peppermint bark, combining rich dark and white chocolate with crunchy candy canes for a festive treat.
Ingredients
- 400 grams dark chocolate (chopped or chips)
- 170 grams all-purpose flour (or gluten-free substitute)
- 170 grams Dutch-processed cocoa powder
- 226 grams unsalted butter (room temperature)
- 226 grams light brown sugar
- 205 grams granulated sugar
- 2 tsp kosher salt
- 1 tsp baking soda
- ½ tsp baking powder
- 1 tbsp pure vanilla extract
- 1 egg (room temperature)
- 285 grams white chocolate (for dipping)
- 1 tbsp coconut oil
- 1 candy cane (crushed)
Instructions
- Preheat your oven to 350°F (180°C) and line your baking sheets with parchment paper.
- In a medium bowl, mix chopped dark chocolate with flour and cocoa powder.
- In a stand mixer, combine butter, light brown sugar, granulated sugar, kosher salt, baking soda, baking powder, and vanilla extract. Mix until fluffy, then add the egg.
- Gradually add the flour/chocolate mixture, mixing until just combined.
- Scoop dough into discs and place on prepared baking sheets, pressing reserved chocolate into the tops.
- Bake for 13-15 minutes and allow to cool.
- Melt white chocolate with coconut oil in a microwave.
- Dip cooled cookies in the melted white chocolate and sprinkle crushed candy canes on top.
- Let the cookies sit until the white chocolate hardens.
Notes
Store cookies in an airtight container for up to one week at room temperature. The dough can be prepared in advance and refrigerated.
- Prep Time: 20 minutes
- Cook Time: 15 minutes
- Category: Dessert
- Method: Baking
- Cuisine: American
Nutrition
- Serving Size: 1 cookie
- Calories: 150
- Sugar: 12g
- Sodium: 300mg
- Fat: 8g
- Saturated Fat: 4g
- Unsaturated Fat: 3g
- Trans Fat: 0g
- Carbohydrates: 22g
- Fiber: 1g
- Protein: 2g
- Cholesterol: 20mg
🥗 Free Custom Keto Meal Plan?
Do you want to lose weight while still enjoying delicious Asian & Thai Fusion meals? Take this quick quiz to get your personalized Keto plan based on your favorite foods!
- ✅ No more guessing what to eat
- ✅ Delicious & easy-to-make recipes
- ✅ Tailored to your body type
Get My Custom Plan Now! →
*Over 100,000+ people have transformed their lives with this quiz.