Table of Contents
Table of Contents
As autumn envelops our homes with its cozy embrace, I find myself reminiscing about those chilly evenings spent in the kitchen with my family, trying to find the perfect recipe for cookies that capture the essence of the season. One of our family favorites? Spooky Ghost Brown Butter Pumpkin Cookies. This delightful twist on traditional pumpkin cookies transforms simple ingredients into a hauntingly delicious experience that’ll have everyone buzzing with excitement.
What makes these cookies so special, you ask? It’s the delightful nuttiness from the brown butter combined with the seasonal warmth of pumpkin and a playful ghostly appearance that brings the joy of Halloween to the plate. Unlike other pumpkin cookies that can be overly dense, this recipe boasts a chewy texture that is both comforting and enchanting.
Each bite melts in your mouth, filling your home with an aroma that evokes feelings of nostalgia while you’re surrounded by friends and loved ones. Today, I’m excited to share this beloved recipe so you can create your very own batch of Spooky Ghost Brown Butter Pumpkin Cookies. Keep reading, and you’ll be equipped with all the tips and tricks you need to ensure your cookie game is elevated to spectral heights!
What Are Spooky Ghost Brown Butter Pumpkin Cookies?
Spooky Ghost Brown Butter Pumpkin Cookies are an enchanting treat that merges classic flavors with a whimsical design. These cookies celebrate the harvest season with rich pumpkin puree and brown butter, enhancing the cookie’s flavor profile with a nutty depth that simply elevates your typical fall cookie.
Imagine sinking your teeth into a cookie that has a slightly crispy exterior contrasted with a gooey center; that’s this recipe in a nutshell. The aroma of warm spices dances through the air, making it impossible to resist grabbing a second (or third!) cookie as you admire their ghostly shapes created with chocolate accents.
These cookies are perfect for Halloween parties, family gatherings, or any occasion that calls for a festive touch! They’re a delightful way to celebrate the changing seasons while bringing a smile to everyone around you.
Why You’ll Love This Recipe
Here are five compelling reasons to whip up a batch of Spooky Ghost Brown Butter Pumpkin Cookies this fall:
Unmatched Flavor: These cookies strike the ideal balance of sweet and savory, thanks to the brown butter and spices. It’s hard to find such depth of flavor in store-bought cookies, making this homemade version an absolute standout.
Irresistible Texture: The chewy, melt-in-your-mouth texture is unlike any store-bought cookie. The addition of brown butter lends a richness that you’ll simply fall in love with at first bite.
Pocket-Friendly: Making your own cookies will not only save you money compared to that boutique bakery down the street but will also allow you to create a larger batch for family and friends, thus more warm smiles all around.
Personal Touch: You can customize the spooky details! Add various expressions to your ghostly faces or even turn them into pumpkin shapes for a new twist. It’s a perfect way to engage kids or friends in the baking process, making for a fun activity together.
Easy to Make: Even if you’re new to baking, the step-by-step instructions make this recipe accessible. You’ll impress everyone with your dessert skills before you know it!
Ingredients Section
To create these Spooky Ghost Brown Butter Pumpkin Cookies, here’s what you will need. Pay attention to quality, as it does make a difference in the final product:
- Brown Butter: 1 batch Brown Butter and Maple Chewy Pumpkin Cookies by Butternut Bakery (ensure it’s melted and browned properly for that nutty flavor).
- Pumpkin Puree: 1 cup of real pumpkin puree—canned is fine, but if you can find fresh, it elevates your cookies!
- Granulated Sugar: 1 cup for sweetness and to balance the flavors.
- Brown Sugar: 1 cup (packed) for that rich caramel flavor.
- Egg: 1 large egg, at room temperature, vital for binding.
- Flour: 2 cups all-purpose flour, sifted for lightness.
- Baking Soda: 1 teaspoon for proper rise.
- Baking Powder: 1 teaspoon for added fluffiness.
- Salt: ½ teaspoon to enhance flavor.
- Pumpkin Spice: 1 tablespoon, or a blend of cinnamon, nutmeg, and ginger.
- White Chocolate: For ghostly drapes (Ghirardelli melting wafers recommended).
- Black Candy Melts: For spooky eyes and mouth expressions.
- Piping Bag & Medium Cookie Scoop: For shaping and decorating your cookies.
- Light Colored Baking Pans: They reflect heat well, promoting even baking.
Preparation Notes:
- Make sure your butter is at room temperature before you start mixing.
- I often use organic ingredients when possible—especially for eggs and pumpkin puree—to enhance flavor and quality.
Step-by-Step Instructions
Ready to bake? Let’s dive into the delightfully eerily wonderful world of Spooky Ghost Brown Butter Pumpkin Cookies. Follow these steps for amazing results:
Step 1: Prepare the Dough
- Preheat the Oven: Set your oven to 350°F (175°C) to ensure it’s perfectly hot when your cookies are ready to bake.
- Brown the Butter: In a saucepan, melt 1 batch of butter over medium heat and swirl it until it turns golden brown and smells nutty (about 5-8 minutes). Let it cool slightly.
- In a large mixing bowl, combine the brown butter, granulated sugar, and brown sugar until fluffy (about 2-3 minutes). Add the egg and pumpkin puree, mixing until combined.
Step 2: Mix the Dry Ingredients
- In a separate bowl, whisk together the flour, baking soda, baking powder, salt, and pumpkin spice.
- Gradually mix the dry ingredients into the wet mixture until just combined. Do not overmix!
Step 3: Scoop and Bake
- Using a medium cookie scoop, drop hearty spoonfuls of dough onto light-colored baking pans lined with parchment paper.
- Bake for 12-14 minutes, until the edges are set but the centers are still slightly gooey. Timing may vary based on your oven, so keep an eye on them.
Step 4: Create Ghostly Visages
- Cool the Cookies: Allow the pumpkin cookies to fully cool on a rack.
- Melt White Chocolate: While the cookies cool, melt your white chocolate in a microwave-safe container (following package instructions).
- Dollop the White Chocolate: Spoon a small dollop onto the center of each cooled cookie. Using the back of a small spoon, create an oval ghost shape by dragging the chocolate downwards.
Step 5: Add the Spooky Faces
- Allow the white chocolate to harden slightly.
- Melt Black Candy Melts: Melt these in the same manner as the white chocolate and pour into a piping bag.
- Pipe the Faces: Pipe little eyes and mouths to give your ghost cookies personality. Allow them to fully dry.
Chef’s Tip Box
- Practice First: If you’re nervous about piping, practice on a piece of parchment paper to get the hang of it before decorating the cookies.
- Common Mistakes to Avoid: Don’t overbake the cookies; they should be soft when removed from the oven. They will continue to cook on the baking sheet for a couple of minutes.
Expert Tips & Tricks
- Brown Butter Perfection: Make sure to keep an eye on your butter while it’s browning; it can go from perfect to burnt rather quickly!
- Storage Recommendations: Once cooled, store your cookies in an airtight container at room temperature for up to 5 days. They also freeze wonderfully if you want to plan ahead.
- Make Ahead: You can make the dough a day in advance and keep it in the fridge. Just let it sit at room temperature for 10-15 minutes before scooping.
- Common Problems: If your dough is too sticky, add a tablespoon or two of flour. If it’s too dry, a touch of milk can help adjust the consistency.
- Flavor Boosts: Feel free to throw in some chopped pecans or cranberries for an even more seasonal touch.
Serving Suggestions
These Spooky Ghost Brown Butter Pumpkin Cookies are a treat in themselves, but pairing them with a warm cup of spiced cider or your favorite hot chocolate elevates the experience. Consider serving them on a festive platter to create a whimsical centerpiece for your a Halloween soirée. Guests will love the homage to the season!
Variations & Substitutions
If you’re feeling adventurous, here are some delicious ideas:
- Different Flavors: Try adding white chocolate chips or even a drizzle of caramel over the top for a rich twist.
- Gluten-Free Option: Substitute all-purpose flour with a gluten-free blend.
- Dairy-Free Adjustment: Use coconut oil and dairy-free chocolate to create a version for those with dietary restrictions.
- Seasonal Variations: At Thanksgiving, make them pumpkin pie-shaped and top with turkey-themed decorations!
Nutrition & Storage Info
- Prep Time: 30 minutes
- Cook Time: 14 minutes
- Total Time: 44 minutes
- Yield: 24 cookies
- Estimated Calories per Serving: Approximately 150 calories per cookie (depending on frosting and size)
- Storage Instructions: Room temperature for up to 5 days, fridge for a week, or freeze for up to 3 months.
FAQ Section
Can I use fresh pumpkin instead of canned?
Yes! Just make sure it’s well-pureed and drained of excess moisture.What can I substitute for brown butter?
If you’re short on time, melted regular butter works, but you’ll miss the unique flavor of brown butter.How do I know when the cookies are done?
The edges should be set, and the centers slightly puffy and soft.Can I make these cookies without pumpkin spice?
Absolutely, you can use just cinnamon or any other spice blend you prefer.Are there alternatives for candy melts?
You can use chocolate chips in place of candy melts; just melt them and use the same piping technique.Can I decorate these cookies with regular frosting?
Yes, royal icing would be a great alternative for toppings!What if my cookies spread too much?
This could be due to too much butter; make sure to cool the brown butter sufficiently before mixing.Can I freeze these cookies?
Yes! Freeze them individually on a baking sheet and then transfer to an airtight container.What’s the best way to store decorated cookies?
Place parchment paper between layers to prevent sticking.How long will the cookies last?
Stored correctly, they can last up to 5 days at room temperature or a few weeks in the freezer.
Conclusion
These Spooky Ghost Brown Butter Pumpkin Cookies are more than just a treat; they’re a celebration of everything that makes fall magical—from the cozy spices to the hauntingly delightful designs. I encourage you to give this recipe a try and share the joy with family and friends. Your kitchen will be filled with laughter, warmth, and the scent of pumpkin spice that will have everyone coming back for seconds.
I can’t wait to hear how your cookies turn out! Join the conversation in the comments below and check out my other seasonal recipes for more inspiration.
Iced Pumpkin Cookies: A Sweet Fall Treat
Happy baking!
Print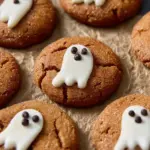
Spooky Ghost Brown Butter Pumpkin Cookies
- Total Time: 44 minutes
- Yield: 24 cookies 1x
- Diet: Vegetarian
Description
Delightful cookies combining brown butter and pumpkin to create hauntingly delicious treats perfect for fall and Halloween.
Ingredients
- 1 batch brown butter
- 1 cup pumpkin puree
- 1 cup granulated sugar
- 1 cup brown sugar (packed)
- 1 large egg (at room temperature)
- 2 cups all-purpose flour (sifted)
- 1 teaspoon baking soda
- 1 teaspoon baking powder
- ½ teaspoon salt
- 1 tablespoon pumpkin spice
- White chocolate (for draping)
- Black candy melts (for faces)
- Piping bag
- Medium cookie scoop
- Light colored baking pans
Instructions
- Preheat your oven to 350°F (175°C).
- In a saucepan, melt 1 batch of butter until browned and nutty (about 5-8 minutes). Let cool slightly.
- In a mixing bowl, combine brown butter, granulated sugar, and brown sugar until fluffy (2-3 minutes). Add egg and pumpkin puree, mixing until combined.
- In a separate bowl, whisk together flour, baking soda, baking powder, salt, and pumpkin spice.
- Gradually mix dry ingredients into the wet mixture until just combined. Do not overmix!
- Using a medium cookie scoop, drop spoonfuls of dough on light baking pans lined with parchment paper.
- Bake for 12-14 minutes until edges are set but centers are still gooey.
- Allow cookies to cool on a rack.
- Melt white chocolate and dollop onto each cooled cookie, creating ghost shapes.
- Melt black candy melts, pipe eyes and mouths onto cookies, and allow to dry.
Notes
Ensure butter is at room temperature before mixing. Use organic ingredients when possible for enhanced flavor.
- Prep Time: 30 minutes
- Cook Time: 14 minutes
- Category: Dessert
- Method: Baking
- Cuisine: American
Nutrition
- Serving Size: 1 cookie
- Calories: 150
- Sugar: 10g
- Sodium: 125mg
- Fat: 6g
- Saturated Fat: 3g
- Unsaturated Fat: 2g
- Trans Fat: 0g
- Carbohydrates: 22g
- Fiber: 1g
- Protein: 2g
- Cholesterol: 20mg
Ask the Community
🥗 Free Custom Keto Meal Plan?
Do you want to lose weight while still enjoying delicious Asian & Thai Fusion meals? Take this quick quiz to get your personalized Keto plan based on your favorite foods!
- ✅ No more guessing what to eat
- ✅ Delicious & easy-to-make recipes
- ✅ Tailored to your body type
Get My Custom Plan Now! →
*Over 100,000+ people have transformed their lives with this quiz.