Table of Contents
Table of Contents
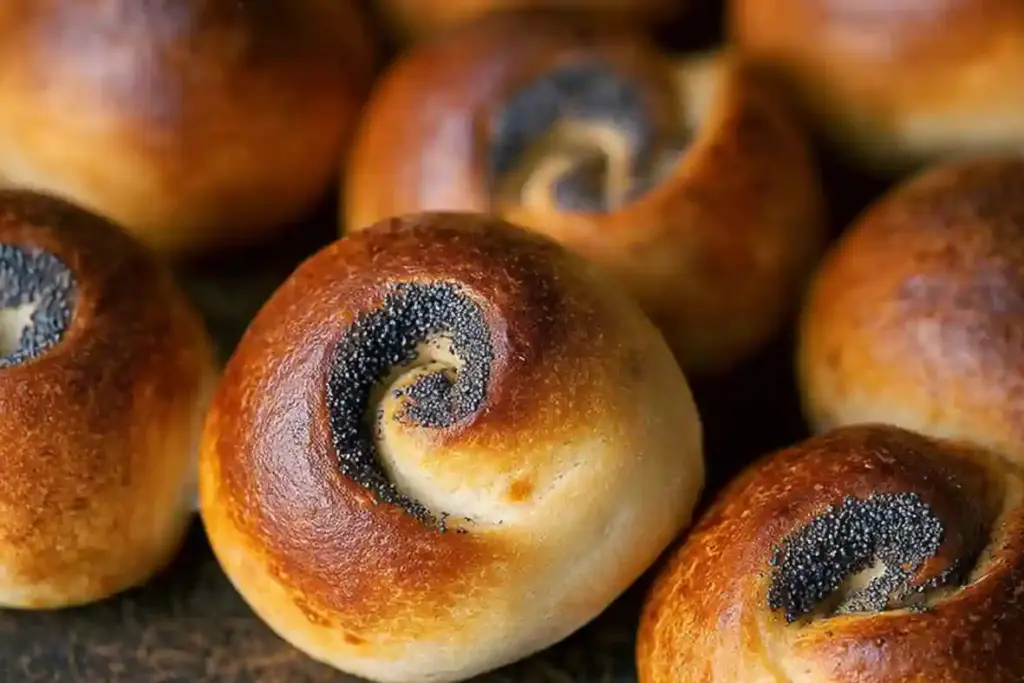
If you’ve ever wandered into a local bakery and been greeted by the sweet, nutty aroma of freshly baked Poppy Seed Buns, you know just how comforting that moment can feel. I still remember the sunny Saturday mornings spent in my grandmother’s kitchen, where she would whip up these little spirals of joy. With each bite, the crunch of the poppy seeds paired perfectly with that soft, buttery dough – it felt like a warm hug from the inside.
These buns are more than just a treat; they’re a connection to family memories and the simple pleasures of life. While many recipes might skip over the essential details or rely on premade dough, I’ve refined this classic to create a version that makes your taste buds dance with every mouthful.
In this recipe, I’ll share the secrets that make my Poppy Seed Buns stand out from the crowd. Expect helpful tips, delightful twists, and a sprinkle of love that you can pull into your own kitchen. Get ready to savor the experience as I guide you through creating these delightful buns, where every bite tells a story.
What Are Poppy Seed Buns?
Poppy Seed Buns have a rich heritage that stretches across many cultures, embodying comfort and celebration in their doughy depths. Traditionally found in European kitchens, these buns are made with a sweet, soft pastry dough enveloping a fragrant poppy seed filling, often enhanced with hints of citrus or vanilla. The unique blend of flavors creates an irresistible experience: imagine biting into a pillow of dough, with a lightly crunchy exterior giving way to a sweet, nutty-rich interior.
The texture is a crucial part of the appeal; they are soft yet sturdy, a perfect canvas to hold the filling. Whether served warm out of the oven or enjoyed at room temperature, these buns make the ideal companion for a morning coffee or as an afternoon snack. You can whip them up for special occasions, a leisurely Sunday brunch, or just as a delightful weekday treat to brighten your mood.
Why You’ll Love This Recipe
- Freshness Over Factory-Made: While store-bought versions can be convenient, nothing compares to the aroma of fresh Poppy Seed Buns baking in your oven. Plus, you get to control every ingredient – no preservatives or artificial flavors here!
- Cost-Effective: Making your own buns saves you money without sacrificing quality or taste. A few pantry staples transform into a bakery masterpiece that’s sure to impress family and friends.
- Customizable Options: Whether you prefer a hint of lemon zest, a dash of cinnamon, or even a drizzle of honey, this recipe welcomes personalization. Want to go vegan? Swap out the egg and use flaxseed or almond milk to create your perfect twist!
- Ease of Preparation: While the process might look intricate, making Poppy Seed Buns is surprisingly straightforward. With minimal equipment and just a bit of patience, you’ll enjoy bakery-quality results right at home.
- Family Tradition: Engage your loved ones in the baking process! Whether you’re teaching your kids or making a batch for a family gathering, this recipe creates lasting memories and delicious treats.
Ingredients Section
For the Poppy Seed Filling
- 1 poppy seed filling: Look for high-quality, finely ground poppy seeds. If you can, buy from a trusted brand or local store to ensure freshness.
For the Perfect Pastry Dough
- 2 1/2 cups all-purpose flour: I love using King Arthur’s flour for its quality!
- 1/2 cup unsalted butter, room temperature: Ensure it’s soft but not melted to achieve the right texture.
- 1/2 cup milk: Whole milk gives the best flavor, but feel free to use any milk alternative if you have dietary restrictions.
- 1 packet (2 1/4 tsp) active dry yeast: Always store your yeast in the fridge for freshness.
- 1 egg, room temperature: Crack it ahead of time, so it’s easier to incorporate.
- 1 tbsp sugar: This helps feed the yeast, ensuring a perfect rise!
Prep Notes
- Before you start, make sure all your ingredients are at room temperature, especially the butter and milk, for a smooth dough.
Step-by-Step Instructions
- Prepare the Dough:
- In a small bowl, combine the warm milk and yeast. Let it sit for about 5-10 minutes until foamy – this means your yeast is alive and ready!
- Mix the Ingredients:
- In a large mixing bowl, combine the flour, sugar, and salt. Then, mix in the softened butter until the mixture resembles coarse crumbs.
- Pour in the yeast mixture and the room-temperature egg. Stir until a dough forms.
- Knead the Dough:
- Turn the dough onto a floured surface and knead for about 8-10 minutes until smooth and elastic. Pro tip: The dough should spring back when you poke it gently.
- First Rise:
- Place the dough in a greased bowl, cover it with a clean kitchen towel, and let it rise in a warm spot for about 1 hour, or until it doubles in size.
- Roll Out the Dough:
- After rising, punch down the dough gently to release air. Roll it out into a long, flat rectangle on a floured surface – about 12 x 18 inches.
- Prepare the Poppy Seed Filling:
- Spread the prepared poppy seeds evenly in the center of the dough.
- Form the Buns:
- Gently seal both ends of the dough, keeping the poppy seeds inside. Roll the dough into a spiral shape, starting from one long side.
- Shape the Buns:
- Slice the dough into 1-2-inch pieces. Arrange them, cut side up, on a lined baking sheet, leaving some space between each bun for rising.
- Second Rise:
- Cover the buns lightly with a towel and let them rise for about 30-45 minutes.
- Make the Glaze:
- Use a small bowl to whisk together the egg and sugar until combined.
- Glaze and Bake:
- Preheat your oven to 350°F (175°C). Brush each bun generously with the egg mixture.
- Bake for 25-30 minutes or until golden brown. You’ll know they’re ready when they smell heavenly and have a lovely golden hue.
- Cool and Enjoy:
- Let the buns cool for a few minutes before serving. Trust me, the wait is worth it!
Expert Tips & Tricks
- Please don’t rush the Rises: Allowing the dough to rise properly is crucial for its fluffy texture. If you’re in a cooler environment, it may take longer, so be patient!
- Use Fresh Ingredients: The fresher your yeast and poppy seeds, the better your buns will taste. Check expiration dates, especially on dry ingredients.
- Customize Your Filling: Feel free to incorporate ground nuts, citrus zest, or chocolate chips into your poppy seed filling for variety.
- Make-Ahead Instructions: Prepare the dough the night before, let it rise, and then refrigerate overnight. In the morning, take it out and let it come to room temperature before shaping and baking.
- Storage Recommendations: Store leftover buns in an airtight container at room temperature for up to 3 days. For more extended storage, freeze them in a zip-top bag for up to a month.
- Common Pitfalls: Be cautious not to over-knead your dough. If it becomes too harsh and rigid to work with, it won’t create that lovely soft texture we want.
Serving Suggestions
These delightful Poppy Seed Buns are perfect on their own, but why not elevate your experience? Serve them warm with a pat of butter or a dollop of homemade jam for a sweet twist. Pair them with a steaming cup of coffee or tea for a cozy afternoon indulgence. You can also feature these buns on your brunch table for celebrations, adding a touch of elegance to any occasion.
Present them artfully on a cake stand, dusted with powdered sugar, or glaze with a sweet citrus icing for an aesthetically pleasing touch that will dazzle your guests.
Variations & Substitutions
- Flavor Combinations: Aside from classic poppy seed, experiment with fillings like matcha, almond paste, or even Nutella for a delicious surprise that caters to your palate!
- Dietary Restrictions: Make these buns gluten-free by using a gluten-free all-purpose flour blend and ensuring the poppy seed filling is compliant. You can also replace the egg with a flax mixture (1 tablespoon of flaxseed meal + 3 tablespoons of water).
- Seasonal Variations: In autumn, consider adding pumpkin spice to the dough or filling, and for a refreshing summer twist, light citrus zest provides a bright touch!
Nutrition & Storage Info
- Prep Time: 30 minutes
- Cook Time: 30 minutes
- Total Time: 1 hour 15 minutes (plus rising time)
- Yield: 12 buns
- Estimated Calories per Serving: 180 calories
- Storage Instructions:
- Store at room temperature for up to 3 days or in the fridge for up to a week.
- Freeze in an airtight container for up to 1 month.

FAQ Section
- Can I use whole wheat flour?
- Absolutely! Whole wheat flour can be used, but consider mixing half with all-purpose flour for a lighter texture.
- What should I do if my dough won’t rise?
- Check the freshness of your yeast and ensure you’re in a warm environment. If all else fails, you can create a warm box by preheating your oven for a minute, turning it off, and placing the dough inside.
- Can I make these buns without poppy seeds?
- Yes! Feel free to substitute the poppy seed filling with any nut butter, fruit preserves, or even a sweet chocolate spread if you prefer a gaudier flavor!
- How do I know if my buns are done baking?
- They should be golden brown on top, and if you tap the bottom, it should sound hollow. An instant-read thermometer should register 190°F (88°C).
- Can I double the recipe?
- Of course! Just be sure to have enough space on your baking sheets and keep a close eye on baking times, as it may need a bit longer in the oven.
- What do you recommend if I don’t have poppy seeds?
- Substitute other seeds like sesame or a sweet nut filling combined with brown sugar or caramelized nuts.
- How can I make these vegan?
- Substitute the egg with a flax egg (1 tbsp flaxseed meal + 2.5 tbsp water) and use plant-based butter and milk; the result will be just as delicious!
- Can I freeze baked buns?
- Yes! Just make sure to cool them completely first, then wrap each bun in plastic wrap and store them in a freezer-safe bag.
- How do I warm them up after freezing?
- You can heat them in the oven at 350°F (175°C) for 10-15 minutes or in the microwave for 20-30 seconds, but watch out for overcooking!
- What can I serve alongside the buns?
- A light salad, a cup of tea or coffee, or even a selection of cheeses can complement this baked treat perfectly!
Conclusion
There you have it! A gorgeous and delightful way to bring Poppy Seed Buns into your life and the lives of those you love. They’re a slice of heaven you can recreate at home, filled with warmth and joyful memories. I can’t wait for you to try this recipe! Please let me know how it goes, and feel free to share your experiences in the comments. And if you’re looking for other delightful treats, check out my other cozy baking recipes on the blog – there’s plenty more to love! 🍞💖
Fluffy Lemon Poppy Seed Muffins
Strawberry Salad with Poppy Seed Dressing
Print
Poppy Seed Buns
- Total Time: 2 hours 30 minutes
- Yield: 12 buns
- Diet: Vegetarian
Description
Soft, slightly sweet yeast buns filled with rich poppy seed paste, a traditional Eastern European pastry perfect for breakfast or afternoon tea.
Ingredients
For the Poppy Seed Filling
- 1 poppy seed filling
For the Perfect Pastry Dough
- 2 1/2 cups all-purpose flour
- 1/2 cup unsalted butter, room temperature
- 1/2 cup milk
- 1 packet (2 1/4 tsp) active dry yeast
- 1 egg, room temperature
- 1 tbsp sugar
Instructions
- Let the buns cool for a few minutes before serving. Trust me, the wait is worth it!
- Let the buns cool for a few minutes before serving. Trust me, the wait is worth it!
- Let the buns cool for a few minutes before serving. Trust me, the wait is worth it!
- Prepare the Dough:
- In a small bowl, combine the warm milk and yeast. Let it sit for about 5-10 minutes until foamy – this means your yeast is alive and ready!
- Mix the Ingredients:
- In a large mixing bowl, combine the flour, sugar, and salt. Then, mix in the softened butter until the mixture resembles coarse crumbs.
- Pour in the yeast mixture and the room-temperature egg. Stir until a dough forms.
- Knead the Dough:
- Turn the dough onto a floured surface and knead for about 8-10 minutes until smooth and elastic. Pro tip: The dough should spring back when you poke it gently.
- First Rise:
- Place the dough in a greased bowl, cover it with a clean kitchen towel, and let it rise in a warm spot for about 1 hour, or until it doubles in size.
- Roll Out the Dough:
- After rising, punch down the dough gently to release air. Roll it out into a long, flat rectangle on a floured surface – about 12 x 18 inches.
- Prepare the Poppy Seed Filling:
- Spread the prepared poppy seeds evenly in the center of the dough.
- Form the Buns:
- Gently seal both ends of the dough, keeping the poppy seeds inside. Roll the dough into a spiral shape, starting from one long side.
- Shape the Buns:
- Slice the dough into 1-2-inch pieces. Arrange them, cut side up, on a lined baking sheet, leaving some space between each bun for rising.
- Second Rise:
- Cover the buns lightly with a towel and let them rise for about 30-45 minutes.
- Make the Glaze:
- Use a small bowl to whisk together the egg and sugar until combined.
- Glaze and Bake:
- Preheat your oven to 350°F (175°C). Brush each bun generously with the egg mixture.
- Bake for 25-30 minutes or until golden brown. You’ll know they’re ready when they smell heavenly and have a lovely golden hue.
- Cool and Enjoy:
- Let the buns cool for a few minutes before serving. Trust me, the wait is worth it!
Notes
For finer texture, grind poppy seeds twice in electric grinder,Dough can be refrigerated overnight after first rise,Substitute 1/2 cup jam for poppy filling if preferred,Best eaten same day but can be frozen for up to 1 month
- Prep Time: 30 minutes (plus rising)
- Cook Time: 25 minutes
- Category: Pastry
- Method: Baking
- Cuisine: Eastern European
Nutrition
- Serving Size: 1 bun
- Calories: 320
- Sugar: 18g
- Sodium: 120mg
- Fat: 14g
- Saturated Fat: 6g
- Unsaturated Fat: undefined
- Trans Fat: undefined
- Carbohydrates: 42g
- Fiber: 3g
- Protein: 7g
- Cholesterol: 60mg
Ask the Community
🥗 Free Custom Keto Meal Plan?
Do you want to lose weight while still enjoying delicious Asian & Thai Fusion meals? Take this quick quiz to get your personalized Keto plan based on your favorite foods!
- ✅ No more guessing what to eat
- ✅ Delicious & easy-to-make recipes
- ✅ Tailored to your body type
Get My Custom Plan Now! →
*Over 100,000+ people have transformed their lives with this quiz.