When it comes to creating the perfect treat that brings joy to both kids and adults, Layered Colorful Cookies are a standout choice. These vibrant cookies not only delight with their enchanting hues but also offer a delightful crunch that pairs beautifully with a soft center. Whether you’re planning a birthday celebration, holiday gathering, or just want to treat the family, this recipe is sure to spark interest and inspiration in the kitchen.
Why You’ll Love Layered Colorful Cookies
Perfect for Families, Quick, and Delicious
One of the best aspects of Layered Colorful Cookies is their family-friendly nature. This is a perfect recipe for involving kids in cooking, allowing them to express their creativity through colors and decorations. Additionally, the process is quick – no one wants to spend all day in the kitchen when baking should also be fun!
Nutritional Benefits and Simple Ingredients
Unlike many fancy desserts, these cookies utilize straightforward ingredients that you likely already have at home. While they are a treat, you can also sneak in some nutritional benefits by using less sugar or incorporating whole wheat flour. The simple, wholesome ingredients often lead to less guilt while indulging!
Flexibility and Adaptability
Layered Colorful Cookies provide incredible versatility. You can easily tweak the colors for different seasons or occasions, and they are budget-friendly, using common pantry staples. Don’t hesitate to experiment with various flavors and colors to make each batch unique.
Essential Ingredients for the Recipe
Ingredients
- 3 cups all-purpose flour
- 1/2 tsp baking powder
- 1/4 tsp salt
- 1 cup unsalted butter, softened
- 1 cup granulated sugar
- 1 large egg
- 2 tsp vanilla extract
- Gel food coloring (red, blue, yellow, green, etc.)
- 1 tbsp milk (if needed for consistency)
- Sanding sugar or sprinkles (optional, for decoration)
All-Purpose Flour
All-purpose flour serves as the backbone of our cookies, providing structure and stability. If you want to experiment, you could try a gluten-free blend or almond flour for a nutty flavor profile.
Unsalted Butter
Unsalted butter is key to achieving that rich taste and texture. If you’re looking for healthier alternatives, you might consider using coconut oil or margarine, though these will subtly alter the flavor.
Gel Food Coloring
The gel food coloring is what really makes these cookies pop. With more vibrant colors than liquid dyes, you can easily adjust how colorful your cookies become. Feel free to explore other shades or brands that suit your vision!
Ingredient Preparation
Step 1 – Preheat and Prep
Start by preheating your oven to 350°F (175°C). Line your baking sheets with parchment paper, ensuring an easy release after baking.
Step 2 – Mix Dry Ingredients
In a bowl, whisk together the flour, baking powder, and salt. This step ensures your dry ingredients are evenly distributed and ready to mix with the wet ingredients later.
Step 3 – Cream Butter and Sugar
In a large bowl, cream together the softened butter and granulated sugar until it’s light and fluffy. This process provides air to the cookies, making them soft yet slightly crisp on the outside.
Step-by-Step Cooking Instructions
Step 1 – Initial Preparation
You should first gather all your ingredients on the counter so you don’t miss anything during the mixing process. Preheating the oven as mentioned earlier is crucial, so allow it ample time to reach the desired temperature.
Step 2 – Ingredient Assembly
Add the egg and vanilla extract to your butter and sugar mixture. Gradually mix in the dry ingredients until combined. When a dough forms, divide the dough into three portions. Leave one portion plain, add red gel coloring to another, and blue to the third.
Step 3 – Cooking and Finishing Touches
Layer the colored doughs in the prepared baking sheet, pressing them gently to create a rainbow of colors. Bake for about 10-12 minutes, or until the edges start turning golden brown. Allow the cookies to cool on the sheet for a few minutes, then transfer them to a wire rack.
Tips for an Even Tastier Version
Adding Extra Ingredients
If you want an exciting twist, consider adding chocolate chips, nuts, or even dried fruits. These additions can enhance texture and flavor, turning your cookies into something truly unique!
Techniques to Enhance Flavor
Incorporating a touch of almond extract or lemon zest can elevate the cookie’s flavor profile. Experiment with spices like cinnamon or nutmeg for a seasonal twist.
Adjustments for Preferences
You can adjust the amount of sugar, or use alternatives like coconut sugar or honey to cater to dietary needs. Always ensure that you measure carefully to maintain the integrity of the cookies.
Recipe Variations and Adaptations
Vegetarian Option
This recipe is inherently vegetarian! However, for those looking to keep it vegan, substitute the egg with a flaxseed meal mixed with water, and use plant-based butter.
Gluten-Free or Low-Carb Option
A gluten-free flour blend can replace all-purpose flour if you’re catering to gluten sensitivities. For a low-carb version, try using almond flour or coconut flour but remember to adjust the ratios since they absorb moisture differently.
Other Adaptations
Customize your cookie colors and flavors to suit your occasion! Bright pastel colors work perfectly for Easter, while vibrant red and green are ideal for Christmas celebrations.
Serving Suggestions
Salad or Soup Ideas
To balance the sweetness of cookies, serve them with a light salad or a comforting bowl of soup. A refreshing cucumber salad complements the cookies beautifully!
Hearty Sides
For a more indulgent affair, pair them with warm homemade bread or roasted vegetables; the contrast will make for an exciting meal.
Drink Recommendations
Enjoy your cookies alongside a steaming cup of tea, or for a festive touch, serve with your favorite wine or a delicious mocktail.
Storage and Reheating Tips
How to Store Leftovers
Store your cookies in an airtight container at room temperature for up to a week. If you plan on keeping them longer, consider freezing them!
Reheating Techniques
If you want to refresh your cookies, pop them in the microwave for about 10 seconds, or place them in a preheated oven for a few minutes until warmed through.
Portioning Tips
This recipe yields quite a few cookies, making them perfect for sharing. For meal prep, consider portioning them out into snack bags that can easily be stored in the freezer.
Nutritional Information and Benefits
Nutritional Values per Serving
Each cookie contains approximately 150 calories, 2g protein, 8g fat, and 20g carbohydrates. They each pack a delightful sweetness without overpowering your dietary needs.
Ingredient Benefits
The butter contributes vitamins A and D, while the flour adds carbs and a bit of protein. Balance out the sweetness with nuts or dried fruits that add fiber too!
Recommended Portions
Limit yourself to one or two cookies per serving, especially if your goal is to maintain a balanced diet. Pair them with a nutritious meal to offset the treat.
Common Mistakes to Avoid
Issue 1 – Overmixing the Dough
Be gentle when mixing the dough; overmixing can lead to tough cookies. Aim for just combined consistency when incorporating your dry ingredients.
Issue 2 – Skipping Chilling Time
For best results, consider chilling the colored dough for about 30 minutes before baking, allowing for a firmer texture and better flavor development.
Issue 3 – Ignoring Oven Temperature
Ovens can vary; always use an oven thermometer for accurate readings. If the temperature is too hot, you might end up with burnt cookies!
Inspiring Conclusion
Layered Colorful Cookies are not only a feast for the eyes, but also a delightful treat that can bring everyone together in the kitchen. This recipe encourages creativity and experimentation, ensuring every batch is a unique experience. Whether you’re serving them for a festive gathering or simply indulging with your family, these cookies are sure to become a treasured favorite.
FAQ (Frequently Asked Questions)
- Can I prepare this recipe in advance?
Absolutely! You can prepare the dough a day ahead and keep it in the refrigerator. Just allow it to come to room temperature before baking. - What are the best substitutes for unsalted butter?
Coconut oil or margarine can serve as suitable alternatives if you’re aiming for a dairy-free option. - Can I freeze the cookies?
Yes, they freeze well! Just wrap each cookie individually in plastic wrap and store them in a freezer bag. - How can I make my cookies thicker?
You can chill your cookie dough before baking, and slightly increase the flour amount until the desired thickness is achieved. - Is it okay to use liquid food coloring instead of gel?
Yes, but note that liquid coloring may not yield as vibrant a result as gel food coloring. - What’s the best way to decorate these cookies?
Sprinkles are an easy and fun way to decorate, but you can also use icing or melt chocolate for extra flair. - Can I make these cookies for a gluten-free diet?
Definitely! Just substitute the all-purpose flour with a gluten-free flour blend. - How long should I bake them for?
Bake for 10-12 minutes, or until the edges are lightly golden brown. - Can I add flavors like lemon or almond?
Yes, both extracts can enhance the flavor amazingly! Just a small quantity can make a big difference. - What is the best way to store these cookies?
Keep them in an airtight container at room temperature or freeze for longer freshness.
Now, let your imagination run wild with colors and decorations, and most importantly, enjoy the joy of baking! Happy baking!
Keto Cookies: A Delicious Treat for Any Occasion
Print
Layered Colorful Cookies: A Fun and Festive Baking Adventure
- Total Time: 2 hrs (includes chilling)
- Yield: 24 cookies 1x
- Diet: Vegetarian
Description
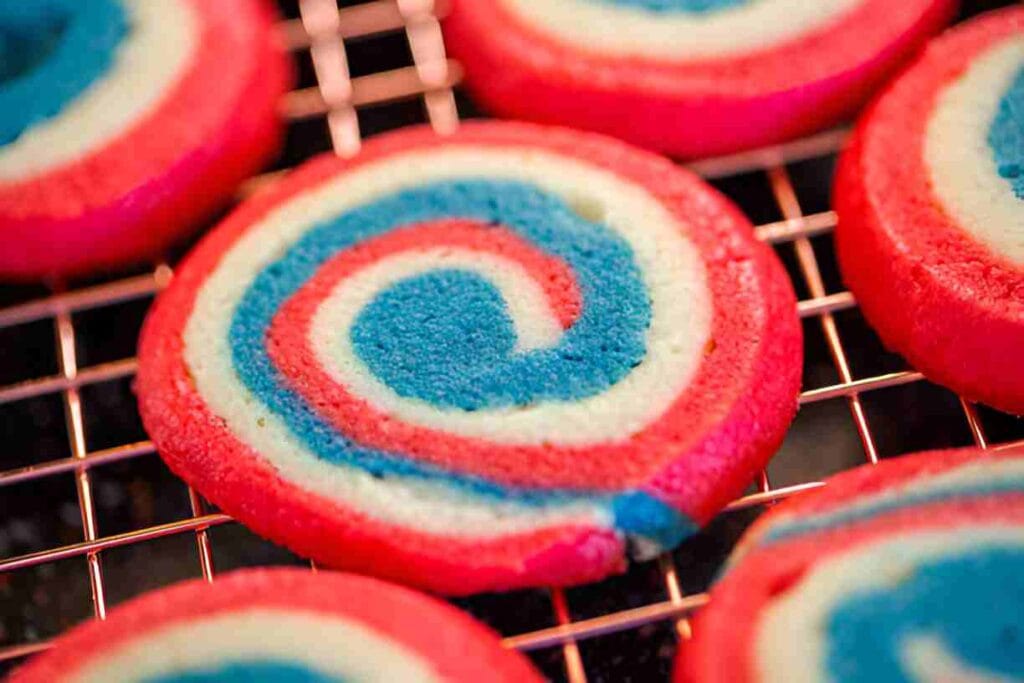
Buttery, colorful layered cookies with a striking striped or rainbow effect. Perfect for holidays, parties, or as edible gifts!
Ingredients
- 3 cups all-purpose flour
- 1/2 tsp baking powder
- 1/4 tsp salt
- 1 cup unsalted butter, softened
- 1 cup granulated sugar
- 1 large egg
- 2 tsp vanilla extract
- Gel food coloring (red, blue, yellow, green, etc.)
- 1 tbsp milk (if needed for consistency)
- Sanding sugar or sprinkles (optional, for decoration)
Instructions
- Mix dry ingredients: Whisk flour, baking powder, and salt in a bowl. Set aside.
- Cream butter & sugar: Beat butter and sugar until fluffy (3-4 mins). Add egg and vanilla.
- Combine: Gradually add dry ingredients to wet, mixing until a dough forms.
- Color the dough: Divide dough into equal portions. Add gel coloring to each and knead until vibrant (wear gloves!).
- Layer: Roll each color into a rectangle (¼-inch thick). Stack layers, brushing with milk between to adhere. Wrap in plastic and chill 1 hour.
- Slice & bake: Trim edges, then cut into ¼-inch slices. Place on parchment-lined sheets. Bake at 350°F (175°C) for 10-12 mins until edges are lightly golden.
- Cool: Let rest on baking sheet for 5 mins, then transfer to a rack. Decorate with sanding sugar if desired.
Notes
- Chilling is crucial for clean slices—freeze dough for 20 mins if too soft.
- For neater layers, roll dough between parchment paper.
- Store in an airtight container for up to 1 week.
- Use gel (not liquid) food coloring for bold hues without altering texture.
- Prep Time: 30 mins
- Cook Time: 12 mins
- Category: Dessert
- Method: Baking
- Cuisine: International
Nutrition
- Serving Size: 1 cookie
- Calories: 150
- Sugar: 9g
- Sodium: 35mg
- Fat: 8g
- Saturated Fat: 5g
- Unsaturated Fat: 2g
- Trans Fat: 0g
- Carbohydrates: 18g
- Fiber: 0g
- Protein: 2g
- Cholesterol: 25mg
🥗 Free Custom Keto Meal Plan?
Do you want to lose weight while still enjoying delicious Asian & Thai Fusion meals? Take this quick quiz to get your personalized Keto plan based on your favorite foods!
- ✅ No more guessing what to eat
- ✅ Delicious & easy-to-make recipes
- ✅ Tailored to your body type
Get My Custom Plan Now! →
*Over 100,000+ people have transformed their lives with this quiz.