
Table of Contents
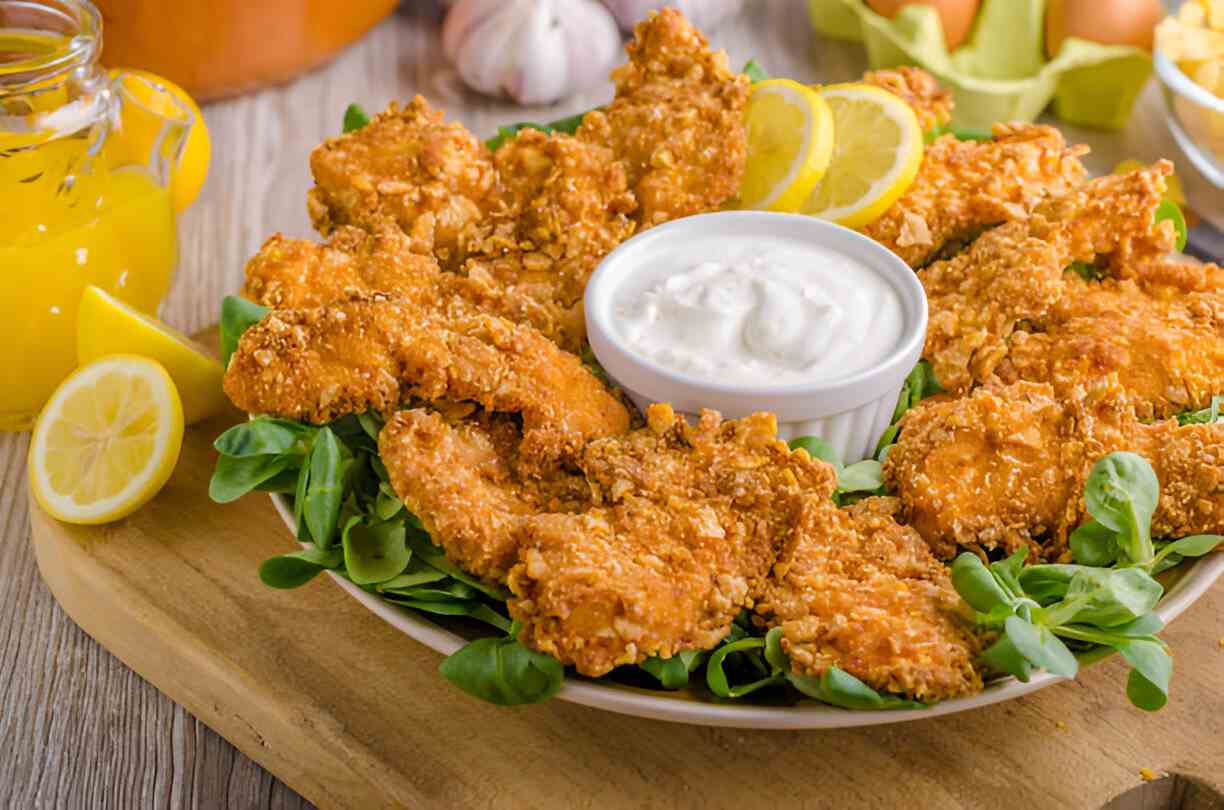
If you’re searching for the perfect comfort food that brings together the irresistible crunch of perfectly fried chicken with tender, juicy meat inside, then our Chicken Tenders Fried recipe is exactly what you need. In this comprehensive guide, you’ll discover an Easy Fried Chicken Tenders recipe that transforms simple ingredients into Crispy Fried Chicken Tenders you can enjoy at home. Whether you’re making Homemade Fried Chicken Tenders for a family dinner or a fun weekend treat, this article is packed with expert tips, detailed steps, and creative variations to help you create the ultimate dish every time.
Why You’ll Love Chicken Tender Fried
Our Chicken Tenders Fried recipe isn’t just a dish; it’s an experience that brings together family, flavour, and fun. Here’s why you’ll fall in love with it.
Perfect for Families, Quick, and Delicious
Imagine a dinner table filled with smiles as everyone enjoys a plate of golden, crispy chicken tenders that are juicy and full of flavor. This recipe is designed to be family-friendly—easy enough for a quick weeknight meal yet impressive enough to serve to guests. The crunchy coating and tender meat make each bite a delight, ensuring that even picky eaters will be asking for seconds.
Nutritional Benefits and Simple, High-Quality Ingredients
While fried foods are often seen as indulgences, our Homemade Fried Chicken Tenders recipe focuses on quality ingredients. We use lean chicken breast, fresh herbs, and whole-grain flour or breadcrumbs to create a dish that is satisfying without being overly greasy. With simple seasonings and controlled frying methods, you can enjoy a meal that balances indulgence with a nod to nutrition—giving you protein, essential vitamins, and a burst of flavour in every bite.
Flexibility and Budget-Friendliness
One of this recipe’s greatest strengths is its adaptability. Whether you’re on a budget or need to cater to dietary preferences, our Easy Fried Chicken Tenders recipe is flexible enough to adjust. You can substitute different flours, try a variety of spices, or even bake instead of frying if you’re looking for a healthier alternative. This versatility means you can tailor your dish to meet your needs while still creating Crispy Fried Chicken Tenders that are every bit as delicious as the original.
Essential Ingredients for the Recipe
The foundation of our Chicken Tenders Fried lies in selecting the right ingredients. Every element plays a role in achieving that perfect balance of crunch and tenderness.
Ingredients:
- 1 lb chicken tenders (or chicken breast cut into strips)
- 1 cup all-purpose flour
- 1 tsp garlic powder
- 1 tsp paprika
- 1/2 tsp salt
- 1/2 tsp black pepper
- 1/2 tsp onion powder (optional)
- 1 egg
- 1/4 cup milk
- 1 cup vegetable oil (for frying)
- Dipping sauces (e.g., ranch, honey mustard, BBQ)

Chicken Breast – The Tender Protein
For our recipe, high-quality chicken breast is key. It provides lean protein and a tender texture when cooked properly. For the best results, opt for organic or free-range chicken if available. You can also use chicken tenders if you prefer pre-cut pieces, but boneless chicken breast, sliced into strips, works just as well.
Flour or Breadcrumbs – The Crispy Coating
The coating is what makes the chicken tenders irresistible. A blend of all-purpose flour or flour and breadcrumbs creates a crunchy outer layer. For a gluten-free option, try using a gluten-free flour blend or crushed gluten-free crackers. This ingredient is essential for the signature crispy texture that defines Crispy Fried Chicken Tenders.
Seasonings and Spices – The Flavor Enhancers
The right spices are crucial to transform simple chicken into a flavorful delight. A combination of salt, pepper, garlic powder, paprika, and a touch of cayenne pepper gives the tenders a balanced heat and flavour. For a twist, you can add dried herbs like oregano or thyme. These seasonings not only enhance the taste but also add a vibrant aroma that makes your kitchen smell amazing.
Ingredient Preparation
Proper preparation sets the stage for success. Follow these steps to ensure your ingredients are ready to create the perfect Homemade Fried Chicken Tenders.
Step 1 – Prepping the Chicken
Begin by cutting the chicken breast into strips or using pre-cut tenders. Pat the chicken dry with paper towels to remove any excess moisture; this is crucial for achieving a crispy coating. Season the chicken lightly with salt and pepper, and set aside in a shallow dish. Allowing the chicken to come to room temperature for about 10–15 minutes can help it cook more evenly.
Step 2 – Creating the Coating Mixture
In a large bowl, combine your chosen flour or breadcrumbs with your blend of seasonings. Stir thoroughly to ensure the spices are evenly distributed. For a time-saving tip, prepare this coating mixture ahead of time and store it in an airtight container. This way, you’re ready to coat the chicken as soon as it’s prepped.
Step 3 – Preparing the Dipping Station
Set up a simple three-step station: one bowl with the seasoned coating mixture, one bowl with beaten eggs (you can add a splash of milk for extra richness), and a third plate for the coated chicken. This assembly line method makes the process quick and efficient, ensuring every piece of chicken is evenly coated for that perfect crunch.
Step-by-Step Cooking Instructions
Now that all your ingredients are prepped, it’s time to fry up your Chicken Tenders Fried and create an unforgettable meal. Follow these detailed instructions for success.
Step 1 – Initial Preparation
Preheat your oil in a deep fryer or a large, heavy skillet to 350°F (175°C). If you’re using a skillet, fill it with enough vegetable or canola oil to reach about 1–2 inches in depth. Use a thermometer to monitor the oil’s temperature, as maintaining the right heat is key to getting a crispy exterior without absorbing too much oil.
Step 2 – Coating the Chicken
Take each piece of chicken and first dip it into the beaten egg mixture, ensuring it’s fully coated. Then, dredge it thoroughly in your seasoned flour or breadcrumb mixture. Shake off any excess coating and place the chicken pieces on a tray. Work in small batches so that the oil temperature doesn’t drop too much when you add the chicken.
Step 3 – Frying and Finishing Touches
Carefully place the coated chicken pieces into the hot oil. Fry them in batches, ensuring that the pieces do not overlap. Cook each batch for 4-6 minutes, turning occasionally until the chicken is golden brown and crispy. The internal temperature of the chicken should reach 165°F (74°C) for safe consumption. Once done, transfer the fried chicken tenders to a paper towel-lined plate to drain any excess oil. For an extra touch, you can sprinkle a bit of extra salt while they are still hot. This step-by-step process guarantees Crispy Fried Chicken Tenders that are golden on the outside and tender on the inside.
Tips for an Even Tastier Version
Elevate your Homemade Fried Chicken Tenders with these expert tips and creative ideas that add an extra burst of flavour and texture.
Adding Extra Ingredients
Consider enhancing your coating mixture with extras like grated Parmesan cheese, finely chopped fresh herbs, or even a pinch of smoked paprika for a smoky flavour. Mix in a small amount of cornstarch with the flour for an even crispier finish. These additional ingredients help boost the flavour profile and add a delightful crunch to every bite.
Techniques to Enhance Flavor
For maximum flavour impact, try these techniques:
- Double Dipping: For an extra-crispy crust, dip the chicken in the egg and flour mixture twice before frying.
- Resting the Coated Chicken: Let the coated chicken sit for 10-15 minutes before frying. This helps the coating adhere better to the meat.
- Oil Temperature Management: Always monitor and maintain the oil temperature to ensure the chicken cooks evenly without becoming greasy. These simple adjustments can transform your Easy Fried Chicken Tenders into a truly gourmet experience.
Adjustments for Preferences
If you’re looking for a healthier alternative, consider baking your chicken tenders in the oven. Preheat your oven to 425°F (220°C), arrange the coated tenders on a baking sheet lined with parchment paper, and bake for about 20-25 minutes, flipping halfway through. This method will yield a delicious version of Homemade Fried Chicken Tenders with less oil but still plenty of flavor. You can also experiment with air frying for a similar result.
Recipe Variations and Adaptations
Cooking is all about creativity. Here are some exciting variations and adaptations of the Chicken Tenders Fried recipe to suit different tastes and dietary needs.
Vegetarian Option
For a meatless version, substitute chicken with tofu or tempeh. Press the tofu to remove excess moisture, cut it into strips, and marinate it with your favourite seasonings. Then, follow the same coating and frying steps. This adaptation creates a delicious vegetarian alternative that’s just as crispy and flavorful.
Gluten-Free or Low-Carb Option
If you’re following a low-carb diet, swap out traditional flour or breadcrumbs for a gluten-free blend or crushed pork rinds. Many gluten-free flours work well in creating a crispy coating, and these alternatives allow you to enjoy Crispy Fried Chicken Tenders without the gluten.
Other Adaptations for Seasonal Flavors
Incorporate seasonal ingredients to give your dish a fresh twist. For example, add a dash of lemon zest or a sprinkle of fresh rosemary to the coating during the summer, or mix in a pinch of cinnamon for a subtle warmth during the winter months. These seasonal adaptations ensure your Fried Chicken Tenders Recipe remains exciting and versatile all year round.
Serving Suggestions
Presentation is key to any great meal. Here are some creative ideas for serving your Chicken Tenders Fried that will impress your guests and elevate your dining experience.
Salad or Soup Ideas
Pair your crispy chicken tenders with a light, refreshing salad. A crisp Caesar salad or a mixed greens salad with a tangy vinaigrette is a perfect match. Alternatively, serve with a bowl of hearty tomato soup for a comforting and balanced meal.
Hearty Sides
For a more filling meal, consider serving your tenders with classic sides such as crispy French fries, coleslaw, or homemade macaroni and cheese. Garlic bread or a warm, buttery biscuit can also be an excellent accompaniment that soaks up every bit of the savoury sauce.
Drink Recommendations
Enhance your meal with the perfect beverage. A cold, refreshing lemonade or iced tea works wonderfully with the bold flavours of fried chicken. For an adult option, a light lager or a crisp white wine like Sauvignon Blanc pairs excellently with the dish. These drink choices round out the meal and complement the rich, savoury flavours of your Homemade Fried Chicken Tenders.
Storage and Reheating Tips
To enjoy your Chicken Tenders Fried even after leftovers, proper storage and reheating are crucial.
How to Store Leftovers
Allow your fried chicken tenders to cool completely before storing them in an airtight container. They can be kept in the refrigerator for up to three days. If you plan on keeping them longer, consider freezing them in a single layer on a baking sheet before transferring them to a freezer-safe container. Label the container with the date to ensure freshness when you’re ready to enjoy them later.
Reheating Techniques
For best results when reheating, use an oven instead of a microwave to maintain the crispiness. Preheat your oven to 350°F (175°C) and place the tenders on a baking sheet, reheating for 10-12 minutes until warmed through. If you prefer the microwave, reheat on medium power for 1-2 minutes, but be aware that this may reduce the crispiness slightly.
Portioning Tips for Meal Prep
For those who love meal prepping, divide your Easy Fried Chicken Tenders into individual portions. This way, you can quickly grab a satisfying snack or meal on busy days without having to reheat the entire batch. Pair each portion with a side of vegetables or a small salad to create a balanced meal.
Nutritional Information and Benefits
Understanding what goes into your meal can help you enjoy it as part of a balanced diet. Here is a breakdown of the nutritional aspects of our Homemade Fried Chicken Tenders.
Nutrition Information (per serving):
- Serving Size: 4 oz (about 2-3 tenders)
- Calories: 350
- Sugar: 1g
- Sodium: 400mg
- Fat: 15g
- Saturated Fat: 3g
- Unsaturated Fat: 10g
- Trans Fat: 0g
- Carbohydrates: 20g
- Fiber: 1g
- Protein: 30g
- Cholesterol: 100mg
Nutritional Values per Serving
A typical serving of our Chicken Tenders Fried dish (about 4-6 pieces) can provide roughly 400–600 calories, depending on the portion size and cooking method. The dish is rich in protein from the chicken and provides healthy fats from the oil used for frying. Although it’s an indulgence, you can enjoy it in moderation as part of a balanced diet.
Ingredient Benefits
- Chicken Breast: A lean source of protein, essential for muscle repair and overall health, while being relatively low in fat.
- Whole-grain flour/Breadcrumbs: Provide dietary fibre and complex carbohydrates that help maintain energy levels.
- Herbs and Spices: Offer antioxidants and anti-inflammatory properties that add both flavour and health benefits. Using high-quality ingredients ensures that each bite is not only delicious but also nutritious.
Recommended Portions
For a balanced meal, enjoy a serving of Chicken Tenders Fried alongside a generous portion of vegetables or a salad. This ensures you get a good mix of protein, carbs, and fibre, keeping your meal satisfying without overindulging.
Common Mistakes to Avoid
Even with the best recipes, common pitfalls can derail your results. Here are some mistakes to avoid when making Fried Chicken Tenders and tips to ensure perfect results every time.
Issue 1 – Overmixing the Meat Mixture
When preparing the meatball mixture for your tenders, be careful not to overmix. Overworking the meat can result in dense, tough tenders instead of light and tender pieces. Mix gently until just combined to preserve the texture.
Issue 2 – Incorrect Oil Temperature
Maintaining the correct oil temperature (around 350°F or 175°C) is crucial. If the oil is too hot, the coating will burn before the chicken cooks through; if it is too cool, the tenders will absorb too much oil and become greasy. Use a thermometer to monitor the oil, and adjust your heat as necessary.
Issue 3 – Inadequate Coating
A common mistake is not coating the chicken evenly. This can lead to some parts being too dry while others are overly greasy. Ensure every piece is thoroughly dipped in the egg wash and then fully covered in your seasoned flour or breadcrumb mixture. Pat off excess coating lightly for an even, crispy result.
Inspiring Conclusion
In conclusion, our Chicken Tenders Fried recipe is a celebration of flavour, texture, and the joy of home cooking. From the first crunch of the crispy coating to the tender, juicy chicken inside, every bite is a testament to the art of creating comfort food that is both delicious and satisfying. This recipe not only offers a classic, family-friendly meal but also provides endless opportunities for customization—whether you prefer a spicier kick, a healthier baked alternative, or a unique twist on the traditional version.
We encourage you to experiment with your variations of this Fried Chicken Tenders Recipe. Share your creations with family and friends, try out new seasonings, and enjoy the process of perfecting a dish that brings smiles and satisfaction to every table. After all, great cooking is all about sharing joy—and nothing beats a plate of Homemade Fried Chicken Tenders served with love.
FAQ (Frequently Asked Questions)
Below are answers to some common questions about our Chicken Tenders Fried recipe. We hope these insights help you achieve perfect results and inspire you to make this dish a regular favourite.
- Can I prepare this recipe in advance?
- Yes! You can cut and season the chicken and even set up your coating station ahead of time. Assemble the tenders just before frying for the best texture.
- What type of chicken works best for this recipe?
- Chicken breast is ideal for lean, tender meat. If you prefer, you can also use pre-cut chicken tenders, which are already portioned for perfect frying.
- How can I make the tenders extra crispy?
- Double-dip the chicken by repeating the egg wash and flour or breadcrumb coating. Additionally, allow the coated chicken to rest for 10 minutes before frying so the coating adheres better.
- What is the ideal oil temperature for frying?
- Maintain the oil at around 350°F (175°C). Use a deep-fry thermometer to monitor the temperature, ensuring that the tenders cook evenly without becoming greasy.
- Can I bake these tenders instead of frying them?
- Yes, for a healthier alternative, bake the coated tenders on a lightly oiled baking sheet at 425°F (220°C) for 20-25 minutes, flipping halfway through for even crisping.
- What are good dipping sauces for these tenders?
- Serve your Homemade Fried Chicken Tenders with a variety of sauces, such as honey mustard, barbecue sauce, ranch dressing, or even spicy Sriracha mayo for an extra kick.
- How do I prevent the chicken from becoming soggy?
- Ensure the chicken is patted dry before coating, and fry in small batches to avoid lowering the oil temperature. Let the tenders drain on paper towels immediately after frying.
- Can I use a coating different from flour or breadcrumbs?
- Absolutely. You can experiment with cornmeal for a different texture or use crushed crackers for an extra crunch.
- What sides pair well with these chicken tenders?
- They go wonderfully with a crisp coleslaw, French fries, a fresh garden salad, or even mashed potatoes for a more filling meal.
- How should I store leftovers?
- Any leftovers can be stored in an airtight container in the refrigerator for up to three days. To maintain crispiness, reheat in the oven for best results.
Chicken Tenders with Garlic Parmesan: The Ultimate Recipe Guide

Chicken Tenders Fried
Ingredients
- 1 lb chicken tenders (or chicken breast cut into strips)
- 1 cup all-purpose flour
- 1 tsp garlic powder
- 1 tsp paprika
- ½ tsp salt
- ½ tsp black pepper
- ½ tsp onion powder (optional)
- 1 egg
- ¼ cup milk
- 1 cup vegetable oil (for frying)
- Dipping sauces (e.g., ranch, honey mustard, BBQ)
Instructions
- Prepare the Coating:In a shallow bowl, mix flour, garlic powder, paprika, salt, black pepper, and onion powder.In another bowl, whisk together the egg and milk.Coat the Chicken:Dip each chicken tender into the egg mixture, then coat evenly with the flour mixture. Shake off any excess.Heat the Oil:Heat vegetable oil in a large skillet over medium-high heat (350°F/175°C).Fry the Chicken:Carefully place the coated chicken tenders in the hot oil. Fry for 3-4 minutes per side, or until golden brown and cooked through (internal temperature of 165°F/74°C).Remove and place on a paper towel-lined plate to drain excess oil.Serve:Serve hot with your favorite dipping sauces.
Notes
- For extra crispiness, double-coat the chicken by dipping it in the egg mixture and flour mixture twice.
- Use an air fryer for a healthier version: Cook at 400°F (200°C) for 10-12 minutes, flipping halfway through.
- Store leftovers in an airtight container for up to 3 days.