Discover the delightful taste and easy preparation of Roasted Garlic Aioli. This creamy dip is perfect for busy families and makes healthy eating delicious.
Roasted Garlic Aioli is not just another condiment; it’s a creamy, dreamy dip that elevates any dish it graces. Picture yourself dipping fresh veggies or slathering this creamy garlic delight on sandwiches and wraps; the flavour explosion is incredible! In today’s article, we will explore this wonderful recipe in-depth, unveiling its benefits and the delightful ways to serve it. Let’s get into why you need this aioli in your life!
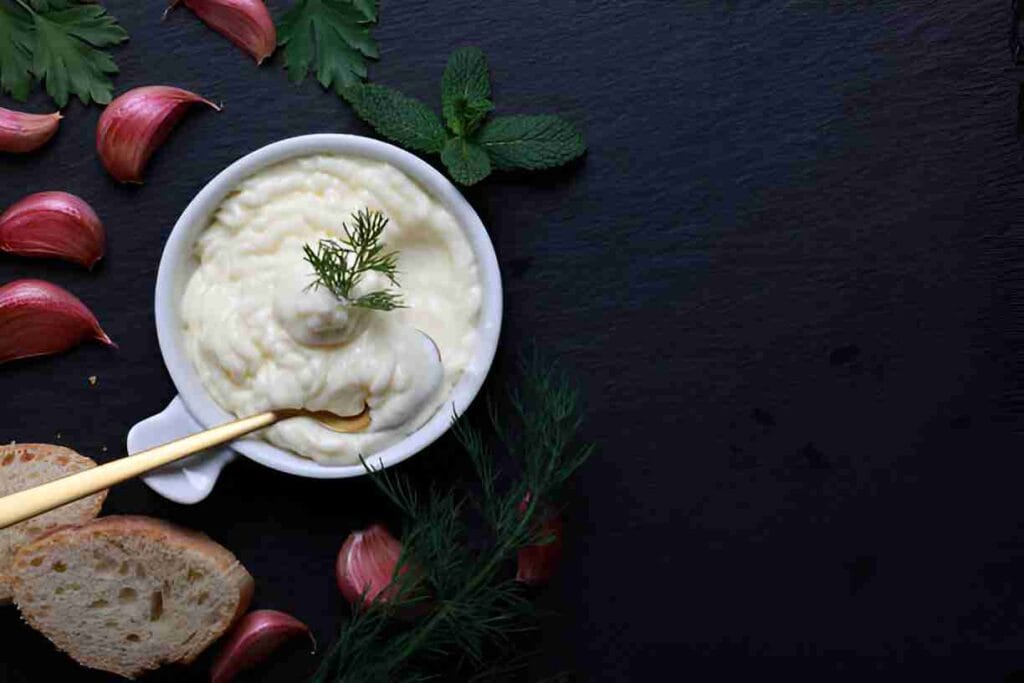
Table of Contents
Why You’ll Love Roasted Garlic Aioli
Family-Friendly Delight
The beauty of Roasted Garlic Aioli lies in its simplicity and deliciousness. Kids love dipping their veggies and fries in this creamy goodness, making it an easy way to sneak in some nutrition. You can whip it up in no time, turning ordinary meals into something special! It’s a great recipe to get the whole family involved in the kitchen.
Nutritional Benefits and Simple Ingredients
This creamy spread is made from basic and accessible ingredients, ensuring you can whip it up any time. The stars of this recipe—garlic and olive oil—are packed with nutrients and health benefits. Olive oil is rich in healthy monounsaturated fats, while garlic boasts immunity-boosting properties. What’s not to love?
Flexible and Adaptable
Roasted Garlic Aioli is a superstar when it comes to versatility. You can easily customize it to meet your dietary preferences or ingredient availability. Whether you’re out of one ingredient or prefer a different flavour profile, this aioli can evolve based on what’s in your pantry. It’s a budget-friendly and creative way to enhance any dish!
Essential Ingredients for the Recipe
Ingredients:
- 1 whole garlic bulb
- 1 tsp olive oil (for roasting)
- 2/3 cup mayonnaise
- 1 tbsp lemon juice
- 1/2 tsp Dijon mustard
- 1/4 tsp salt
- 1/8 tsp white pepper
- 1 tsp warm water (optional, for thinning)
Garlic
Garlic is the star ingredient in this recipe. Its robust flavor becomes mellow and sweet when roasted, turning this aioli into a rich experience. If you don’t have fresh garlic, you can use garlic powder, but the flavour won’t be as strong.
Olive Oil
Olive oil not only helps in roasting the garlic but also adds a wonderful creaminess to the aioli. You could switch it up and use avocado oil or even a light sesame oil for an interesting twist.
Mayonnaise
Mayonnaise serves as the base of this aioli, giving it that luscious texture. If you want a lighter version, you can use Greek yoghurt instead. It’ll still be creamy but with added protein!
Ingredient Preparation
Step 1 – Roasting the Garlic
Preheat your oven to 400°F (200°C) to prepare for the garlicky goodness. Cut off about 1/2 inch from the top of each garlic bulb, exposing the cloves. Drizzle each bulb with 1 tablespoon of olive oil and wrap them tightly in aluminium foil.
Step 2 – Roasting Perfection
Place the wrapped garlic bulbs on a baking sheet or directly on the oven rack. Allow them to roast for 45 minutes until the cloves are golden and soft. You’ll know it’s ready when your kitchen fills with that savoury aroma!
Step 3 – Blending Your Aioli
Once the garlic is roasted and cool enough to handle, squeeze the soft cloves into a food processor. Add the mayonnaise, the remaining olive oil, Dijon mustard, lemon juice, and zest. Blend until smooth. Taste and adjust the seasoning with salt and pepper.
Step-by-Step Cooking Instructions
Step 1 – Initial Preparation
Make sure your oven is preheated and you have all your ingredients gathered. This makes the entire process smoother and faster since everything is within reach.
Step 2 – Ingredient Assembly
Now that you’ve roasted the garlic blend all the ingredients in your food processor until the aioli is silky. This step is crucial for achieving the right texture, so give it a good blend!
Step 3 – Cooking and Finishing Touches
After blending, taste your aioli—this is your chance to tweak it! If it needs a little more brightness, add a touch more lemon juice. If it’s too thick, blend in a splash of water or extra olive oil.
Tips for an Even Tastier Version
Adding Extra Ingredients
Feel free to experiment! Add roasted red peppers for a smoky aioli or some fresh herbs, like basil or parsley, for a refreshing twist. Even a pinch of smoked paprika can add a lovely depth.
Techniques to Enhance Flavor
Consider marinating your garlic or adding spices like cayenne pepper or cumin for unexpected layers of flavour. Additional seasonings can turn this aioli into a flavour powerhouse!
Adjustments for Preferences
This recipe is very adaptable! For those on a vegan diet, swap mayonnaise for a vegan alternative or tahini. For those watching carbs, reduce the amount of mayo or add pureed avocado for a fresh twist!
Recipe Variations and Adaptations
Vegetarian Option
This aioli is already vegetarian, but if you’d like a twist, serve it alongside roasted vegetables for a hearty meal. The aioli pairs beautifully with almost any veggie you might have on hand!
Gluten-Free or Low-Carb Option
Serve this aioli with gluten-free crackers or fresh veggie sticks instead of bread. It makes for a satisfying snack without the carb heaviness.
Other Adaptations
Adapt the flavours based on seasons! Try adding seasonal spices like pumpkin spice in the fall or fresh chives and dill in spring for a fresh herbaceous flavour.
Serving Suggestions
Salad or Soup Ideas
Roasted Garlic Aioli is a perfect dipping sauce for salads. Consider trying it with a simple green salad drizzled over the top or a warm soup, particularly a creamy potato or vegetable soup.
Hearty Sides
Serve this aioli alongside homemade bread or oven-roasted vegetables. It’s an excellent comfort food that satisfies both your taste buds and your appetite.
Drink Recommendations
Pair your meal with refreshing drinks—sparkling water with lemon for a light touch, or even a nice white wine can complement the aioli beautifully.
Storage and Reheating Tips
How to Store Leftovers
Roasted Garlic Aioli can be refrigerated in an airtight container for up to a week, making it great for meal prep. Just make sure to keep it covered in the fridge to prevent it from absorbing other flavours.
Reheating Techniques
While you’re unlikely to need to reheat aioli, if you do, ensure it’s done gently so you don’t change its texture too much. A quick whisk or stir can help maintain its creaminess.
Portioning Tips
When storing, consider portioning it into small containers. This way, you can grab single servings whenever you need without worrying about the freshness of the entire batch.
Nutritional Information and Benefits
Nutritional Values per Serving
Roasted Garlic Aioli is rich in healthy fats, protein, and vitamins, making it perfect for dipping or spreading. Each serving contains about 100-150 calories, primarily from the healthy fats in olive oil and mayonnaise.
Ingredient Benefits
Garlic contains allicin, which is known for its heart health benefits. Olive oil is a powerhouse of antioxidants and also supports healthy cholesterol levels, while lemon juice adds a refreshing vitamin C boost.
Recommended Portions
A good serving size is about 2 tablespoons of aioli, which should be perfect for a dipping experience. This keeps it portion-controlled while allowing you to enjoy the creamy texture and taste.
Common Mistakes to Avoid
Issue 1 – Over-Roasting Garlic
One common error is over-roasting the garlic, which can turn it bitter. Keep an eye on your bulbs and ensure they’re perfectly golden.
Issue 2 – Skipping Seasoning
Don’t skip the salt and pepper! They enhance the flavor of your aioli significantly. Always taste and adjust as needed.
Issue 3 – Incorrect Consistency
If your aioli turns out too thick, you can always blend in a little water or lemon juice to achieve the right creamy texture.
Inspiring Conclusion
Roasted Garlic Aioli is a joy to make and enjoy. It brings everyone together at the table, allowing for shared experiences, laughs, and culinary adventures. Don’t hesitate to experiment with flavours and find your family’s favourite combinations.
Encourage your loved ones to dive into the cooking experience. Share your creations on social media or with friends—it’s always fun to see how everyone interprets the same recipe differently!
FAQ (Frequently Asked Questions)
- Can I prepare this recipe in advance? Absolutely! You can make aioli up to a week ahead of time; store it in an airtight container in the fridge.
- What are the best substitutes for garlic? If you don’t have fresh garlic, you can use roasted garlic powder, but the flavour won’t be as rich.
- How can I make this aioli vegan? Substitute the mayonnaise for a vegan version, or use tahini as a base.
- Can I freeze Roasted Garlic Aioli? It’s not recommended to freeze because it can change the texture, but it’s great for a week in the fridge!
- How do I adjust the flavour? Experiment with adding different herbs or spices based on your preference—think smoked paprika, fresh basil, or even chipotle powder for a kick!
- What can I serve with aioli? Roasted vegetables, fresh bread, crackers, or even as a spread on sandwiches are great options!
- Will the flavour change when stored? Aioli can become more garlicky over time as it sits; if you’re a garlic lover, you’ll appreciate this!
- How do I know if the aioli is done blending? It should be silky and smooth. If you see chunks of garlic, blend a little longer until it’s creamy.
- How can I make the aioli spicier? Add a dash of cayenne pepper or blend in some jalapeños for an exciting twist on the traditional flavour!
- Can I adjust the consistency of the aioli? If it’s too thick, add a little bit of water or extra olive oil until you reach your desired consistency.
This delightful Roasted Garlic Aioli recipe is not only easy to make but also brings a touch of gourmet to everyday meals. Enjoy experimenting with it, and happy cooking!
Mediterranean Seven Layer Dip: A Flavorful Journey
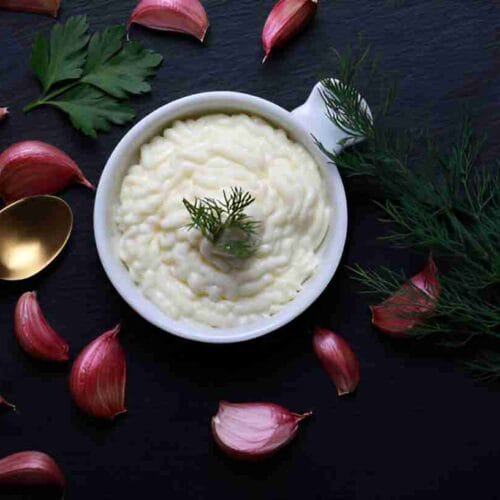
Roasted Garlic Aioli
Ingredients
- 1 whole garlic bulb
- 1 tsp olive oil (for roasting)
- 2/3 cup mayonnaise
- 1 tbsp lemon juice
- 1/2 tsp Dijon mustard
- 1/4 tsp salt
- 1/8 tsp white pepper
- 1 tsp warm water (optional, for thinning)
Instructions
- Roast Garlic: Slice garlic bulb top, drizzle with olive oil, wrap in foil, and roast at 400°F (200°C) for 40 minutes. Cool.Squeeze Paste: Press softened garlic cloves into a bowl.Blend: Whisk with mayonnaise, lemon juice, mustard, salt, and pepper until smooth.Adjust: Thin with water if needed.Chill: Refrigerate for 30+ minutes for flavors to meld.
Notes
- Stores refrigerated for up to 2 weeks.
- For quick version, use 1 tsp garlic powder (adjust to taste).
Ask the Community
🥗 Free Custom Keto Meal Plan?
Do you want to lose weight while still enjoying delicious Asian & Thai Fusion meals? Take this quick quiz to get your personalized Keto plan based on your favorite foods!
- ✅ No more guessing what to eat
- ✅ Delicious & easy-to-make recipes
- ✅ Tailored to your body type
Get My Custom Plan Now! →
*Over 100,000+ people have transformed their lives with this quiz.