

Indulging in a vibrant Red, White, and Blue Layer Cake is an excellent way to bring a splash of color and joy to any gathering. This eye-catching dessert is perfect for family barbeques, birthday parties, or festive occasions like the Fourth of July. Not only does it taste delicious, but it’s also straightforward to prepare with some essential ingredients and fun techniques. Let’s dive into this delightful cake recipe that celebrates flavor, convenience, and creativity.
Why You’ll Love Red, White, and Blue Layer Cake
Perfect for Families
This Red, White, and Blue Layer Cake is a fantastic recipe for families because it’s quick to make and even more fun to decorate. The kids will love getting hands-on with the layering, mixing, and frosting. Plus, it’s a visually stunning dessert that’s sure to impress both the young and the young-at-heart.
Nutritional Benefits
Though cakes are typically indulgent treats, you can make this version a tad more wholesome. It uses simple ingredients like eggs and oil, which provide some nutritional value. Additionally, the cake can be made with alternative flours to enhance its nutritional profile if desired.
Flexibility
This recipe is adaptable to fit various dietary preferences and occasions. Whether you want to swap out frosting for yogurt or incorporate seasonal fruits, the choices are abundant. Plus, it can be crafted on a budget without sacrificing taste or fun.
Essential Ingredients for the Recipe
Ingredients
- Cake Layers:
- 3 cups all-purpose flour
- 2 1/2 cups granulated sugar
- 1 tbsp baking powder
- 1 tsp salt
- 1 cup unsalted butter, softened
- 4 large eggs
- 1 cup whole milk
- 1 tbsp vanilla extract
- Red food coloring (gel-based for vibrancy)
- Blue food coloring (gel-based for vibrancy)
- Frosting:
- 2 cups unsalted butter, softened
- 6 cups powdered sugar
- 1/4 cup heavy cream
- 2 tsp vanilla extract
- Pinch of salt
- Decoration (optional):
- Red, white, and blue sprinkles
- Fresh berries (strawberries, blueberries)
Main Ingredient 1: White Cake Mix
The white cake mix serves as the cake’s foundation, providing texture and ease. If you’re feeling ambitious, you can prepare your cake mix from scratch using flour, baking powder, and sugar, but using a box mix speeds up the process without compromising flavor.
Main Ingredient 2: Food Coloring
The food coloring is crucial for achieving that vibrant layered effect. You can use gel food coloring for a more intense color that won’t alter the cake’s texture.
Main Ingredient 3: Frosting
Vanilla or cream cheese frosting adds richness and sweetness to the cake. Feel free to make your frosting homemade or choose store-bought for convenience. Experimenting with flavors can also yield delightful results, like chocolate or fruit-flavored frostings.
Ingredient Preparation
Step 1 – Get Ready to Bake
Start by preheating your oven to 350°F (175°C). Prepare three 9-inch round cake pans by greasing them with a bit of vegetable oil or butter and dusting with flour to prevent sticking. This ensures your layers come out smoothly.
Step 2 – Mix the Cake Batter
In a large mixing bowl, combine the white cake mix, eggs, vegetable oil, and water. Blend the ingredients according to the instructions on the package, usually three minutes at medium speed. This is also where you can divide the batter and add food coloring to two separate bowls—one red and one blue.
Step 3 – Prepare for Baking
Once colored, pour the red batter into one prepared pan, the blue batter into another, and leave the third pan for the plain batter. Use a spatula to level the batter evenly across the pans. Bake for 25-30 minutes or until a toothpick inserted into the center comes out clean. Allow the cakes to cool before frosting.
Step-by-Step Cooking Instructions
Step 1 – Initial Preparation
As previously mentioned, start by preheating your oven to 350°F (175°C). While it’s heating, gather your ingredients and baking equipment.
Step 2 – Ingredient Assembly
Mix the cake batter as per the instructions, adding your food coloring. Once mixed, evenly distribute the colored batters into the prepared pans, making sure they are not overflowing.
Step 3 – Baking and Finishing Touches
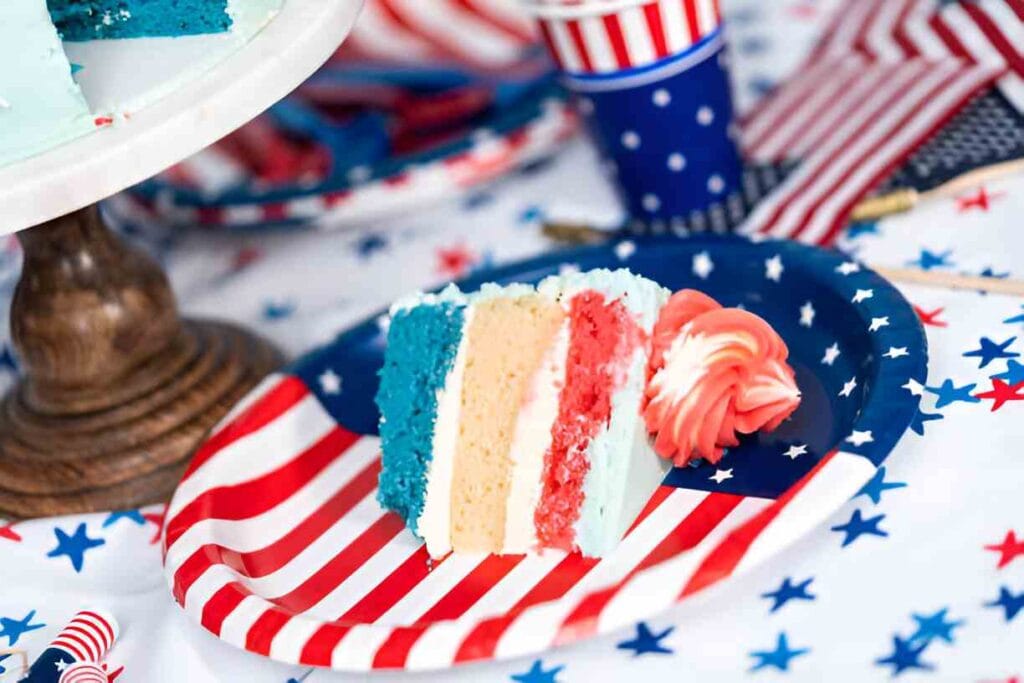
Bake your cakes for 25-30 minutes, checking for doneness with a toothpick. Once baked, allow them to cool in the pans for about 10 minutes before transferring them to wire racks to cool completely. Once cooled, layer them, starting with white, then red, and blue on top, ensuring they align properly. Frost the top and sides of the cake with your chosen frosting.
Tips for an Even Tastier Version
Adding Extra Ingredients
Consider incorporating mix-ins such as chocolate chips or nuts for added texture. You could also add a hint of vanilla extract or almond extract into the batter to elevate the flavor profile.
Techniques to Enhance Flavor
Using flavored syrups or extracts will allow you to create a more complex taste in the frosting. A sprinkle of salt or dash of lemon juice can balance the sweetness and enhance the overall flavor.
Adjustments for Preferences
For gluten-free options, consider using a gluten-free cake mix. Vegan alternatives are available too—coconut oil can replace vegetable oil, and flax eggs can substitute standard eggs.
Recipe Variations and Adaptations
Vegetarian Option
This recipe is naturally vegetarian since it uses plant-based ingredients. However, if preparing a meal with this cake, keep other components vegetarian-friendly.
Gluten-Free or Low-Carb Option
Opt for a gluten-free cake mix instead of the traditional white cake mix for a gluten-free layer cake. If you need a low-carb option, explore almond flour or coconut flour recipes that can mimic cake textures.
Other Adaptations
Seasonal twists can make this cake a year-round treat. Try incorporating pumpkin puree for an autumn theme or using vibrant berries to match the season’s freshest fruits.
Serving Suggestions
Salad or Soup Ideas
Pair this delightful cake with a light summer salad, such as a refreshing cucumber, tomato, and feta salad. Alternatively, a chilled gazpacho can offer a lovely contrast to the cake’s sweetness.
Hearty Sides
For more significant gatherings, consider serving homemade garlic bread or roasted vegetables to create a well-rounded meal. Their savory flavors nicely complement the sweetness of the cake.
Drink Recommendations
Beverages can enhance the whole dining experience. For a non-alcoholic choice, a cool lemonade or iced tea works well. For an adult option, consider sparkling wine or a light beer for a summer picnic.
Storage and Reheating Tips
How to Store Leftovers
Wrap any leftover cake tightly in plastic wrap or store it in an airtight container for freshness. This is essential to prevent the cake from drying out while in the fridge.
Reheating Techniques
For reheating, the microwave works best for individual pieces. If you’re looking to warm the entire cake, the oven on a low setting is preferable to avoid overcooking it.
Portioning Tips
Slice the cake into individual servings for easy meal prep. Place them in labeled containers for a quick grab-and-go treat throughout the week.
Nutritional Information and Benefits
Nutritional Values per Serving
The expected nutritional profile per slice (about 1/12 of the cake) can include around 250 calories, 3g protein, 35g carbohydrates, and approximately 15g sugar.
Ingredient Benefits
This cake offers some vitamins from eggs (B22 and D) and the healthy fats in vegetable oil. You can enhance this further with nutritional upgrades in your frosting or by adding fruits.
Recommended Portions
For special occasions, serving a slice of cake is perfect, but for family dinners, half-slices can keep everyone satisfied without overwhelming them.
Common Mistakes to Avoid
Issue 1 – Overmixing the Batter
Avoid overmixing your batter, as this can lead to a dense cake. Mix just until combined; lumps are okay.
Issue 2 – Incorrect Oven Temperature
Be mindful of your oven calibration; an incorrect temperature can lead to undercooked or burned layers. Always check with a thermometer if you suspect discrepancies.
Issue 3 – Skipping Cooling Time
Don’t rush the cooling process! If you frost before cooling, the warmth can cause the frosting to melt. Allow the layers to cool completely.
Inspiring Conclusion
The Red, White, and Blue Layer Cake is more than just a dessert—it’s a celebration of colors, flavors, and family moments. It’s special not only for its eye-catching design but also for the memories it creates while you bake with loved ones. So don’t hesitate to experiment with the recipe and make it your own. Wear your apron, grab your frosting spatula, and share your delightful creations with friends and family this season!
FAQ (Frequently Asked Questions)
- Can I prepare this recipe in advance?
Of course! You can bake the layers ahead of time and store them in the fridge or freezer. Simply frost them on the day you plan to serve. - What are the best substitutes for eggs in this recipe?
You can substitute each egg with 1/4 cup unsweetened applesauce, 1/4 cup mashed banana, or 1 tablespoon flaxseed meal mixed with 2.5 tablespoons of water. - Can I make this cake gluten-free?
Yes! Just use a gluten-free white cake mix, and your layers will stay fluffy and delicious. - What frosting works best with this cake?
Vanilla buttercream is a classic choice, but cream cheese frosting adds a nice tartness that pairs well with the sweetness. - How long does the cake last?
Stored properly, the cake will remain fresh for 3-5 days in the fridge. - Can I add fruit to the layers?
Sure! Fresh berries between the layers can add flavor and texture, but be careful as they can add moisture. - What can I use instead of vegetable oil?
Coconut oil, melted butter, or any other neutral oil can work well as substitutes. - Is this cake suitable for layering with other flavors?
Absolutely! Feel free to incorporate lemon or almond extract for an exciting twist, or layer with different flavored fillings. - How do I decorate the cake creatively?
Top your cake with fresh berries or even gummy candies in red and blue for a festive finish. You could also try edible glitter for extra flair! - How can I ensure my cakes are level?
To ensure level layers, you can use a serrated knife to trim the tops once they’ve cooled.
Embrace your inner baker, and have fun creating this festive Red, White, and Blue Layer Cake!
Southern Georgia Pecan Cake: A Delightful Southern Treat
PrintRed, White, and Blue Layer Cake: A Festive Delight for Every Celebration

A stunning and festive layered cake with red, white, and blue tiers, topped with creamy frosting and sprinkles. Perfect for celebrations!
- Prep Time: 45 mins
- Cook Time: 30 mins
- Total Time: 3 hrs (includes cooling & decorating)
- Yield: 12 servings 1x
- Category: Dessert
- Method: Baking
- Cuisine: American
- Diet: Vegetarian
Ingredients
- Cake Layers:
- 3 cups all-purpose flour
- 2 1/2 cups granulated sugar
- 1 tbsp baking powder
- 1 tsp salt
- 1 cup unsalted butter, softened
- 4 large eggs
- 1 cup whole milk
- 1 tbsp vanilla extract
- Red food coloring (gel-based for vibrancy)
- Blue food coloring (gel-based for vibrancy)
- Frosting:
- 2 cups unsalted butter, softened
- 6 cups powdered sugar
- 1/4 cup heavy cream
- 2 tsp vanilla extract
- Pinch of salt
- Decoration (optional):
- Red, white, and blue sprinkles
- Fresh berries (strawberries, blueberries)
Instructions
- Preheat oven to 350°F (175°C). Grease and line three 8-inch round cake pans.
- Make the batter: In a bowl, whisk flour, sugar, baking powder, and salt. Beat in butter, eggs, milk, and vanilla until smooth.
- Divide batter: Split into 3 equal portions. Color one red, one blue, and leave one plain (white).
- Bake: Pour each color into a separate pan. Bake for 25-30 mins or until a toothpick comes out clean. Cool completely.
- Make frosting: Beat butter until creamy, then gradually add powdered sugar, cream, vanilla, and salt until fluffy.
- Assemble: Stack layers (red, white, blue) with frosting between each. Frost the outside and decorate with sprinkles or berries.
- Chill for 1 hour before slicing for cleaner layers.
Notes
- Use gel food coloring for brighter, more vibrant layers.
- For a lighter cake, substitute buttermilk for whole milk.
- Freeze cake layers for 20 minutes before frosting for easier handling.
- Store covered in the fridge for up to 3 days.
Nutrition
- Serving Size: 1 slice
- Calories: 520
- Sugar: 58g
- Sodium: 220mg
- Fat: 28g
- Saturated Fat: 17g
- Unsaturated Fat: 8g
- Trans Fat: 0g
- Carbohydrates: 65g
- Fiber: 1g
- Protein: 4g
- Cholesterol: 120mg