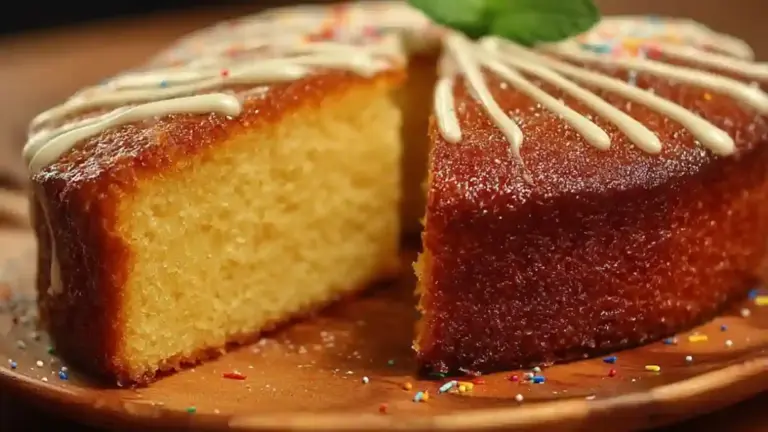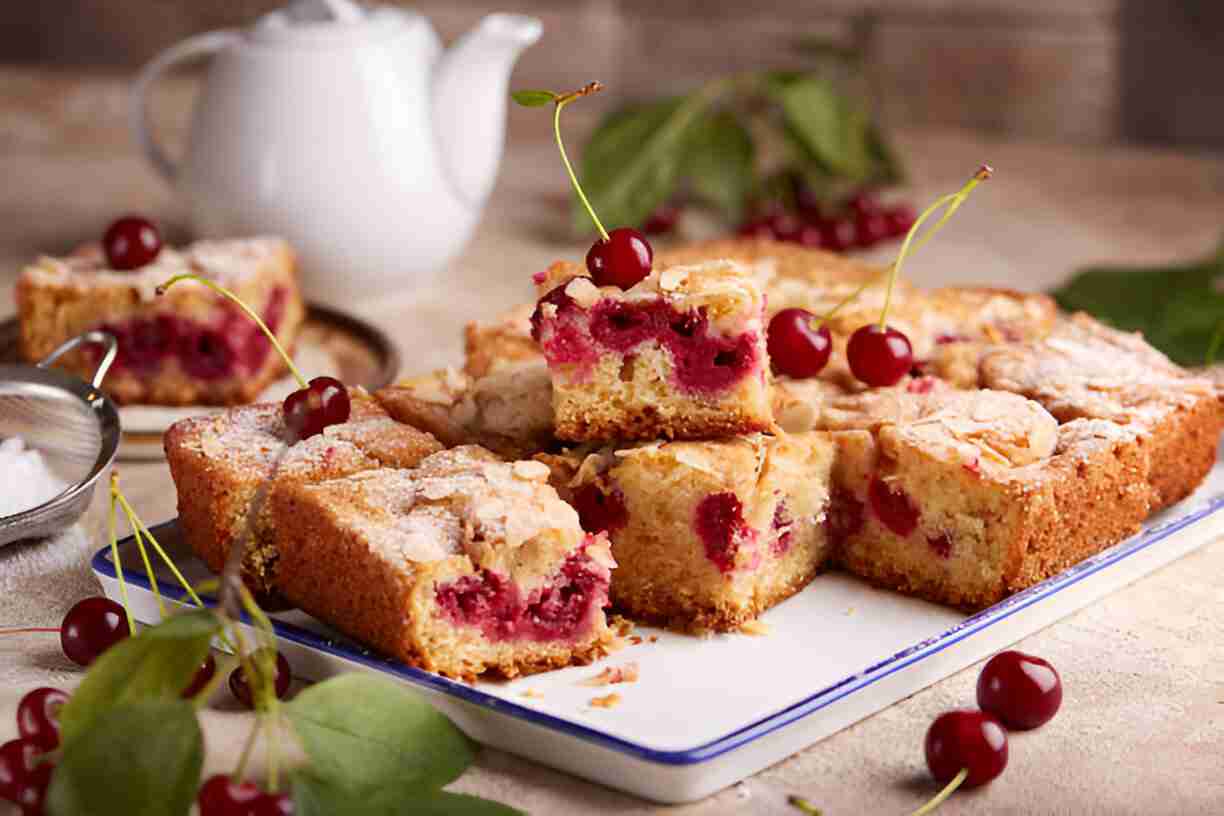
When you’re looking for a comforting dessert that both impresses and satisfies, Cherry Cake takes center stage. With its delicious blend of tender cake and sweet cherries, you won’t just love making this treat—you’ll love eating it, too! Whether you’re baking for a family gathering, a special occasion, or just a simple weekend treat, Cherry Cake is the perfect addition to any dessert table.
Why You’ll Love Cherry Cake
It’s Perfect for Families
Cherry Cake is an excellent choice for family gatherings or casual weeknight desserts. With its straightforward preparation and simple ingredients, anyone can join in on the fun of baking. Kids love to help mix and pour, making it a great bonding activity. Plus, watching their faces light up when they taste the warm cake is priceless!
Nutritional Benefits
This cake is a nice balance of sweetness and nutrition, thanks to the inclusion of cherries. Cherries are packed with antioxidants, vitamins, and minerals. They not only add a burst of fruity flavor but also contribute to a healthier dessert option. Swapping out heavy frosting for a light dusting of powdered sugar or a scoop of yogurt keeps the cake light and tasty.
Flexibility & Adaptability
Feeling adventurous? Cherry Cake is incredibly versatile. You can easily substitute cherries for other fruits such as blueberries, raspberries, or even diced apples, depending on your preferences or what you have on hand. It’s a budget-friendly recipe that allows for creativity without sacrificing flavor.
Essential Ingredients for the Recipe
Ingredients:
- 225g frozen cherries
- 115g unsalted butter, softened
- 170g sugar
- 2 large eggs
- 1 teaspoon vanilla extract
- 170g flour
- 1 teaspoon baking powder
- 1/2 teaspoon salt
Cherries
Cherries are the star of this recipe—their natural sweetness pairs perfectly with the tender cake. While we use frozen cherries for convenience, fresh ones work wonderfully too—just adjust the baking time slightly. If you don’t have cherries, you can use other stone fruits like peaches or plums as a substitute.
Butter
Unsalted butter adds rich flavor and moisture to the cake. If you’re aiming for a healthier version, replace some of the butter with applesauce, which retains moisture while reducing fat.
Sugar
Granulated sugar adds the sweetness we crave, but if you’re looking to cut down on sugar, you can replace half with a natural sweetener or even honey. Just be sure to adjust the liquid ingredients accordingly!
Ingredient Preparation
Step 1 – Prepare the Pan
Start by greasing a round springform pan and lining the base with baking paper. This prevents the cake from sticking and ensures that it comes out beautifully.
Step 2 – Get Those Cherries Ready
In a bowl, toss the frozen cherries with a tablespoon of flour. This helps prevent them from sinking during baking, ensuring that your cherry cake is beautifully speckled throughout.
Step 3 – Measure and Mix
Measure all your dry ingredients, including flour, baking powder, and salt, into a bowl. This step is critical for ensuring that your cake rises perfectly. Mix these dry ingredients thoroughly before moving on to the wet components.
Step-by-Step Cooking Instructions
Step 1 – Preheat Your Oven
Preheat your oven to 175 degrees Celsius (350 degrees Fahrenheit). This is essential for even baking! While it heats, you can combine other ingredients.
Step 2 – Cream Together Butter and Sugar
In a large mixing bowl, cream the softened butter and sugar until the mixture is light and fluffy. This step incorporates air into your batter, making for a light and tender cake. It typically takes about 2-3 minutes with a hand mixer.
Step 3 – Incorporate Eggs and Vanilla
Add the eggs one by one, mixing thoroughly after each addition. Stir in the vanilla extract to heighten the cake’s flavors. Remember, fresh ingredients like the vanilla bean will enhance the taste significantly!
Step 4 – Combine Dry and Wet Ingredients
Gradually add the dry flour mixture to the wet ingredients, mixing just until combined. Don’t overmix! Gently fold in the flour-dusted cherries, ensuring they’re evenly distributed throughout the batter.
Step 5 – Bake to Perfection
Transfer the batter to your prepared pan. Smooth the top with a spatula for even baking. Place it in the preheated oven and bake for 45-50 minutes, or until a toothpick inserted in the center comes out clean.
Step 6 – Cool and Serve
Allow the cake to cool in the pan for about 10 minutes before transferring it to a wire rack. Let it cool completely before dousing it with powdered sugar or serving it with a dollop of whipped cream. Your Cherry Cake is now ready to be enjoyed!
Tips for an Even Tastier Version
Adding Extra Ingredients
Want to amp up the flavor? Consider adding a splash of almond extract for a delightful twist. You could also fold in some chopped nuts, such as almonds or walnuts, for a satisfying crunch.
Techniques to Enhance Flavor
Add a touch of lemon zest to the batter for a fresh citrus note that pairs beautifully with the cherries. Additionally, consider sprinkling the top with some cinnamon before baking to enhance the warm flavors.
Adjustments for Preferences
For those following dietary restrictions, this recipe can easily adapt to gluten-free by substituting all-purpose flour with almond or coconut flour. Just be sure to adjust the liquid and consider adding a binding agent like a flaxseed meal.

Recipe Variations and Adaptations
Vegetarian Option
This Cherry Cake is naturally vegetarian, but if you’re looking for a vegan version, swap the eggs for flax eggs (1 tablespoon of ground flaxseed mixed with 3 tablespoons of water per egg) and use a vegan butter alternative.
Gluten-Free Option
For gluten-free Cherry Cake, use a 1:1 gluten-free flour blend. Be mindful that the texture may be slightly different, but it’ll still be delicious!
Other Adaptations
Change up the flavor profile for the seasons! In autumn, add in some cinnamon and nutmeg, while in the summertime, you could replace the cherries with ripe, juicy peaches.
Serving Suggestions
Salad or Soup Ideas
This cake pairs well with a fresh garden salad or a light soup for a balanced meal. A simple arugula salad with a lemon vinaigrette complements the sweetness of the cake beautifully.
Hearty Sides
For an additional treat, bake some homemade bread or serve alongside roasted vegetables. Their savory flavor balances the sweetness of the Cherry Cake.
Drink Recommendations
Complete the experience with a fine cup of tea or a glass of chilled white wine. For something refreshing, a fruit-infused mocktail would also make an excellent addition.
Storage and Reheating Tips
How to Store Leftovers
Store leftover Cherry Cake in an airtight container at room temperature for up to three days. For longer storage, wrap it tightly in cling film and freeze. It can last for up to three months in the freezer!
Reheating Techniques
To reheat, place a slice in the microwave for about 20-30 seconds or warm it in an oven at low heat until just heated through. Be careful not to dry it out!
Portioning Tips
If you’re meal prepping, consider slicing the cake before storing it. Not only does this make for easy snacking, but you’ll also retain its freshness.
Nutritional Information and Benefits
Nutritional Values per Serving
Each slice of Cherry Cake contains approximately 250 calories, 3g of protein, and 2g of fiber. The inclusion of cherries means you’re also getting antioxidants and vitamins.
Ingredient Benefits
Cherries offer significant health benefits, including reducing inflammation and providing vitamin C. The eggs and butter contribute protein and healthy fats, while the flour provides complex carbohydrates.
Recommended Portions
A typical serving size is one slice, but feel free to enjoy more if it’s a special occasion—you deserve it!
Common Mistakes to Avoid
Issue 1 – Overmixing the Batter
Overmixing can lead to a dense cake. Mix just until the ingredients are combined for a light and fluffy texture.
Issue 2 – Not Preheating the Oven
Failing to preheat your oven can lead to uneven baking. Always ensure your oven is ready before placing in the cake.
Issue 3 – Using the Wrong Pan
Using a different pan size can affect baking time. Stick to a round springform pan to achieve the best results.
Inspiring Conclusion
In conclusion, Cherry Cake is not just a dessert—it’s a feast for the senses, an opportunity to gather with friends and family, and a delicious way to bring sweetness into your life. I encourage you to experiment with the ingredients and adapt the recipe to your taste. Sharing your homemade Cherry Cake with loved ones will surely create cherished memories in the kitchen!
FAQ (Frequently Asked Questions)
Can I prepare this recipe in advance?
Absolutely! You can mix the batter and refrigerate it until you’re ready to bake. Just be sure it comes to room temperature before going into the oven.
What are the best substitutes for flour?
If you’re looking for gluten-free options, almond flour or oat flour works well. Additionally, a gluten-free all-purpose flour blend is a great alternative.
How do I store fresh cherries for later use?
Keep fresh cherries in a breathable bag in the refrigerator. They generally last 3-5 days but are best enjoyed fresh.
Can I freeze the cake?
Yes! Cherry Cake freezes beautifully. Just wrap slices well and store them in the freezer. Defrosting is super easy!
What can I serve with Cherry Cake?
Pair it with ice cream, whipped cream, or a light yogurt for a fantastic dessert experience. It also goes well with a fruit salad.
Is this recipe kid-friendly?
Definitely! Kids will love helping out in the kitchen, and the sweetness of the cherries makes this cake a hit with little ones.
How do I prevent the cherries from sinking into the cake?
Tossing the cherries in a bit of flour before adding them to the batter will help them suspend evenly throughout the cake.
What can replace butter in the recipe?
You can use vegetable oil, coconut oil, or applesauce for a lighter version. Just adjust the amounts according to the substitute you choose.
Can I make this cake with fresh cherries?
Yes! Fresh cherries work perfectly well; just be sure to wash, pit, and slice them before using.
How do I know when the cake is baking?
Check for doneness by inserting a toothpick into the center of the cake; if it comes out clean or with a few moist crumbs, your cake is ready!
Now that you have all the essential insights, it’s time to grab your apron, invite your loved ones, and enjoy the delightful experience of making Cherry Cake! Happy baking!
Pistachio Raspberry Cupcakes: A Sweet Treat for All Occasions

Cherry Cake
Ingredients
- 225g frozen cherries
- 115g unsalted butter, softened
- 170g sugar
- 2 large eggs
- 1 teaspoon vanilla extract
- 170g flour
- 1 teaspoon baking powder
- 1/2 teaspoon salt
Instructions
- 1.Prep: Preheat oven to 350°F (175°C). Grease 9-inch round pan.2.Dry Ingredients: Whisk flour, baking powder, and salt.3.Cream: Beat butter and sugar until fluffy. Add eggs one at a time.4.Combine: Alternately add dry ingredients and milk. Mix in extracts.5.Fold Cherries: Toss cherries with 1 tbsp flour, then fold into batter.6.Bake: 40-45 minutes until golden and tester comes clean.7.Cool: 15 mins in pan, then transfer to rack.
Notes
- Frozen cherries work (thaw and pat dry first)
- For taller cake, use 8-inch pan
- Substitute 1 tsp vanilla for almond extract if needed
Ask the Community
🥗 Free Custom Keto Meal Plan?
Do you want to lose weight while still enjoying delicious Asian & Thai Fusion meals? Take this quick quiz to get your personalized Keto plan based on your favorite foods!
- ✅ No more guessing what to eat
- ✅ Delicious & easy-to-make recipes
- ✅ Tailored to your body type
Get My Custom Plan Now! →
*Over 100,000+ people have transformed their lives with this quiz.